tutorials: pretty paper. true stories. {and scrapbooking classes with cupcakes.}

lovely to meet you Twitter Facebook Pinterest YouTube

Take a Scrapbooking Class

online scrapbooking classes

Shop Shimelle Products

scrapbook.com simon says stamp shimelle scrapbooking products @ amazon.com shimelle scrapbooking products @ amazon.co.uk

Reading Material

travel

How to use a layered page template

digital scrapbooking template tutorial

One of the most common things I hear from scrappers adding digital pages to their albums is that digital takes so much longer to get to a completed page. When I first started to play with digital pages, that was definitely the case. It took me hours and hours when I could make a paper page in under thirty minutes! After a little practice and some frustration, I found out my extreme timing was completely unnecessary: there are ways to make digital pages far more quickly than paper pages. Half of that pacing comes from just learning what functions you’ll be using so you remember them and the quickest ways to make them happen (like when you start to type ctrl+c for copy instead of using your mouse to go up to the top, click on edit, pull down to copy and then hope for the best) and the other half comes from the coolest thing in digital scrapbooking: layered page templates.

When paper scrappers use a sketch, we still have to do all the work. If the sketch has a circle, we have to figure out how to create that circle: use a punch, a die-cutter, trace around a plate, cut it out, paint it, embellish it — so many options! With a digital page template, you start with a sketch but with just a couple clicks you can make each part of the page ‘snap’ right to that part of the sketch. Once you get the hang of it, it’s super fast and you’ll be hooked on the wide variety of page templates available.

For today’s step-by-step process, I’m using the Remember Page Template and other papers and elements are linked as they are shown.

Start by opening the template: it will be a .psd file. PSD stands for Photoshop Document, and that means it is designed to be used with either Photoshop or Photoshop Elements. If you’ve never tried Photoshop Elements, you can download a free 30 day trial to try the software and see what you think. You can also use the templates with Gimp and later versions of Paint Shop Pro, but the commands may be slightly different that what you see in the steps that follow.

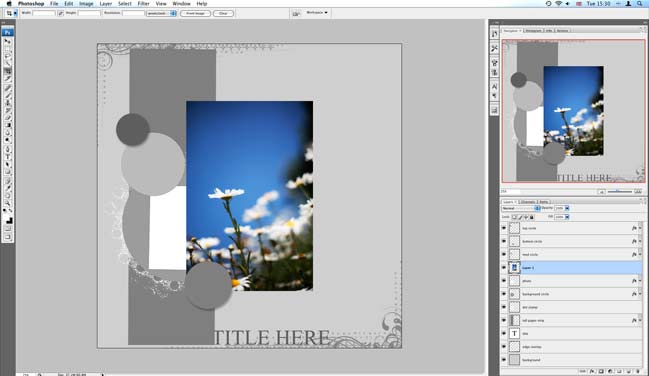
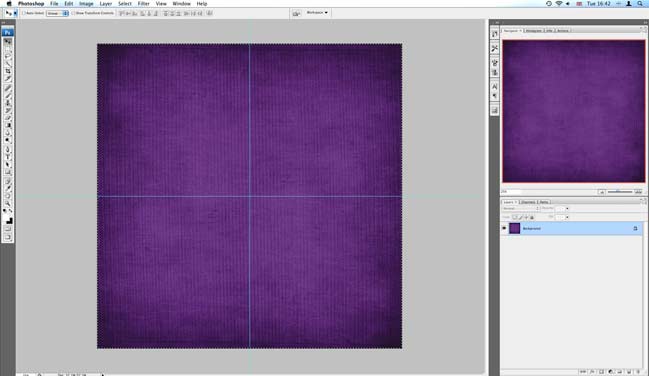
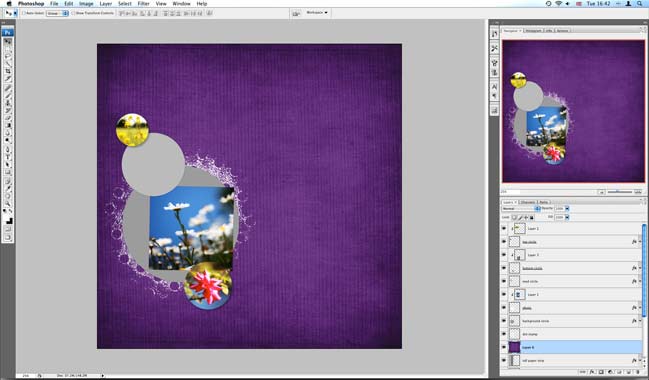
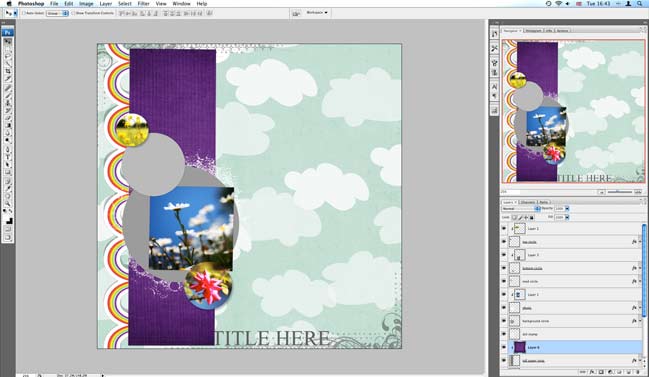
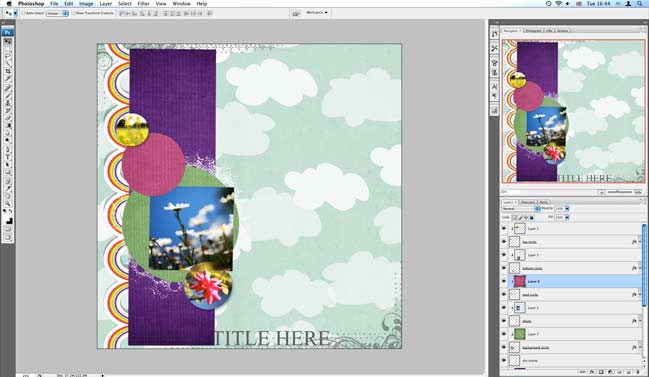
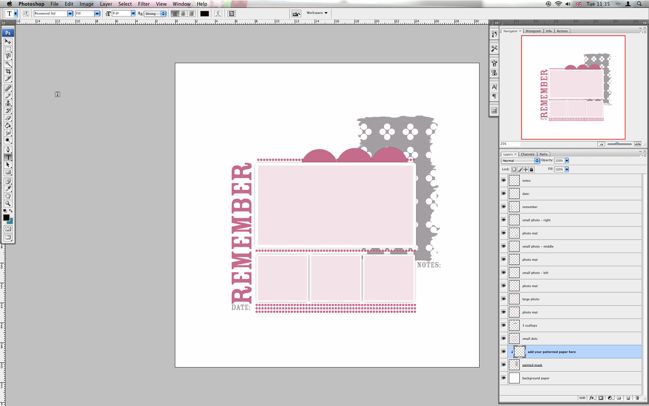
When you open the template, it will look something like this:
digital scrapbooking template tutorial
You’ll see the page and the layers palette (on the right corner of my screen – you can move it wherever you like) shows you how all the elements of the page are on separate layers, so you can work with each one separately. That’s the trick to making this magic trick work.

I keep my photographs and my digital scrapbooking kits in two separate photo libraries, so I usually open my photos first so I can have just the pictures I need, then close that library and switch over to all my digital goodies. This template has room for four photos: one large and three small squares. Go ahead and select the photos you’re going to use and open them in Photoshop. They will open as a separate file while your template stays open in the same program.
digital scrapbooking template tutorial
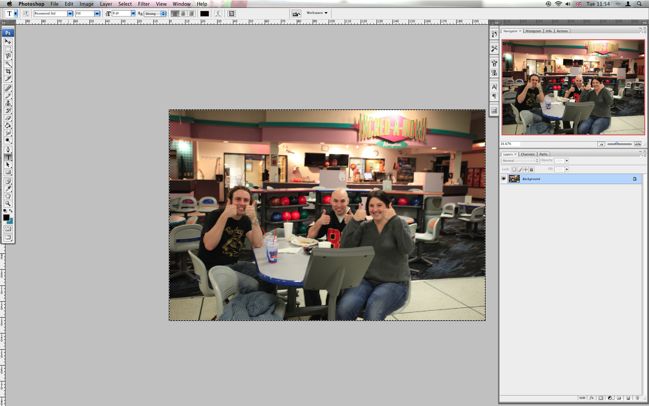
Here’s the photo I’m going to use for the large picture on my page. If you have any editing you want to do to the photo, go ahead and do that now and make sure you flatten it back down to one layer when you’re done. Then select all (ctrl+a) and copy (ctrl+c) so you have this photo on your clipboard. You can go ahead and close this photo (ctrl+w) if you want — I don’t like to keep too many files open at once, but sometimes it means I close something too quickly and have to open it again. It’s just personal preference.

By the way, if you’re following this tutorial on a Mac, use the cmd key instead of ctrl. That’s the same throughout.
digital scrapbooking template tutorial
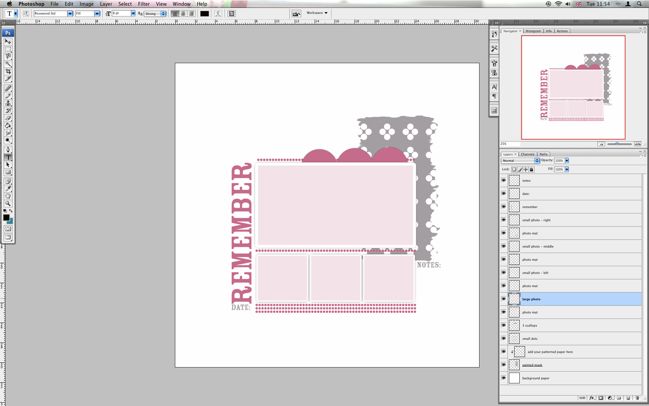
Now go back to the template file. Click the layer you want to add to — for this photo, that layer is called ‘large photo’. That layer will be highlighted in the layer palette (see how it is blue over there at the right?). Now paste (ctrl+v) so your photo is added right above that layer.
digital scrapbooking template tutorial
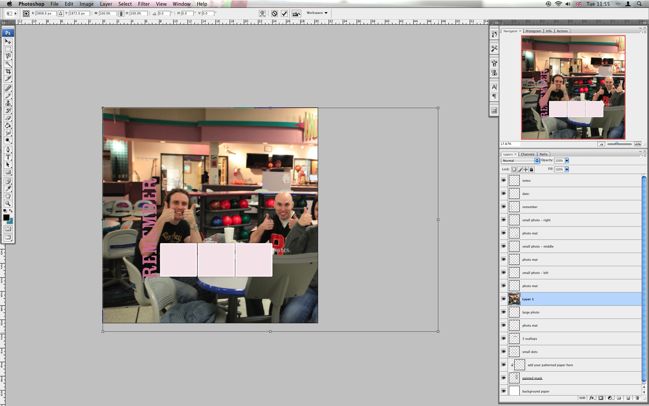
Your photo will probably be the wrong size or in the wrong place. Don’t worry! If you don’t those bars around the edge of the photo (they are default in some versons and not in others), click ctrl+t to make them appear. This lets you resize the photo. Be careful: always hold the shift key as you resize from the corner. If you don’t hold down the shift key, you’ll pull the photo into a weird ratio that will distort it and your friends and family will not like you when you skew their photos to make them look half as tall and twice as wide while you you skew your own photos to be extra tall and thin. It’s just not worth it, I promise. The shift key will keep everything in check! Magic.
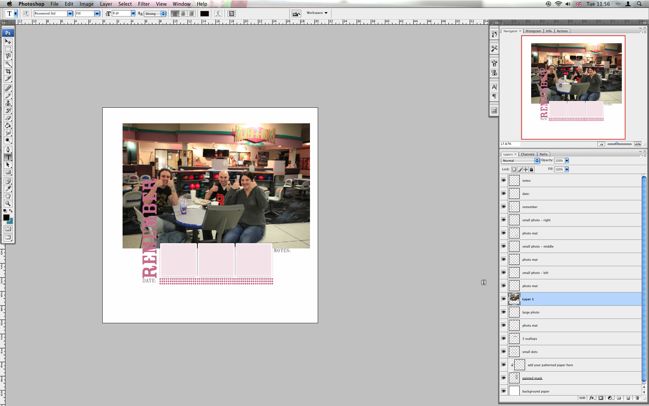
digital scrapbooking template tutorial
Now my photo is closer to the right size. A bit more magic: I don’t need to get it to exactly the size of that box. With just a couple clicks you’ll be able to make it snap to the box. In this case, it also means i can zoom right in on the people in the photo and get rid of the extra background that it pretty messy and unexciting. (Bad photography, Shimelle, bad.)
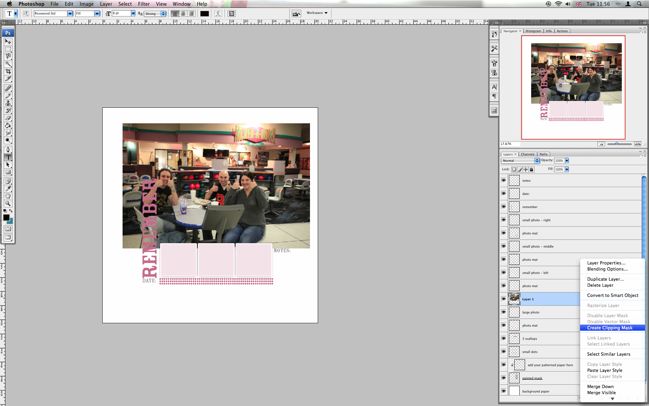
digital scrapbooking template tutorial
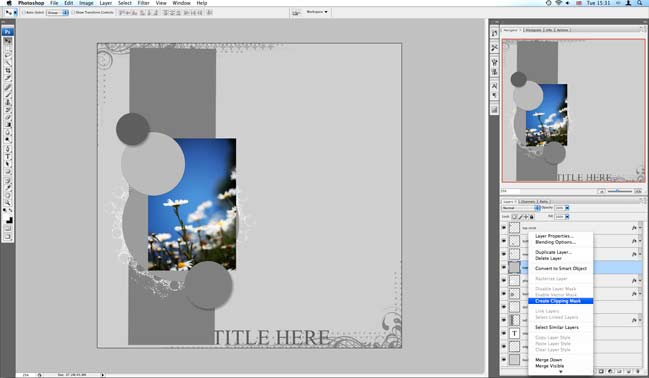
The magic snap effect has different names and is found in different places in different editions of PS/PSE, so figure out where yours is and then know you’ll come back to it often. First try right clicking on the layer with your photo, and look for an option called either ‘Create Clipping Mask’ (that’s what I have in PS CS3) or ‘Group with Previous’ (that’s what it’s called in many older editions and PSE). Click that and things will snap right into place.

If you don’t see anything useful when you right click, use the menu at the top of your screen instead. Make sure you have the layer with your photograph selected, then go to ‘Layer’ at the top and pull down to see the options. Again, look for Create Clipping Mask or Group with Previous. You should find it there somewhere. Click and magically all the extra photo will disappear.

You can continue to move and transform the photo once you’ve clipped/grouped — just make sure you have the photo layer selected.
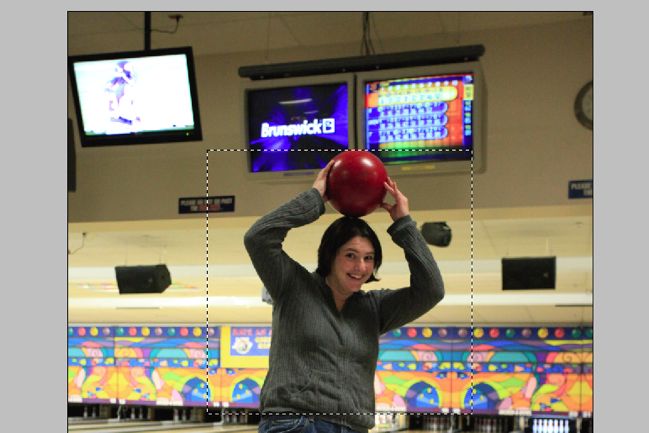
digital scrapbooking template tutorial
We’ll need to repeat this process for each photo (and later, each paper) to complete the page. When you work with the smaller photo spots on a template, you may want to be more selective and not copy the entire page. Use the rectangle marquee tool (near the top of your toolbar, most likely) to select just the part of your photo you want. The small photos on this template are square, so holding shift while you select with the rectangle marquee tool will keep your selection as a square. The dashed lines show you what’s in your selection. When you have what you want, copy (ctrl+c) and close the image if you would like.
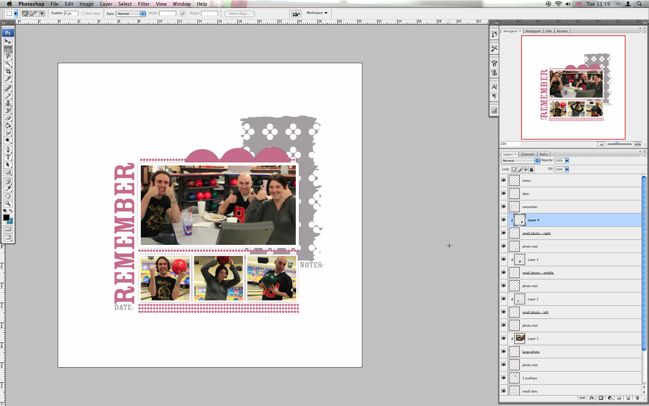
digital scrapbooking template tutorial
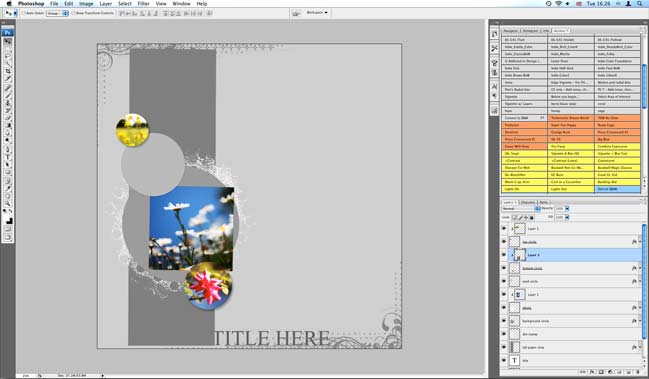
The process is exactly the same for the small photos as the large photo: click on the layer you want, paste (ctrl+v), transform (ctrl+t) to change the size or angle, then Create Clipping Mask or Group with Previous to snap it to the right spot. Here are all four of my photos clipped into place.

Now I’m going to change gears from photographs to the digital files to finish the page — time to play with pretty papers!
digital scrapbooking template tutorial
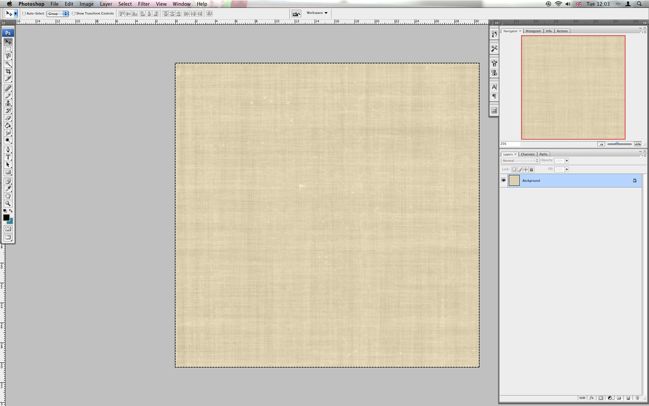
Let’s start by opening a background paper. This is from one of my favourite kits ever: Willow Tree by Brandy Buffington which has beautiful papers and embellishments that go with just about any topic.

Select all of this paper (ctrl+a), copy (ctrl+c), close it (ctrl+w) and go back to your page file.
digital scrapbooking template tutorial
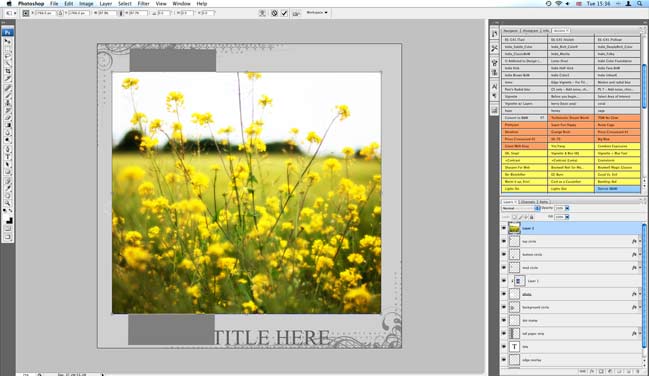
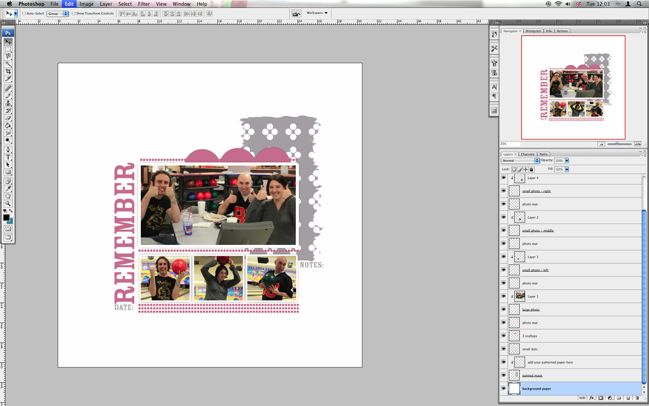
Select the very bottom layer of the page. It’s called ‘background’.
Paste (ctrl+v) in your paper.
digital scrapbooking template tutorial
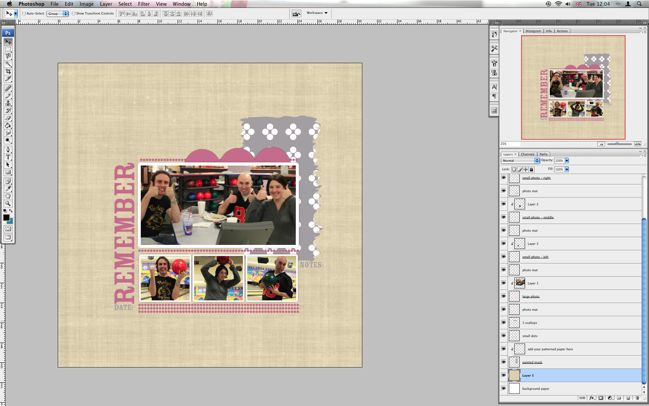
Since we’re using the full paper, we don’t need to clip or group anything — just leave it there and now we have a background to our page.
digital scrapbooking template tutorial
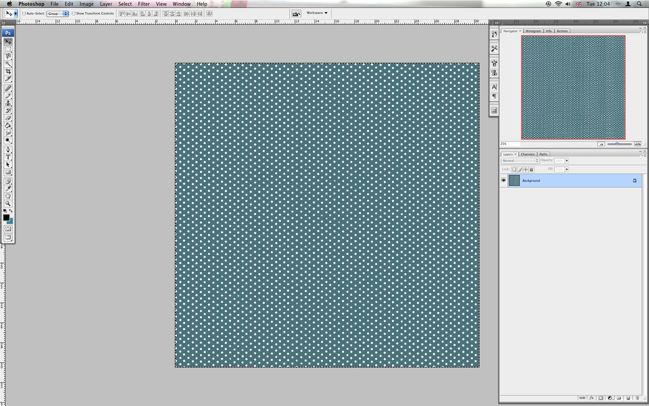
Now we’ll repeat this process for each element on the page. Open another paper (this is from the same Willow Tree kit), select all (ctrl+a), copy (ctrl+c) and close it (ctrl+w). Go back to your page.
digital scrapbooking template tutorial
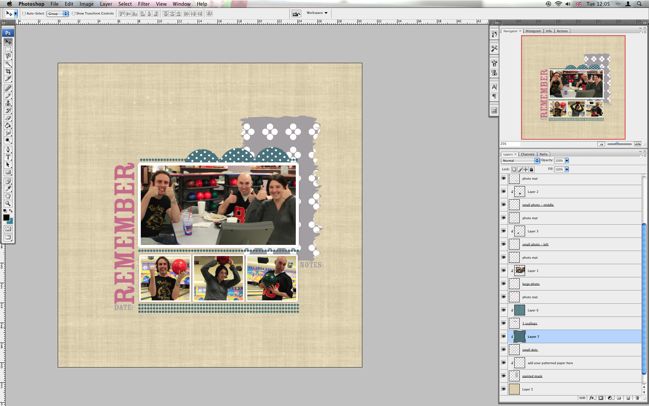
Adding paper to different page elements is exactly the same as what we did with the photographs. Click on the layer you want. Paste in the paper you copied. Group with Previous or Create Clipping Mask to snap it into place. I added the teal polka dot to the three scallops above the photo and a solid, textured teal to the rows of small dots. The small dots are all on one layer so it’s easy to colour them all at once, but if you want to colour them separately, you can just paste multiple layers and move things around to let them all show in the right place. You can clip or group more than one layer to the same page element.
digital scrapbooking template tutorial
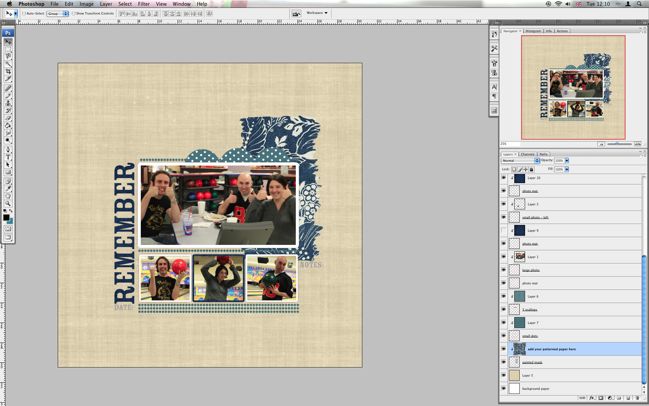
Repeat the same process for the Remember title layer, the middle photo mat and the painted mask layer. Both the navy solid and the navy pattern are rich fabric textured papers from the Art Greco kit by Queen of Quirk. Open the paper, select all, copy, close it. Then select the layer, paste and group/clip to snap in place.
digital scrapbooking template tutorial
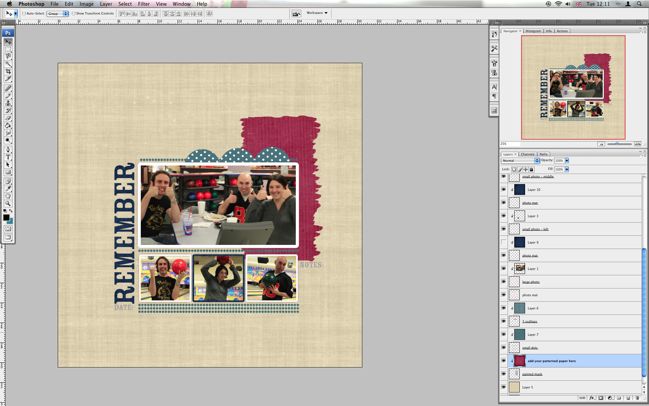
But wait! As much as I love that navy blue pattern, there’s just not enough colour going on here for me! No problem — open another paper, repeat the process and paste it in to change that painted section from blue to red. (The red paper is from the Boris Paper Collection by Queen of Quirk.) In this template, you don’t even have to use the clipping/grouping bit on this layer as it’s already built in to the template so you can just paste it right in so you can instantly see if it’s the right paper for you there.

digital scrapbooking template tutorial
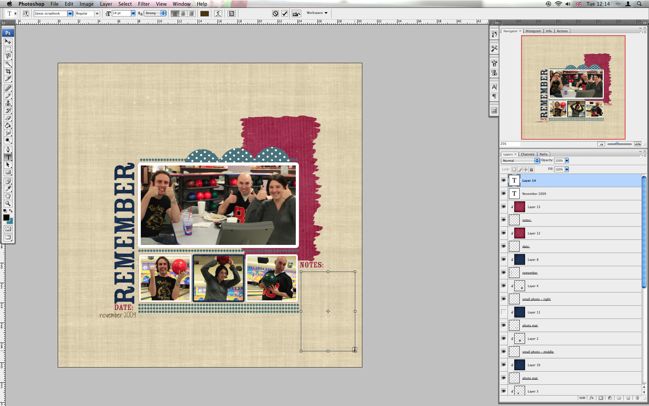
To add some balance to the red, I pasted the same red paper in for the date and notes layers. You can’t change these words with your type tool, but if you want different words there, just click the eyeball next to the layer so it’s switched off and it will disappear. Then you can use your type tool to add whatever word you would like instead. Or you can use the arrow to click and drag it to another place — you can do that to move any page element in a template!
digital scrapbooking template tutorial
Now all my page elements from the template are in place but I need to add the date and notes. Select the type tool (it looks like a big T in your toolbar) and click under the ‘date’ heading. Type your date, change the font, colour and size to whatever you would like. I used brown writing and a free font, 2ps Scrapbook. You click on the arrow tool and then move your text around until it’s in the right place, or you can use transform (ctrl+T) if you want to change the size or angle.
When you add your journaling box, click on the type tool again but instead of just one click, hold down the mouse button while you drag the mouse to form a box. That way you can just type and it will automatically go to the next line when you’ve run out of room. The one click option will just let you type on and on and on without ever starting a new line. So one click for short things like dates and click and drag to make a box for longer things like journaling.

digital scrapbooking template tutorial
Here is the journaling box all filled in and moved to just the right place.

That’s the page done if you like! Save it as a jpg if you’re happy you won’t want to change any layers or save it as a psd if you think you will want to come back and move something later. If you save as a psd, be sure to give it a new name so you don’t write over your template (you can use it again!) and also keep in mind that psd files are significantly larger than jpg files, because you’re essentially saving all those papers and photos too, so be mindful of how much room you’re taking up on your hard drive!

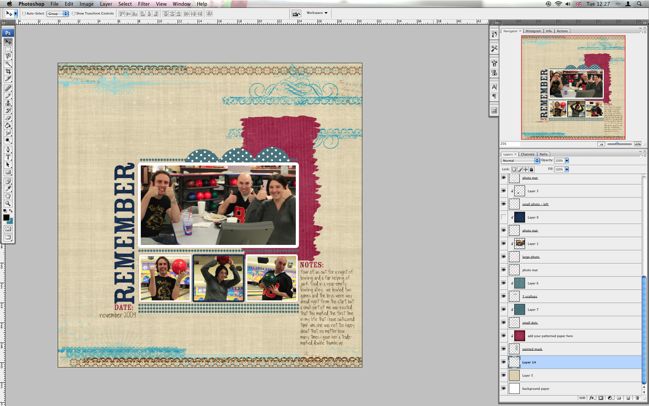
If you want to add more to the page, you can add more embellishment over the top or underneath the layers of the template. Just paste things in wherever you would like them and move them around. Here’s what I added to finish my page:
digital scrapbooking template tutorial
I wanted to add something to the top and bottom of the page, and I started by pasting in an overlay from the Bada Bing set by Rhonna Farrer but it was a bit too much and a bit too bright for this page.

digital scrapbooking template tutorial
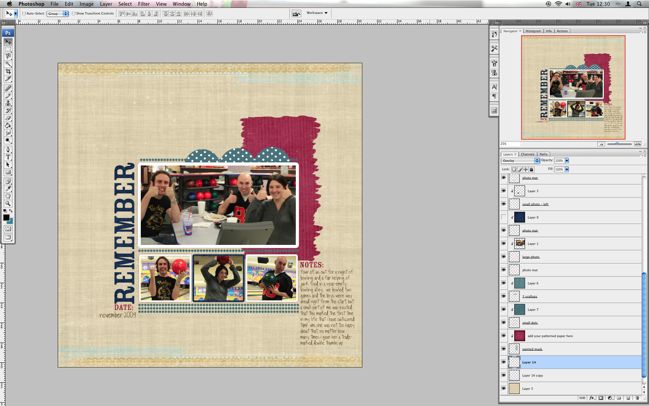
To make it more subtle, I changed the layer mode to overlay. Click on the layer to select it, then look at the top of the layer palette and you’ll see an option that says ‘normal’ by default but you can pull down to see lots of choices. Try overlay, screen or soft light when you want something to be more subtle. The result will always be unique to the combination of elements you have on your page, so just try and see what works best.
digital scrapbooking template tutorial
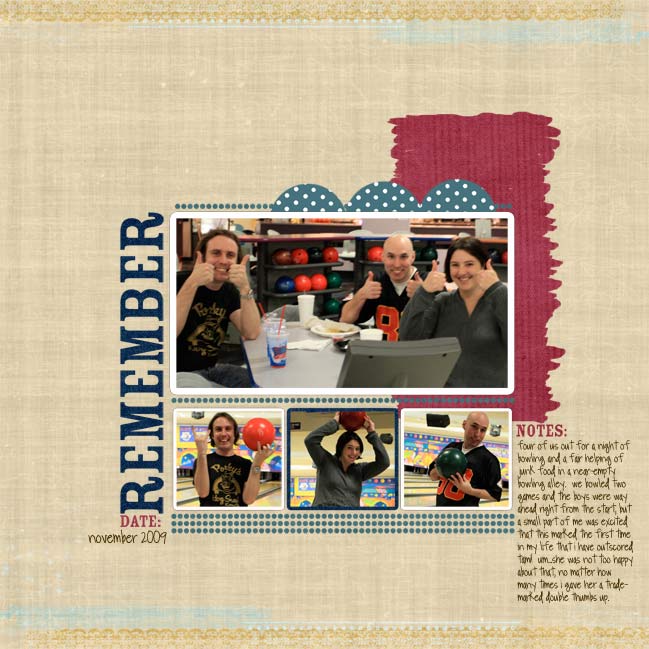
I decided I liked the simpler border at the bottom of the page the best, so I used the rectangle marquee to select and delete the top of the overlay, then select the bottom border and copied it. Then I pasted it into a new layer, used transform (ctrl+t) to turn it 180 degrees and moved it to the top of the page. Presto — all finished!
digital scrapbook page

Remember, these same steps can be used for any layered page template in .psd format, so bookmark this tutorial if you need a hand putting your templates to use. You can download free templates to get you started and find hundreds more templates here.

If you found this template useful and created a page, please share a link in the comments!

You can find more digital scrapbooking tutorials here. Happy scrapping!

digital scrapbooking template

How to use a digital photo mask

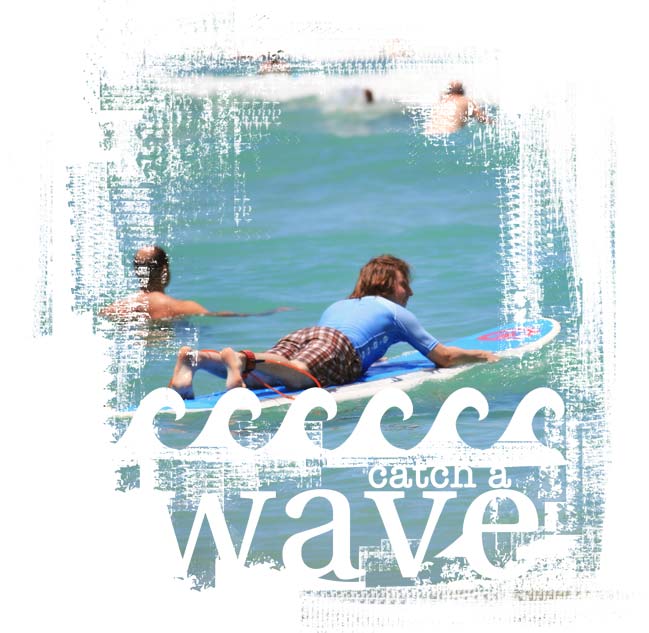
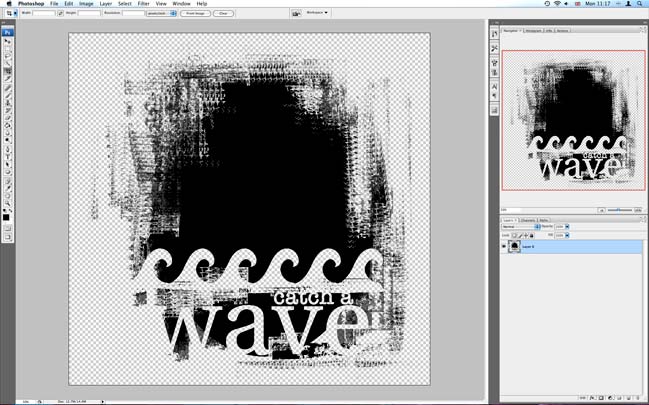
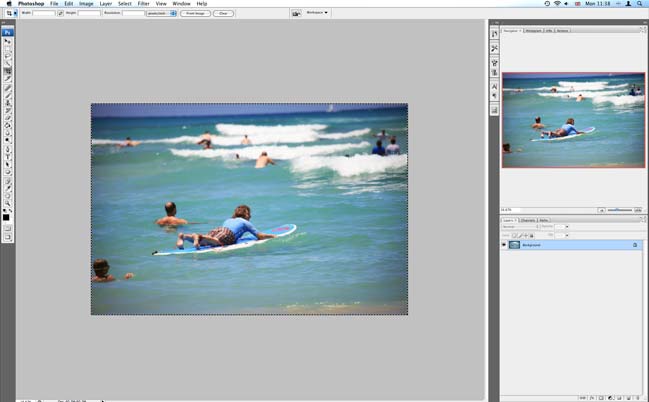
Photo masks are a simple way of showcasing a photo with pretty much any shape or design you can imagine. It’s an easy process once you know how to combine the two images—the photograph(s) and the mask. Here’s how:

1. Open the photo mask file in Photoshop or Photoshop Elements (I’m using Photoshop CS3, but you can accomplish this in any edition). The mask I am using is from Photocuts Masks v.2 by Carina Gardner.

2. Open the photograph you would like to mask in the same program. If you want to edit your photo, do that now and flatten all the layers before you continue.

3. Select all (ctrl+a) and copy (ctrl+c) your photograph.

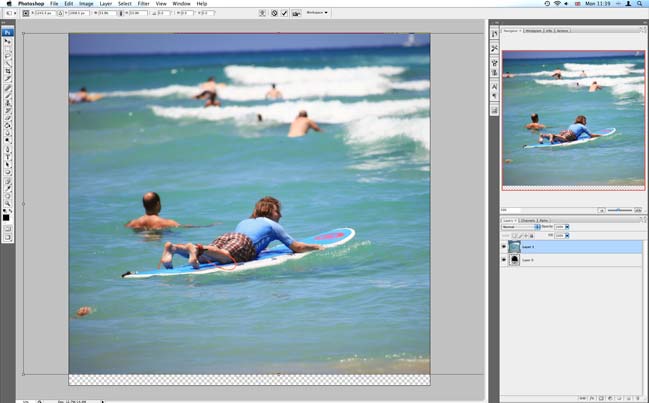
4. Go back to your photo mask file that is open in the same program (you can find it in the window tab at the top). Paste (ctrl+v) your copied photograph over the mask. Use the transform tool (ctrl+t) to adjust the size of your photograph to the rough size of the mask. To change the size without distorting your picture, hold down the shift key and pull a corner to make the image bigger or smaller.

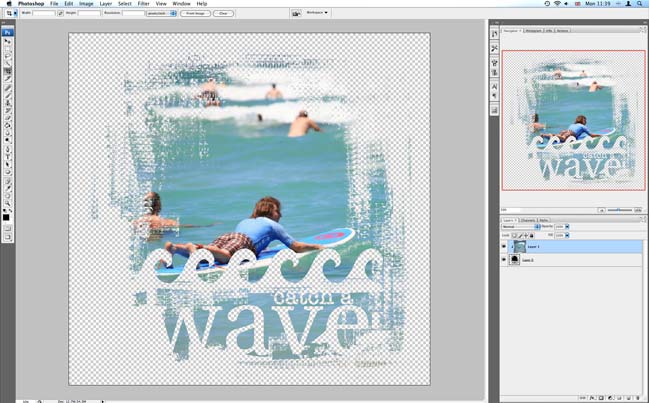
5. Head over to your layer palette at the right of your screen. Your photomask will probably be called layer 0 and your photo will be layer 1. Right click on layer 1 to see this pull-down option menu. Select ‘Create Clipping Mask’ or ‘Group with Previous’. (These two commands act the same in this function, but have different names in different editions of Photoshop.)

6. And now your photo should have magically snapped into the shape of your mask.

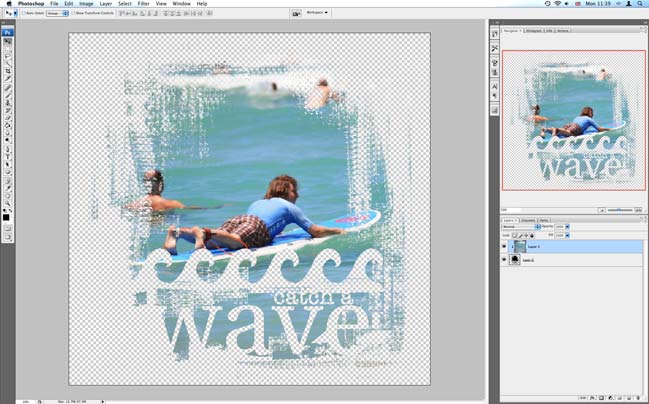
7. You can continue to move your photo and change its size until you are happy with its placement in the mask. Just make sure the photo layer is highlighted in the layer palette and then use the move or transform tools to put things in the right place.

Want to transfer this image to a digital scrapbook page you’re working on? Flatten the layers (ctrl+e), select all (ctrl+a) and copy (ctrl+c). You can then paste it into your digital layout and continue to add layers above and below.

Want to save the masked image to use online, like in a blog post? Change the image size to what you use for your blog (look in the image tab at the top of the screen) and then choose Save for Web from the file tab. Saving as a jpg will default the transparent areas (the checkerboard) to white or another default colour you have selected. That’s fine—if that colour is the same background as your blog. If you want to save the transparency of the image, you’ll need to save it as a gif or png (but be aware that not all web browsers like png files).

Want to print this image to use on a paper layout? No problem. Just use your normal print dialogue and the transparent elements on your screen will become the white of your photo paper. Add a layer of digital paper below the mask if you would like the background to be anything other than white photo paper.

Ready to choose some photo masks? You can start your search here.

xlovesx

Digital scrapbooking tutorial :: Customising a digital page template

digital scrapbook page

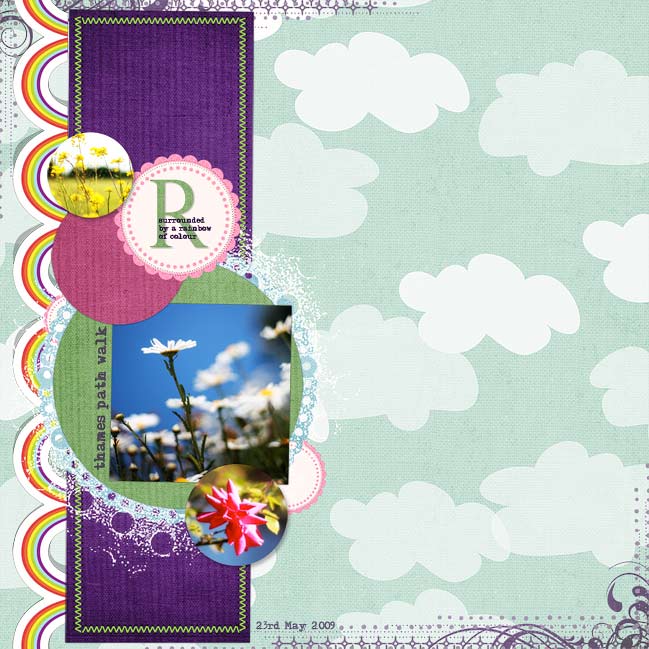
Digital templates help create great pages in a flash while still giving you the ability to customise the look. This layout starts with Scrap Canvas 10 by The Queen of Quirk.

making a digital scrapbook page
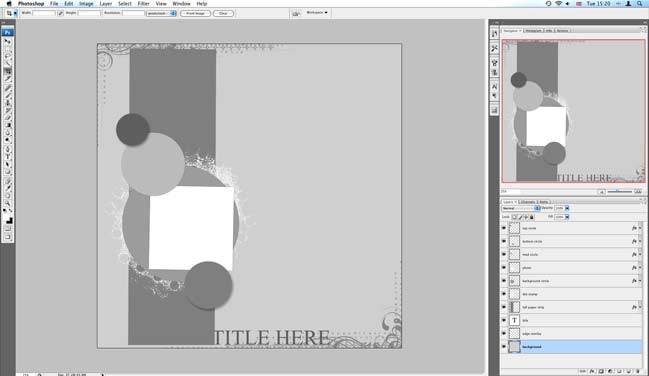
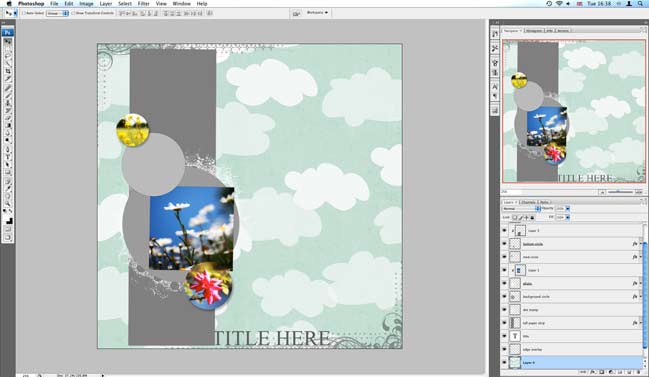
1. Open the layered page template file (.psd) in Photoshop or Photoshop Elements. It will look something like this.

making a digital scrapbook page
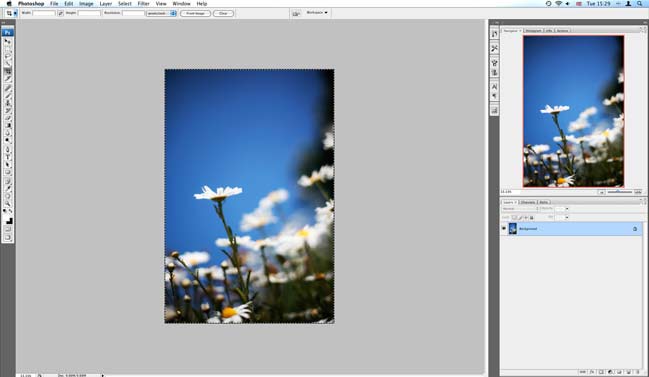
2. You can start with any element on the page. I like to start by putting the photos in, so I can see if the papers match as I go along. Open the photo in the same program, select all or part of the photo that you want to use (ctrl+a will select everything…or use the marquee tool to select just what you want). Copy (ctrl+c).

making a digital scrapbook page
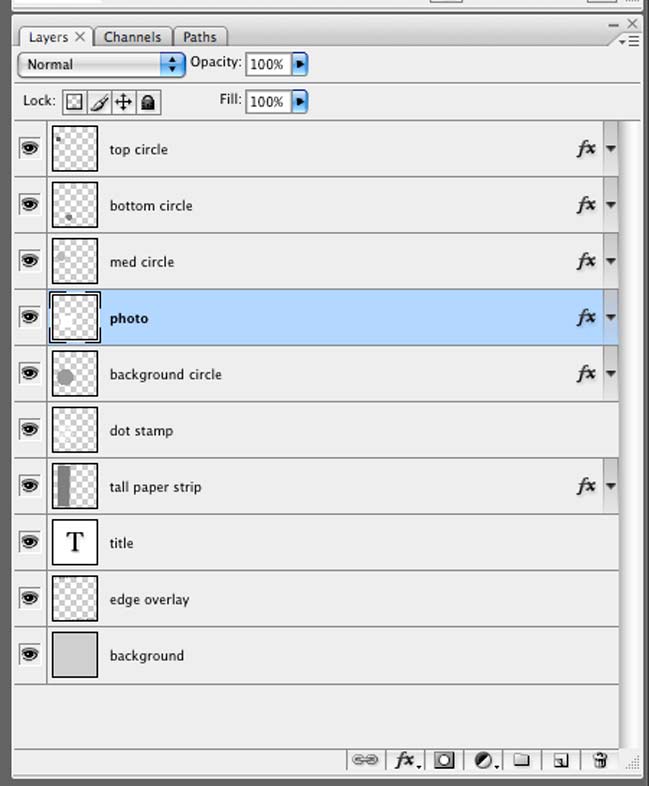
3. Click back to the page template and look at the layers on the right. Click on the photo layer so it is active.

making a digital scrapbook page
4. Paste (ctrl+v). This will make a new layer with your copied picture, and the new layer will be sitting on top of your photo. You can move the photo around on the canvas by clicking the arrow tool at the top of the toolbar, then just dragging it where you would like it. You can change the size with the transform function – ctrl+t. Hold down the shift key and drag from the corner so it won’t stretch or distort. Hit enter or click the checkmark when you are done transforming to commit to the changes.

making a digital scrapbook page
5. Once your photo is roughly in place, right click on that layer and you should see a variety of options. Select ‘create clipping mask’ or ‘group with previous’ (the functions act the same for this purpose but have different names in different editions of PS/PSE. This will make your photo only visible in the photo spot of the template. You can still move the photo and transform its shape if it’s not in quite the right place.

making a digital scrapbook page
6. Repeat steps 3, 4 and 5 for any additional photos you want to include.

making a digital scrapbook page
(I added two more photos to circles on the template – but you can fill these with patterned paper if you prefer.)

making a digital scrapbook page
7. With our photo(s) in place, now let’s add some paper. Open the paper you would like in the background, select all (ctrl+a) and copy. Click back to your layout, click on the very bottom layer and paste. You should now see your paper with the template sitting on top! (If your layer isn’t in the right place, just click and drag to move it to the right spot.)

making a digital scrapbook page
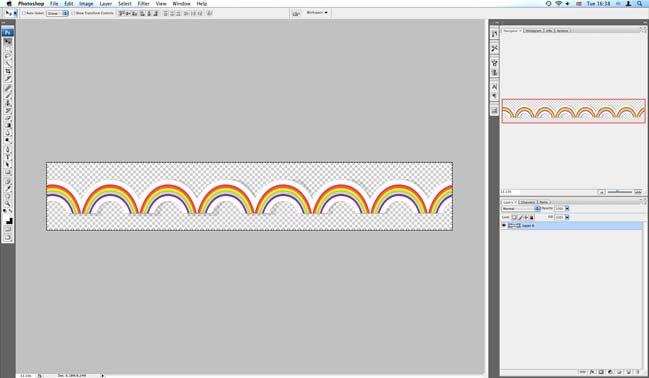
8. And here’s where we start customising things a bit. To go with today’s rainbow theme, I wanted to add a rainbow border. Open the file, select all and copy.

making a digital scrapbook page
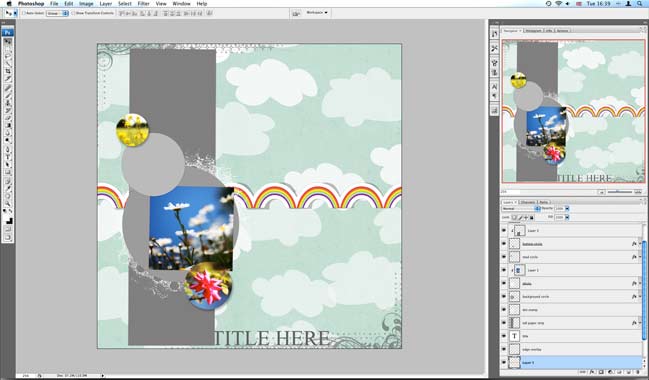
9. Click back to your layout and paste. Now your border should appear on your layout, but it will need to be moved into place.

making a digital scrapbook page
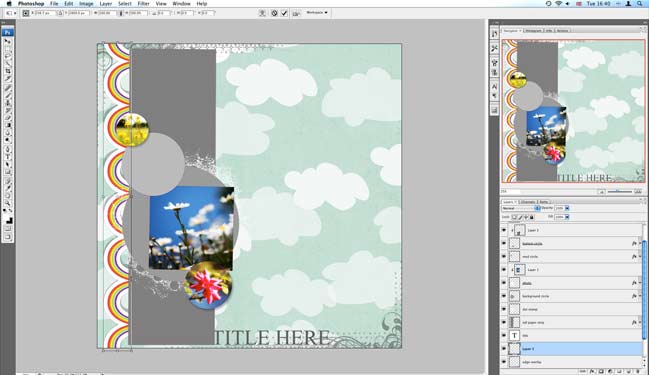
10. Use the transform function (ctrl+t) and hover on a corner to rotate the border into place. Hit enter or the checkmark when you are happy. Tuck the edge of the rainbow behind the large box for a clean finish.

making a digital scrapbook page
11. Open the paper you would like to use for the large rectangle in the template. Select all and copy.

making a digital scrapbook page
12. Click back to your layout, click on the ‘large paper strip’ layer and paste. This should add your paper to a new layer just above the big box.

making a digital scrapbook page
13. Right click on the new layer and select ‘create clipping mask’ or ‘group with previous’ to snap it into place. Presto.

making a digital scrapbook page
14. Repeat steps 11, 12 and 13 for all the papers and spots on the template you need to fill.

making a digital scrapbook page
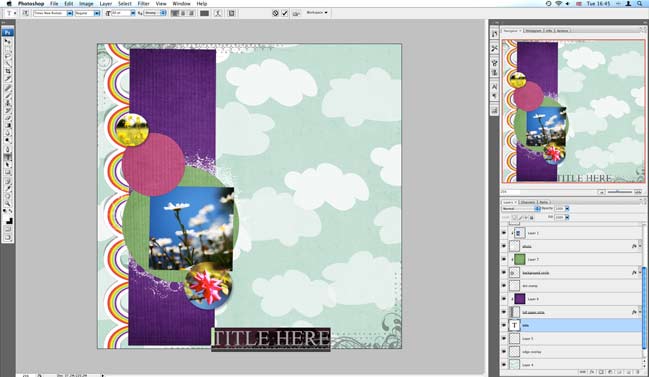
15. To change the title to something other than ‘title’, just click on the title layer, then click on the type tool and click on the word title on the layout. Then you can type in what you want, change the font, the colour, the size, etc. I end up changing mine again later in the layout!

making a digital scrapbook page
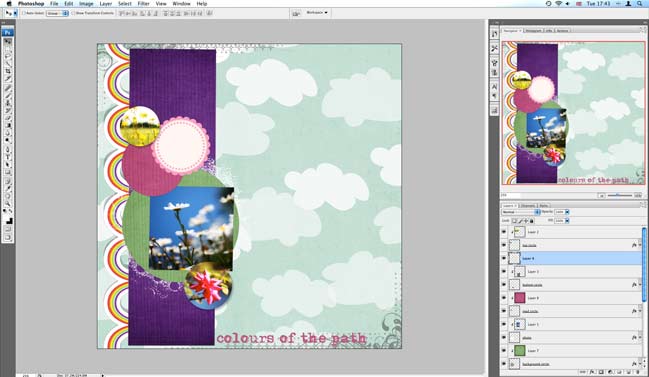
16. Use your other digital supplies to further customise your page, if you fancy. Just open the elements you want, select all, copy and paste them into your layout. Move them around – both on the page and in the layers palette until you have things where you want them, like the pink scallop circle.

making a digital scrapbook page
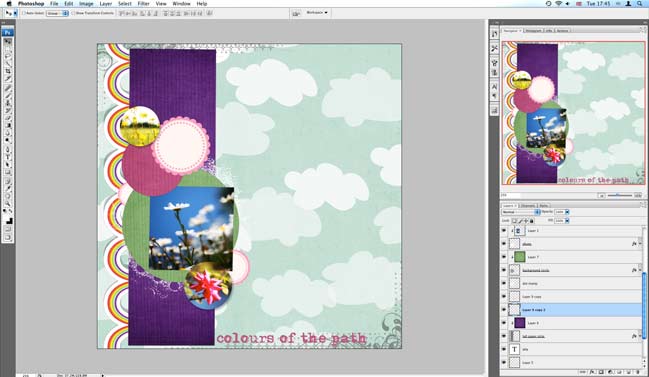
17. If you want to add more of the same accent, you can either paste it again or duplicate the layer and move it around. The handy thing about digital is you can use the accent as many times as you want – in any colour, any size – and you don’t have to go back and buy another pack of that embellishment.

making a digital scrapbook page
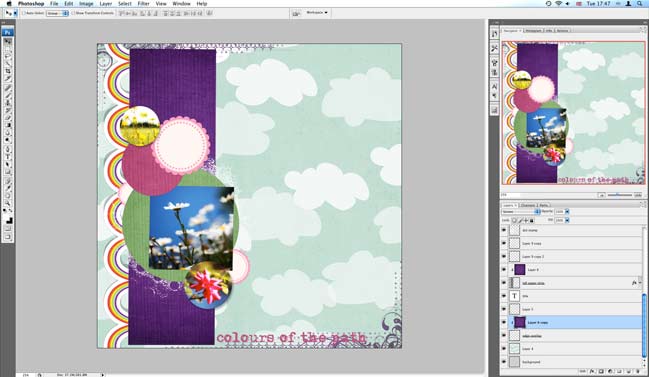
18. To change the colour of the ornate border around the page, paste in a paper of your choice in the layer above the border and use that clipping mask/group with previous function again. You can change the opacity on both layers until you’re happy. The opacity slider is just above your list of layers.

making a digital scrapbook page
19. To add additional text, just click with the type tool and add whatever you would like. You can use the type settings to adjust spacing and size, or you can go back to the arrow tool and use transform to just change size (that won’t change individual elements – but it is helpful to tweak something a little bigger or a little smaller to fit in a certain space) or angle.

making a digital scrapbook page
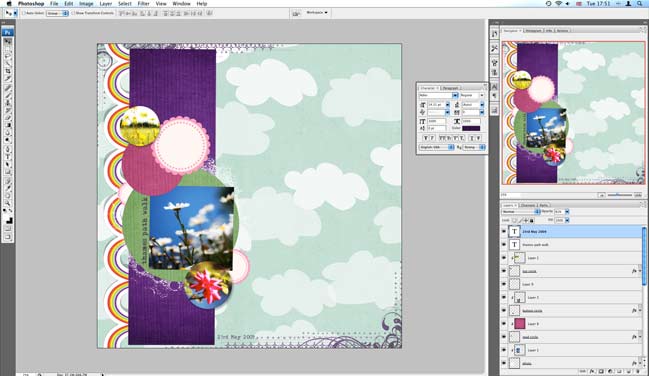
(And here’s when I changed the title to just be the date.)

making a digital scrapbook page
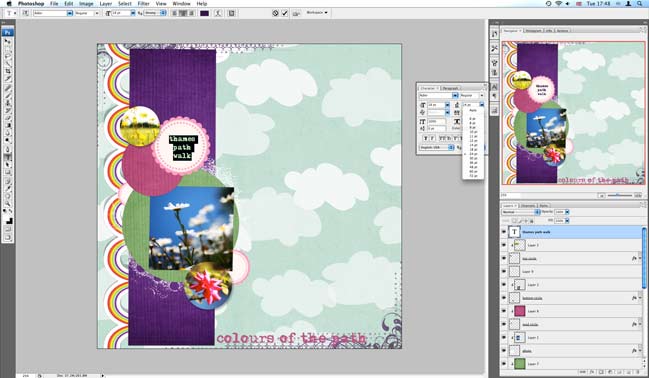
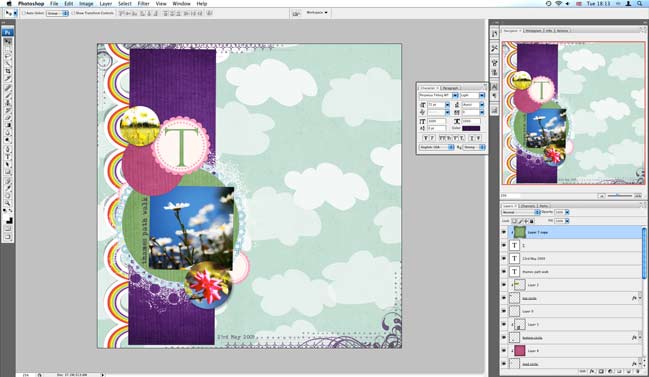
20. Almost done – but that pink circle was looking too empty for me! To add a monogram, use the type tool and type in a big letter.

making a digital scrapbook page
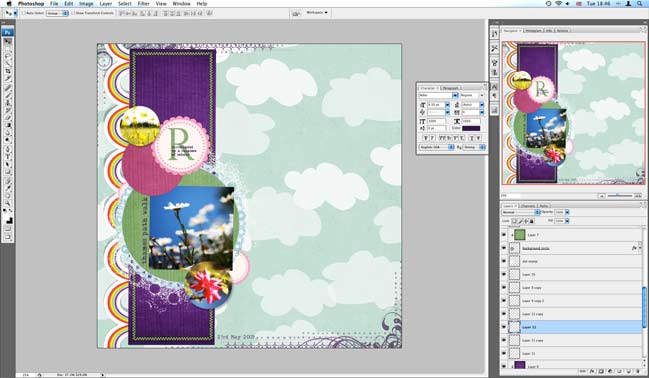
21. You can add colour and texture by using that as your mask! Copy the paper you want (I used the same green as in the big circle), paste it into the layer above your letter, and use the clipping mask/group with previous trick again.

making a digital scrapbook page
22. Last touches – a little more text layered over that monogram and stitches pasted around the purple box.

So still pretty easy…but a little different than the original template, so you can use the same template over and over and make it different each time. Next time just move a little more…rotate the canvas…change the size of a circle…whatever you fancy!

Now…don’t miss out on the challenge—use this template or the rainbow border on a project this month and you can win $15 to go shopping!

xlovesx

Ten Scrapbooking Supplies I Can't Live Without

scrapbooking supplies

When I started scrapbooking, it was nearly impossible to find ten things to buy. Now you have your choice of thousands of products. I had trouble deciding with a limited choice so I know I would be totally overwhelmed if I started scrapping today. After a few email discussions with beginners wondering how best to spread their budget for basic supplies to get started, I’ve made a master list. These are the ten things I personally don’t want to live without when it comes to crafting.

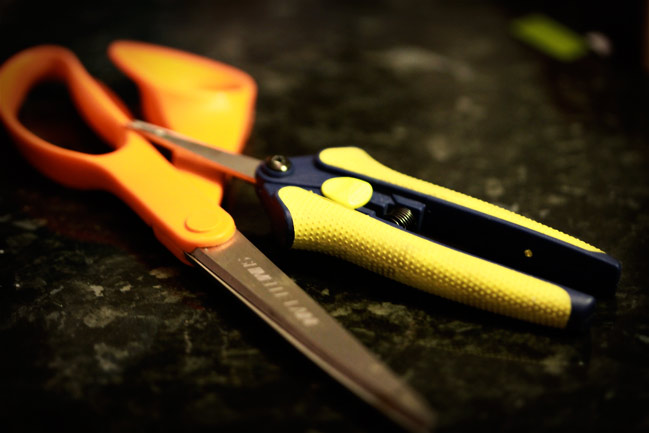
Scissors: I never change my mind when it comes to scissors. I purchased my first pair of Fiskars Soft-Grip Microtip Scissors over ten years ago and at the time, it was pretty much all the play money I could muster, since those were days when I spent most of my time studying in a library rather than generating any sort of income. I’ve had three pairs of these over the years, but none of them were purchased because the first pair had worn out—they were purchased because I went somewhere, realised I had left my scissors at home and promptly decided it was worth a trip to the store to have scissors that I could use easily. The design has changed slightly over the years (and I actually preferred the original design but it’s a tiny change and I got over it) and one of the most important thing to know about Fiskars is in the fine print: their tools have a lifetime guarantee. So if something starts to go awry, email customer service and they will help remedy whatever the problem may be. Definitely cool. Anyway, these scissors are small and super easy to maneuver. I can’t use a craft knife to save my life, but I can cut out tiny details with these. And the open handle design means my hands don’t cramp, so I can sit and cut stuff out for hours if I fancy. I’ve tried several other brands here and there, but I’ve never liked anything else. These win!

scrapbooking supplies

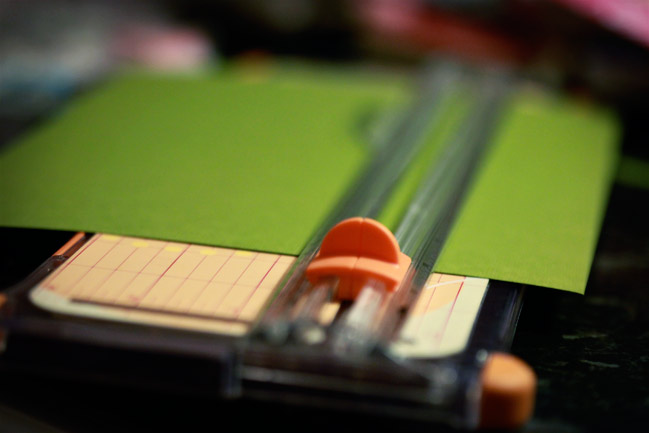
Trimmer: I actually didn’t purchase a paper trimmer until I had been scrapbooking for almost two years. Those were the days of the many-layered photo mat, so we did a lot of straight cutting, but I always cut with scissors and just hoped I could get the line pretty straight. It was only when I went to a crop and saw how quickly others could mat their photos that I decided I might want a paper trimmer after all. I started with the Fiskars 12in Portable Trimmer, which has changed in design over the years but I now have the current model and it happily goes wherever I scrap. It’s small, lightweight and has the magic ruler that flips out from the side so you know exactly what you’re cutting, if you like to measure.
I also have a heavier-duty trimmer that stays at home on my desk. It’s similar to this Fiskars 12in Desktop Trimmer, although mine is a boring black and grey office model rather than the funky colours of the scrapbooking model. (They also do this trimmer in pink with a built-in MP3 player, if you want to go crazy with a cutter.) I use this big trimmer every day because it sits on my desk, but honestly I made that purchase so I could be accurate and economically when doing lots of cutting, like preparing for classes. The blades last much longer, so the cuts stay cleaner longer than the portable model. I’ve only had this trimmer for about a year, if that gives you an idea of how much it was a need/want situation. You can definitely get along just fine with the portable trimmer.
It’s also worth noting that there are guillotine style trimmers available for the scrapbooking market. Frankly, guillotines scare me (probably something to do with the ancient one I used in my high school library) so it’s just never something I’ve considered. I’m quite happy about that as I have managed to keep all my fingers attached over the years. You could say I am not the most graceful or careful scrapbooker in the world. So safe = good in my world. Both of these trimmers meet that requirement.

scrapbooking supplies

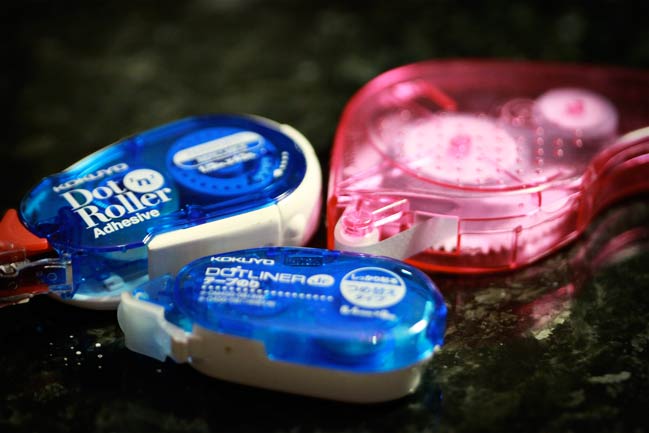
Adhesive: Glue is the core item I have changed the most over the years. I started out with glue sticks and glue pens. I upgraded to something that was on a roller but left me with a gazillion little tabs that ended up sticking to everything in my entire house. And from there I went to Hermafix—which is on a roller with no little paper tabs. At one point I think I was using about five different adhesives on pretty much every page, and although I understand the need for the best tool for the job, five kinds of glue is just too much for me to mess with on the average 12×12 space. Now I use one single adhesive more than 90% of the time: Kokuyo Permanent Dot & Roller Adhesive. Unfortunately it isn’t easy to find in Europe—I actually found it in Japan while we were on holiday and now order my refills from America. In Japan they also have a miniature size, which I think is the Best Thing Ever for adhering ribbon and tiny things which are likely to get globbed up with glue. (For the record, I think ‘globbed up’ can be a technical term.) I talked to the rep from the American distributor and he said they have no intention to release the mini outside of Japan. Devastated! Especially as I didn’t buy any extra refills while I was there. Anyway, I now love this adhesive because it has a great bond but is lightweight and no-mess. So far I’ve had no trouble with the applicator wearing out either, which makes me happy.
If you can’t find the Kokuyo, you may be able to find
Hermafix Permanent Dots, which is what I swore by for years and I do still use if I don’t have my Dot & Roller to hand. This product can be easier to find and the bond holds very well. The drawbacks are that it can be messy and the applicator is infamous for getting globbed up, meaning you have to get a new applicator between every five and ten refills, or so I’ve found. It’s made in Germany, which meant for many years it was pretty much the only scrapbooking product that was more affordable in the UK than in the US, in case you ever feel like knowing that for a game of scrapbooking trivia.
If you like dimension, you’ll also want something to add that in your adhesive arsenal. Zots 3D pop dots work easily, as do foam tape and foam square/dots. If you keep your albums very full or lying flat, don’t skimp on these when you want elements to be raised from the page. If you only put one pop dot in the centre of a 3 inch flower, the rest will eventually get crushed back to the level of the page, and you really don’t want to experience sad moments like that when you don’t have to.

scrapbooking supplies

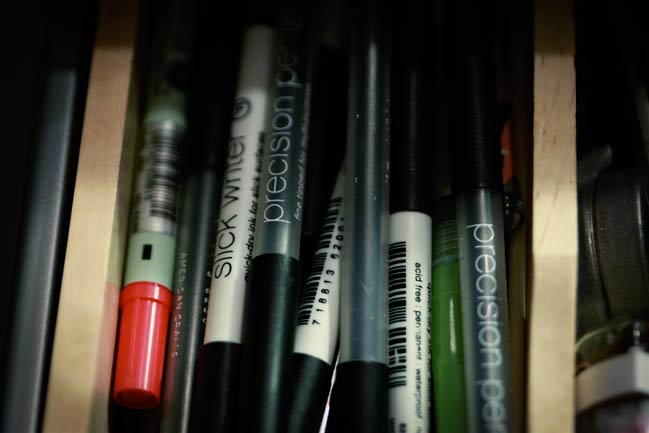
Pen: I believe in writing all my journaling by hand, even though I went through a long phase when everything was typed or at the very least pencilled in stilted print before I went over it in ink. Now I believe life is too short for all that. One big thing for me was finding the pen that made me happy, and that pen is the American Crafts Precision Pen for me. I do believe everyone’s handwriting has a pen that makes it look its best, so try every pen you stumble upon. I love this pen so much that one day I will sit down and tell you my entire love affair with the Precision Pen in its very own blog post. Suffice to say, this pen is permanent, will write easily on paper and photos and the ink is reliable. If you also want to write on transparencies or acrylic pages, pick up an American Crafts Slick Writer too. The tip is a bit thicker but it’s handy to have the option to write on other surfaces without needing a pen that’s filled with fumes.

scrapbooking supplies

Cardstock: All of my pages are built on cardstock, and it makes a big difference in the stability of my pages. I pretty much only use cardstock from Bazzill Basics. When I placed my first order from Bazzill, they had 65 colours in their full range. They have at least ten times that now, plus lots of other things to make cardstock exciting, like embossed patterns and die-cut edges. With so many colours now I don’t try to keep up with the full range, but I do buy huge quantities of my favourite colours and finishes because cardstock is something I know I will always use.
A little extra bit of info—if you submit your work to magazines and your page is chosen, you’ll need to pack it all up and post it in for photography, right? If your page is not on sturdy cardstock, attach it to sturdy cardstock before you send it in. Once a page on lightweight paper is removed from your album, it’s less stable and things are more likely to move between your house and the photography studio. A cardstock backing (and not-shy adhesive) helps tremendously. Just so you know!

scrapbooking supplies

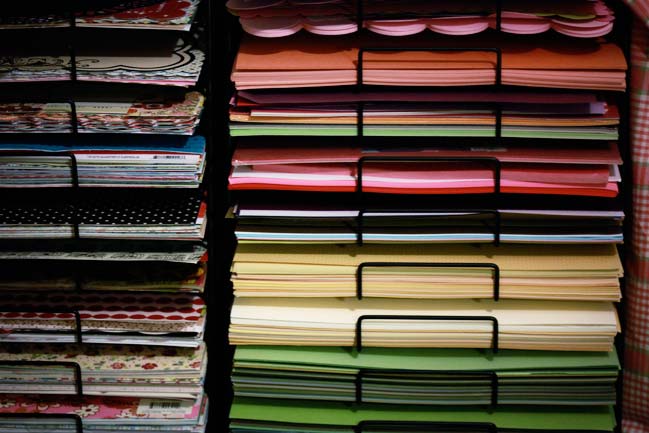
Patterned paper: Patterned papers are what make scrapbooking fun to me. It’s one of the least expensive purchases you can make in this hobby, which means you can get quite a few patterns in your spending budget, and there are so many companies and artists creating papers that you can find something you like no matter what your style may be. If you start looking at patterned papers online and wonder why they differ in price, despite most being the same 12×12” size, there are a few things to keep in mind:
...Not all patterned paper is the same weight or thickness. Cardstock weight is more expensive.
...Some papers are single sided; others are double sided. Double-sided is often more expensive.
...Some papers have a special finish, like an embossed surface, stitches, glitter, flock or something else other than just a printed design. All those things add to the price.
...A few papers on the market are printed by hand rather than by machine.
...Some papers feature licensed designs from giant corporations (like papers to scrapbook a trip to DisneyWorld, for example) and often you pay a little more for those famous characters.
...Not all paper companies are based in the same place. Depending on where you live, various companies may have different costs to import to your market. (This one is pretty rare if you’re scrapping in the USA, but can be a big factor here in the UK.)
There are so many designs out there that there will be something that is just perfect for you, no matter what you want to scrapbook or what kind of design aesthetic you may have. If you can’t go shop in person and are still unsure of what the real thing will look like if you order online, start by finding five or ten patterns you think you will like, across a range of companies. Order those online and you’ll get to see what the quality of each company’s paper is like when you start to scrap with it. After one or two of those orders, you’ll know what you like, what you dislike and then you can try a few new sheets every time you order without worrying that you’re going to buy hundreds of sheets and dislike it all.
Random fact: if you set me loose in a scrapbooking store and told me I could spend as much as I wanted but I could only buy one type of product, I would buy patterned paper way before I would buy the super expensive gadget. Patterned paper makes me happy. It’s also healthier than chocolate.

scrapbooking supplies

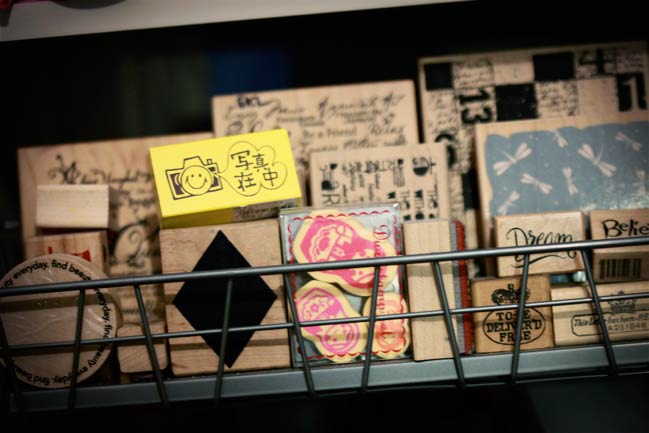
Stamps & Blocks: When I first came to England, I noticed straight away that there were far more places to buy rubber stamps than to buy scrapbooking supplies. But I was a scrapbooker, not a stamper. No matter how many stamps I saw, I saved my pennies and proclaimed I would never get into stamping.
I lied.
Now I use stamps on at least fifty percent of my pages. My favourites are background stamps to add texture and letter stamps for writing. It’s definitely worth viewing stamps as a tool—they are more expensive but they can be used over and over again, so you might pay £2 for a sheet of letter stickers and use them for three layouts or pay £12 for a set of letter stamps and use them for twenty-five layouts. Provided you don’t buy so many letter stamps that you can’t see straight, it does make stamps a good investment. I think the trick is to be careful to buy what you will actually use often. With consumables like paper and stickers, I will buy something just because I like the style because I only need to use it once or twice. With a stamp, I want to be able to use it more than ten times, so it better be something I can reinvent rather than it just looking the same all the time. OR if you’re working on a theme album and want to create dozens of pages that coordinate without buying sixteen sets of the same stickers, a stamp can be the perfect answer. And of course stamps work perfectly for cards, which is why they were so much easier for me to find all those years ago. We do love a handmade card here in the UK!
Stamps do come in various formats—red rubber comes mounted on wood blocks or unmounted in plain sheets. The mounted stamps are quick, easy and stamp well but they take up more room. That makes them great for stamps you want to use for years and years. Unmounted stamps are less expensive in both purchase price and postage, but you’ll need to attach them to something in order to stamp them. You can use various systems that essentially attach a repositionable adhesive to the back of the rubber so you can store them flat and just have one or two blocks to attach them to when you want. Then there is the most affordable and scrapper-friendly option—the clear acrylic stamp and the clear acrylic block. These stamps are light-weight and take up little room, they attach to the block without any adhesive, can be cleaned with just a baby-wipe, and the clear-clear combination means you can see exactly what you’re stamping where. Which is very, very cool. It also means you have a better chance of fixing an image if you mess up. Which probably doesn’t affect you because you would never make the huge gargantuan mistakes I make when I put ink in my hands. I make a lot of mistakes, but I promise they are all fixable: stamping is not nearly as frightening as it looks from afar.
Anyway, I now love stamps and I am quite biased toward these, funnily enough. But you can find ten gazillion designs here to give you a sampling of what is available on the market. (And that last link currently takes you to sale prices, which are always cool.)

scrapbooking supplies

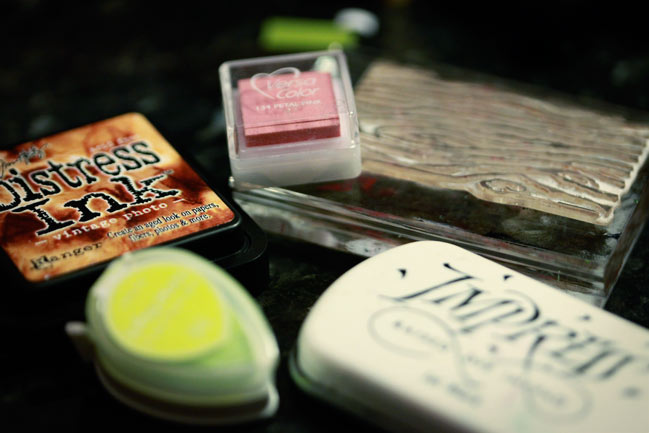
Ink: Perhaps this is just obvious, but without some sort of ink, those stamps are just going to be looking cool in your supply box rather than on your pages. So you’ll want to start with a few basics. I need dye-based inks in black and brown—these dry fast and are the no-frills inks of the stamping world. I also like to have pigment inks in my favourite colours ) and Staz-On in at least black and white for obnoxious surfaces that don’t agree with those other inks. Pigment inks are more like paint—they have more play, stay wet longer and they can be embellished with embossing powders and a heat gun, or you can just leave them alone and they still look great. Pigment inks are great for shadowing—use them with felt or a sponge and swirl them on the edges of something for a faded effect that gives a nice finish. And Staz-On is a super-permanent ink that will stay on paper, wood, metal, plastic, glass and most whatever you throw at it. (Ironically, don’t assume it will stay on fabric. I once spent all day stamping an entire passage of text onto a pair of jeans, only to find that all of this awesomeness disappeared in the wash. Live and learn—there is a special ink for stamping on fabric!) There are so many different ink pads available, you might need a spare house to collect them all. Start with the very basics—about five ink pads in total will do you well for a very long time—and then pick up one now and then to try something new.

scrapbooking supplies

Stickers: These last two are completely personal preference: I love stickers as a scrapbooking supply. Partially because they are a grown-up version of the Lisa Frank designs I used to exchange with pen pals and use to decorate my junior high locker, and partially because they are so darned fast to use. Totally straight-forward and easy. Peel, stick, done! Or you can jazz them up with layers, glitter, gems, sanding, inking, pop-dots, cutting them into pieces…whatever you fancy. The variety available is massive. I buy and use a great deal of stickers, but my mainstays are letters, labels and words. Can’t get enough.

scrapbooking supplies

Ribbon: A totally frivolous choice to finish my top ten. You could happily scrap for years and years without an inch of ribbon if it wasn’t your style, but it is my style and I love ribbon beyond belief. I buy it both from scrapbooking companies and just plain ribbon companies. Sometimes I glue it down and sometimes I sew it down. I like that it can add texture and a richness in a small amount, and it’s handy that I can buy special ribbons in small quantities and my favourite ribbons in big reels so I can use them again and again. Ribbon is fabulous as an addition to pretty much all paper crafts, as it provides that link to the fabrics of more long-term decor. We used a lot of ribbon for our wedding. How much, I cannot say exactly, as I stopped counting when we reached 600 yards. So maybe I like ribbon. Your tenth thing may be something else entirely!

So the ultra-short shopping list I would suggest for a serious starting scrapbooking purchase:
a pair of good scissors
a 12” portable paper trimmer
a black Precision Pen
an adhesive you like
10 sheets of cardstock in colours you love
10 patterned papers that make you happy
a set of letter stamps (and an acrylic block if needed)
a black dye ink pad
a sheet of label stickers
one other embellishment of your choice (mine would be a spool of ribbon)

All that will get you through ten layouts happily and then you’ll have a better idea of what you want to buy next.

I would love to make this a better resource for beginners by including the experience of other scrapbookers! Do you have a purchase you would definitely recommend? Or something you would tell beginners to avoid so they get the most for their money? Please take a few minutes to share your advice for beginners in the comments today. Would your shopping list be similar to mine or do you have something completely different in mind? Thanks so much for sharing your insight!

xlovesx

Step by Step :: Your handwriting on a digital scrapbook page

digital scrapbook page

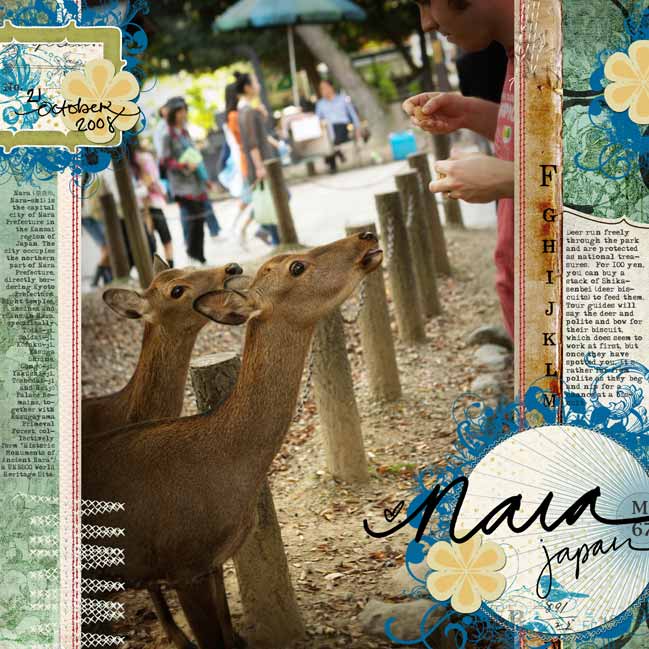
The newest issue of Scrapbook Inspirations included Jane Dean’s challenge for each member of the team to try something new-to-us on the digital front. For some, that meant making their first ever digital page. For others it meant printing things out and using them on a paper layout. My challenge was to find a way to include my handwriting on a digital layout—which admittedly is the biggest clash I have with digital scrapping. I always handwrite my journaling, and after years of that, it just feels wrong to start typing things again! I mean, it took quite a while for me to get used to seeing my own scrawl on those pages.

It turns out you can include your handwriting on digital pages very easily, and you don’t need a wacom tablet or a scanner, nor do you need to learn to write with your mouse! My fancy-schmancy list of equipment included a black pen, a sheet of white paper and my camera. And something tells me we all have those within reach! So here’s the entire layout from start to finish, in case you want to try something similar.

My layout uses these digital kits:
Travel Journal Tool Kit, Round & Round v4, Photo Phun Mat Pieces (all by Rhonna Farrer)
Haphazard (Erica Hernandez)
Spools of Stitches (Tia Bennett) {This is seriously one of the best purchases ever. Use it all the time and it always looks perfect. Love it!}
Sweet Notions (Meredith Fenwick)
Element-ary Stitches 2 (Carina Gardner)

Obviously, you can still follow the techniques with completely different digital supplies to customise the look.

I made my page in Photoshop CS3, but pretty much everything can be accomplished in any edition of Photoshop or Photoshop Elements—it just might mean that certain elements are in a different place or have a different name.

Right, that’s plenty of intro—let’s get started!

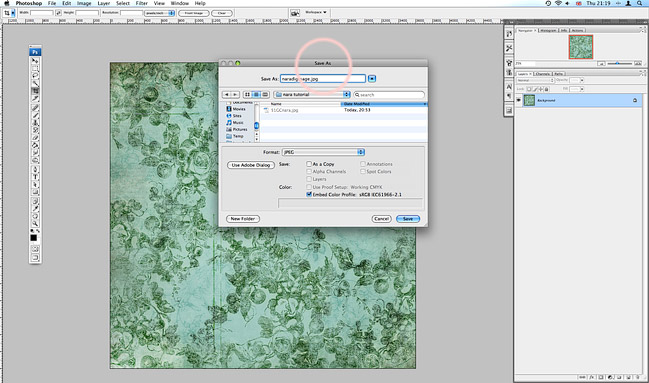
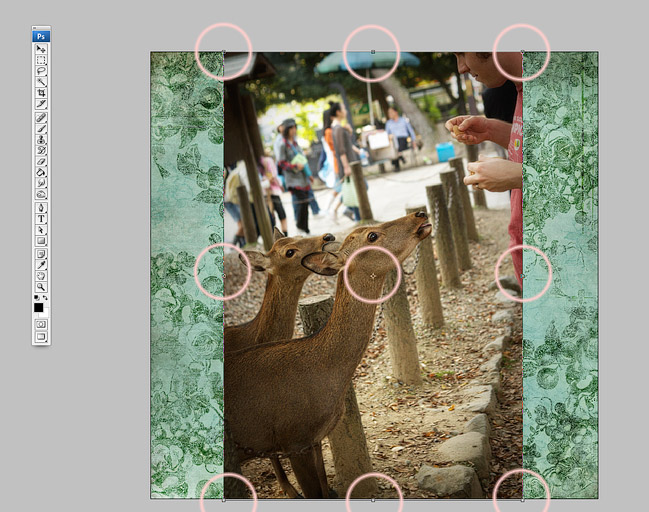
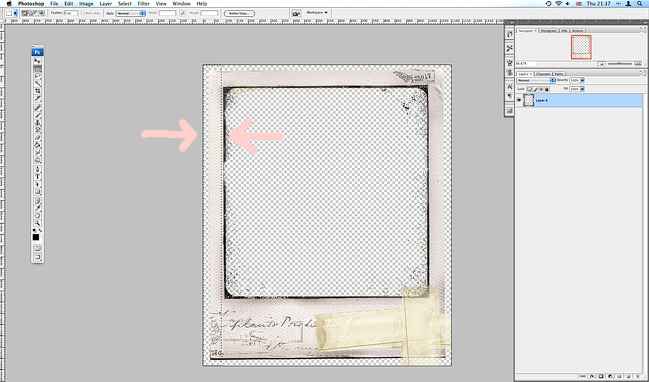
I have a memory like a sieve for certain things, and the set-up of my digital pages is one of them. So instead of opening a new document, I just open the background paper and immediately save it as a new name so I don’t lose the original file. This is paper 2 from the Sweet Notions kit. When it asks what quality to save, I save at the full 12 quality .jpg for this background layer. (By the way, throughout this post, any circle, box or arrow drawn in pink is from me, not the program! Just want to make sure some of the little things are a bit more visible.)

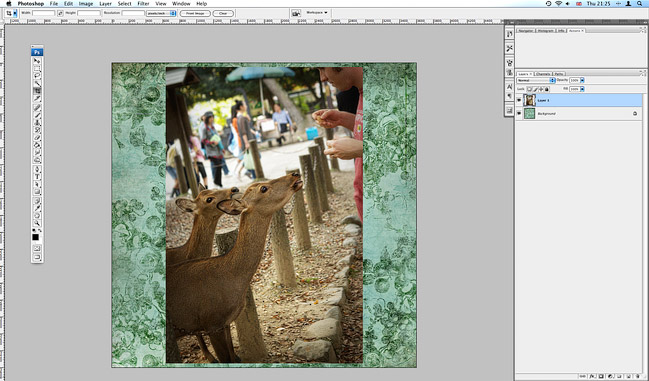
Next I open the photo in Photoshop and get it edited just how I want it, then flatten all the layers so I can copy it. Select all (ctrl + a) and copy (ctrl + c). Switch back to the digital paper (you can access this through ‘window’ at the top) and paste (ctrl + v). Now my photo is on a new layer on top of my digital paper.

Use the transform command (ctrl + t), hold down shift and drag the corner toggle to make the photo the same height as the page. Hit enter or click the checkmark when you’re happy and the toggles will disappear.

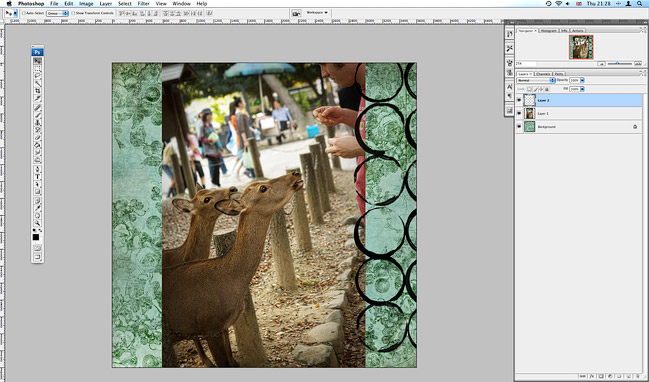
Then it’s time to start layering things on the sides. I started with the set of circles image from the Haphazard kit and added this over the paper on the right side. Open the image, select all, copy and then head back to your page to paste it in. If I know I’m only going to use something once, I just open it and then hit ctrl+a, ctrl+c, ctrl+w straight away—that opens the file, selects all, copies the file and closes it again. Otherwise I’ll end up with 20 big picture files open in Photoshop and start to wonder why my computer is lagging a bit!

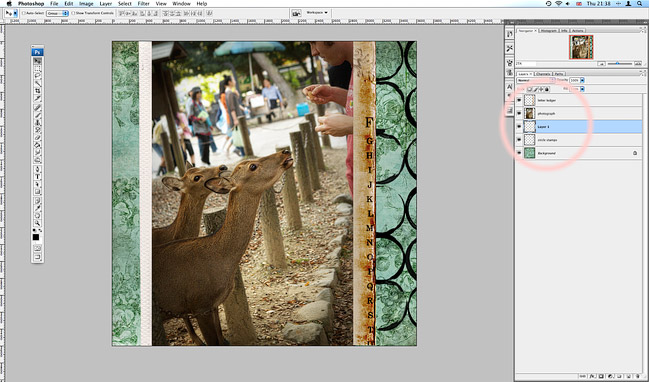
When I pasted this in, it sat on top of the photograph, but I actually want it to sit behind the picture. So go over to the layers palette on the right, click and hold on the layer and just move it into the position you want—the background is the bottom layer and now the photo is the top layer, so there are no stamped circles on the photo. Easy. (And definitely easier than rearranging layers on paper!)

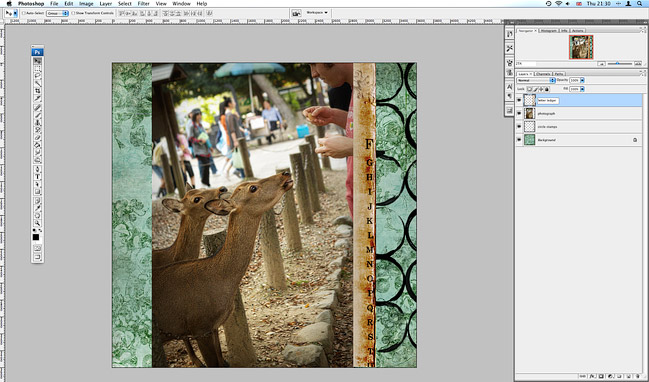
Still working on the right, I opened and copied the ledger scrap from the Photo Phun Mat Pieces kit. It was too small, so I used transform to make it the full length of the page and placed that layer on top of the photograph.

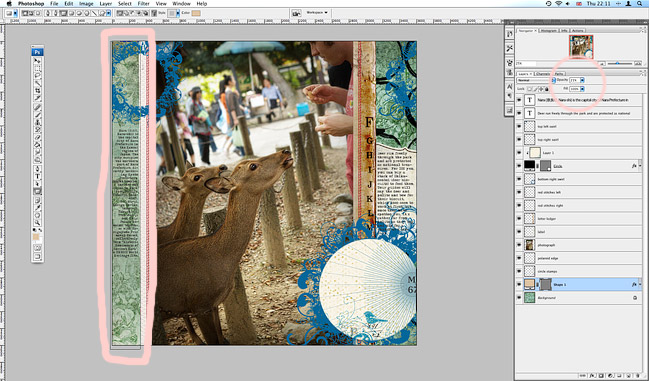
Now the left side of the photo needs some framing, but I don’t have another strip with the kind of texture I’d like. Instead I use a Polaroid frame from the Travel Journal Tool Kit. But obviously I don’t need the entire frame. So I just select the left strip before I copy—using the rectangle marquee tool instead of select-all.

Everything else is the same—paste it into the page, change the size to suit and move the layer so everything is in the right place.

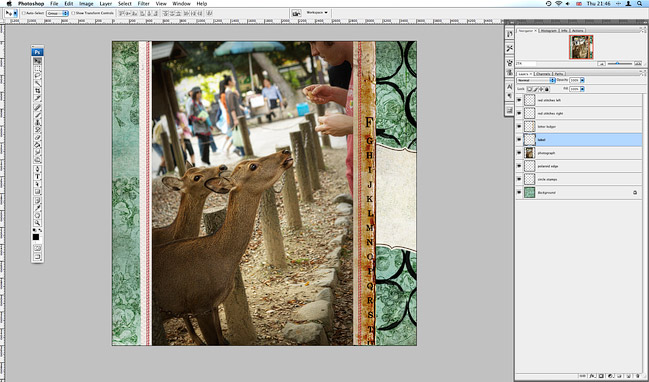
Next open the double straight stitches in red from the Spool of Stitches set. This will open as a horizontal image. Go up to ‘Image’ at the top and select rotate so you can turn it into a vertical image. Now select all, copy and close. Paste into a new top layer and move that set of stitches to the right, stitching the ledger paper into place. Paste again and you’ll have another new layer—move those stitches to the left and stitch the polaroid piece.

Add a label on the right and move the layer so it’s under the ledger paper. To make it run off the page, just position it where you want—anything not on your canvas won’t show.

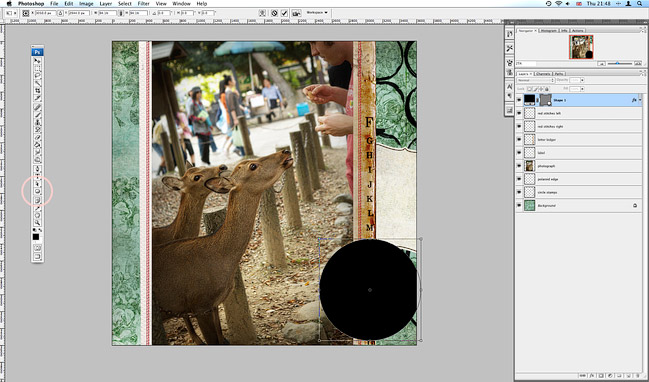
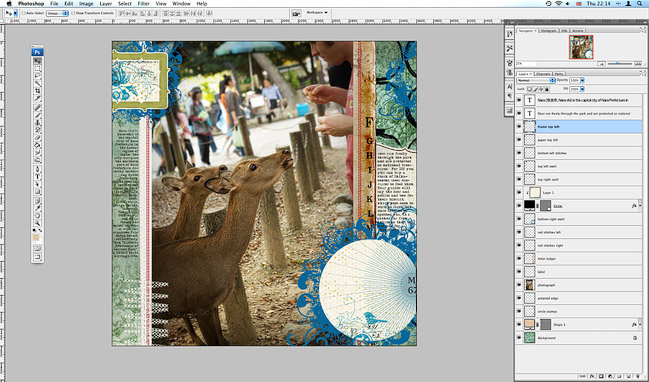
Now we’ll work on the bottom right corner. Use the ellipse tool and hold down shift to draw a circle. Don’t worry about what colour it is, as long as you can see it. Use transform to change its size if needed, then move it into place so it runs off the right side of the page. Make sure this layer is at the top of your palette.

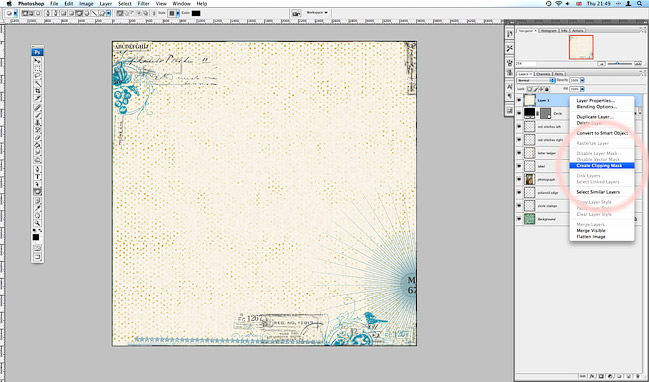
Open a new paper (this one is from the Travel Journal Tool Kit), select all, copy and close. Go back to the page and paste. It should have just covered your entire layout. Go over to the layer palette and right click—choose ‘Create Clipping Mask’. (Some versions of PS/PSE call this ‘Group with Previous’, so if you see that, go for that one.) Presto, your paper will only be visible in the circle.

To add the details underneath the title, we’ll use a brush from the Round N Round set. When you use a brush, it won’t automatically make a new layer, so you’ll need to click on the new layer icon or choose layer-new layer from the top menu.
Pick up your brush tool and choose the brush you fancy. (Read how to load your brushes here if you need help with that.) Select the colour you want to use for your stamping. I like to use the ink blotter to pick one of the colours that is already on the page so I know it will coordinate. Then stamp on the circle and use transform to make the stamp the right size, if needed.

Keep in mind that if you want to be able to move individual stamped images, you’ll need to make a new layer for each one. Otherwise if you stamp several and hit transform or move, you’ll only be able to move them as a group.

Once you’re happy with the swirly circle, move the layer so it’s under the circle.

While we have this brush and colour handy, make a new layer and stamp once in the top right, then another new layer and stamp in the top left. These are roughly the same size as each other but they are smaller than the title circle.

Next I added typed text to both sides of the layout. Click on the T for Type tool and click and drag to draw a box to hold your text. Type or paste it in and choose the font and size you want. Move it into place. Make sure the type on the right is in a layer above the stamped swirls.

Add another text box to the left side. I used some text from Wikipedia to help with the Japanese characters and historical information.

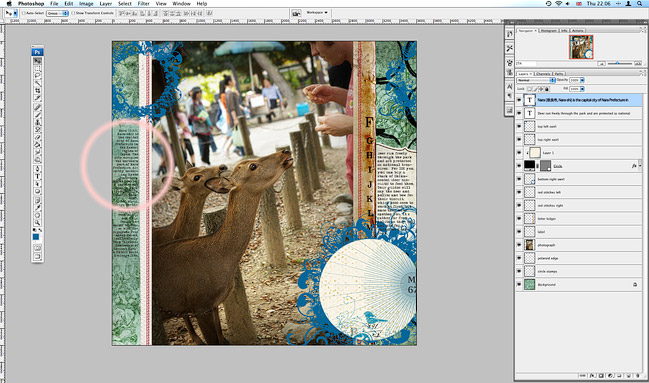
The text was too hard to read over the dark patterned paper, so I drew in a light yellow box and placed this over the patterned paper, then adjusted the opacity (at the top of the layers palette—cirlced on the right) until it wasn’t obvious that the pattern was different but the text was easier to read.

Nothing else to add to the bottom left so I added some more stitches here so it wouldn’t be so unbalanced. Just open, copy, close and paste.

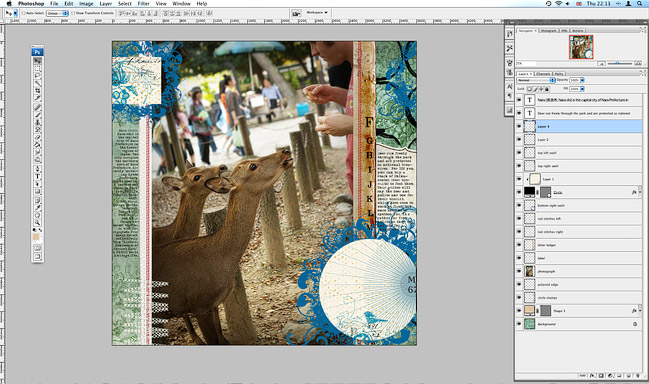
Now up to the top left corner, where we already have that brush stamped in blue. We’ll use the same paper that we used inside the circle at the bottom right—you can access it either by clicking on its layer in this image or by opening the paper again. Use the rectangle marquee tool to select part of the design you like and paste this into the top left corner. We’re going to cover the edges so don’t worry too much about how it lines up with the brush stamp.

Open a frame image and paste it over the top of the paper rectangle so all the edges are covered.

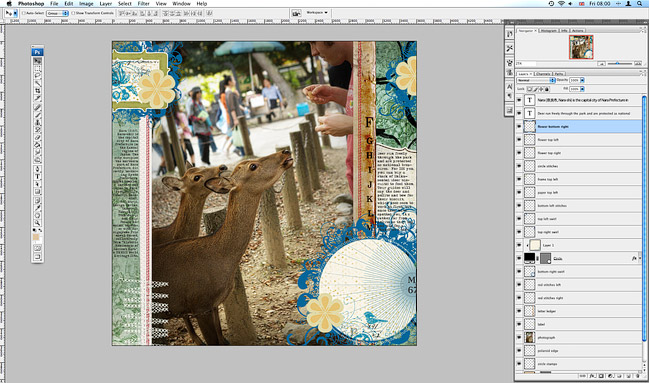
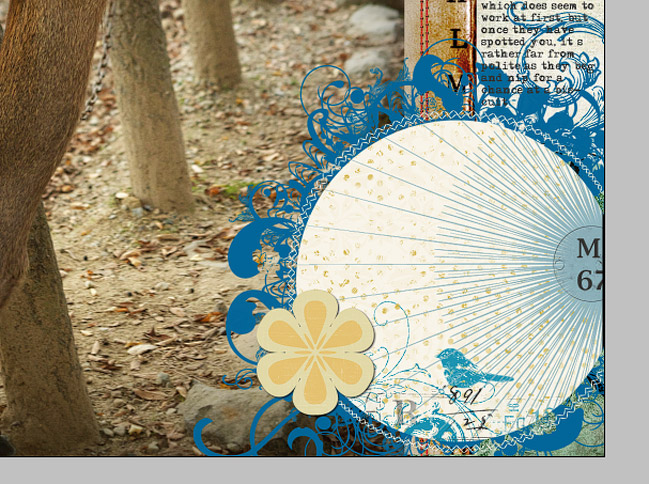
At this point the page is looking pretty dark so we need something bright to lighten it up. Open and copy the yellow flower, then paste it three times to create a visual triangle. Follow the places we stamped in blue—top right, bottom right, top left.

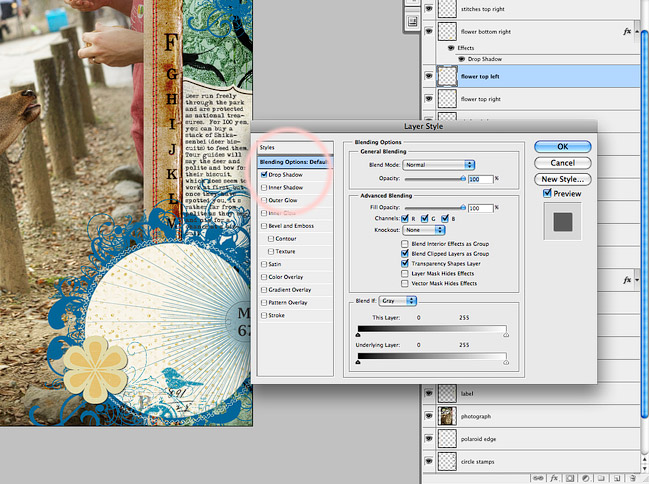
I thought the flowers were looking a little flat, so I double clicked on the layer so I could edit the style and added a subtle drop shadow. (Shadows are something that is different in pretty much every piece of software. If you can’t find them in yours, try googling “drop shadow” and the name and version of your software and you should find out where it is hiding for you!)

And I added a circle of stitches around the circle we cut out, just to keep it in theme with the rest of the page. The stitch layer sits underneath the flower layer.

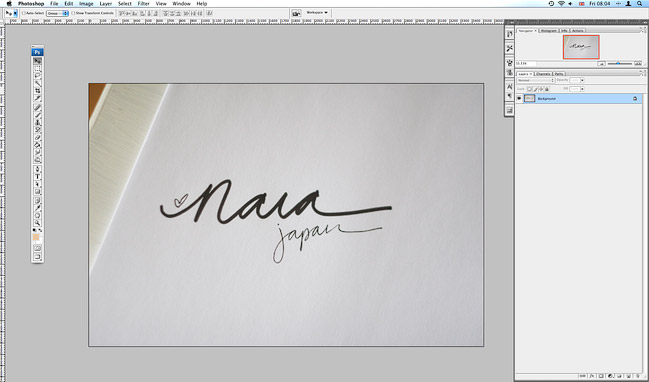
Now we are finally ready to add our handwriting! Tia has written a great tutorial for doing this with a scanner here but I didn’t have a scanner, so I adapted her instructions to work with a camera instead. Write out whatever you want to include with a black pen on white paper. Then take a picture that has good light and good focus. Open that picture in Photoshop.

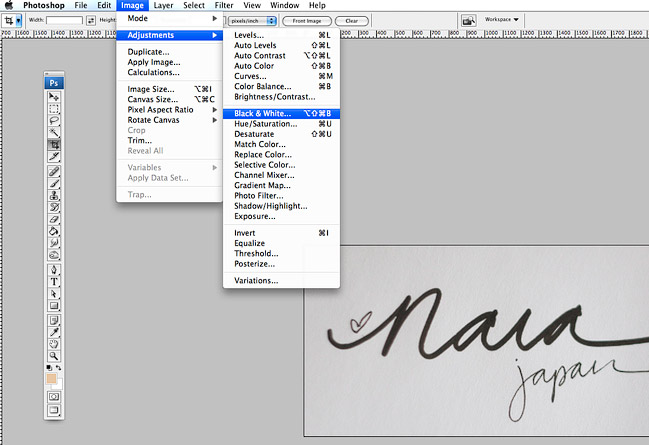
I found I got cleaner results when I changed the image to black and white.

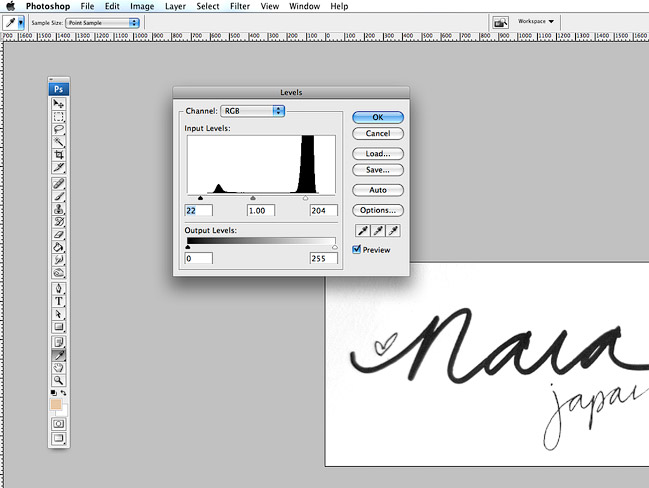
But of course after converting to black and white, your white paper will be a shade of light grey. Use levels, contrast or curves to make it a sharp white/black image.

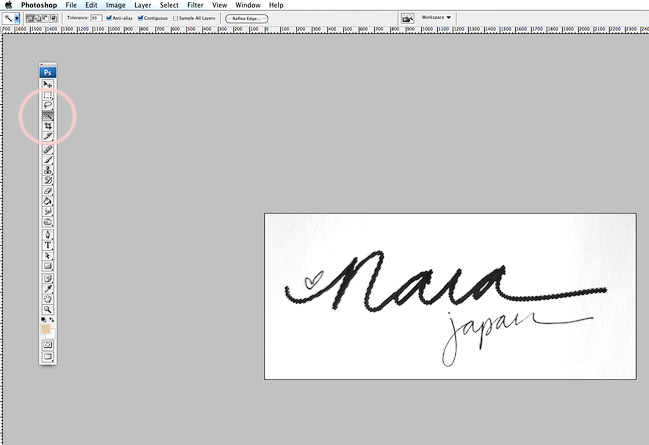
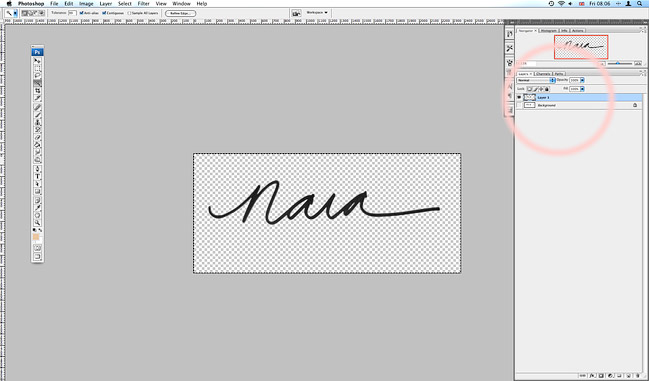
Grab the magic wand tool from the tool bar. Thicker writing is easiest, so we’ll start with the word ‘Nara’. Click the magic wand on part of the word and all the letters that are connected will be surrounded by marching ants.

Copy this (ctrl + c).

Make a new layer and paste (ctrl + v).
Now you can make the original picture invisible by clicking on the little eye by the bottom layer in the layers palette—and then the background will go to checkerboard and you’ll see exactly why you’ve pasted in. It’s just what you’ve written, but it’s taken away the white background and the other words. If that looks right, you’re ready to go back to your layout…

and paste it in. Use move or transform to get it in the right place.

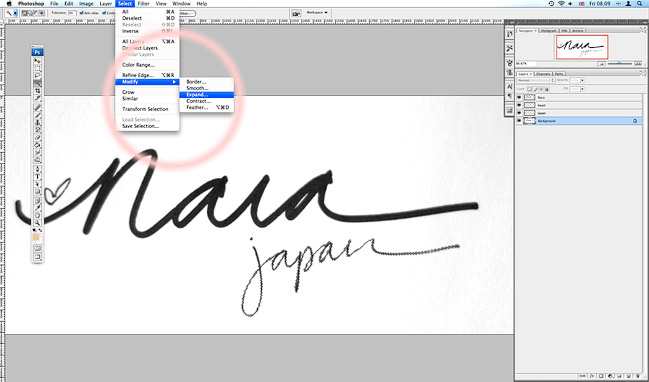
Things written with a fine-tipped pen take a little more work. Turn that bottom layer back on (click on the eye) and make sure you’re working on that layer. Zoom into your image so you can see exactly where the the pixels are which colour. Use the magic wand to select the writing, just like before. (If your letters are not joined up, you will need to select each one separately. You can either select each one, fill and paste it onto the new layer, then come back and repeat the process for each letter, OR you can select one, hold down shift and select the next one and so on until you have the entire word in marching ants.)

This word is too small to show up on the finished layout, so we need to give it a few more pixels. Go to Select-Modify-Expand and add more pixels to the word. I added 3, so I’m basically adding 1.5 pixels to each side of my handwritten letters. Now your marching ants will march further away from your letters so you can see the size you’ve chosen.

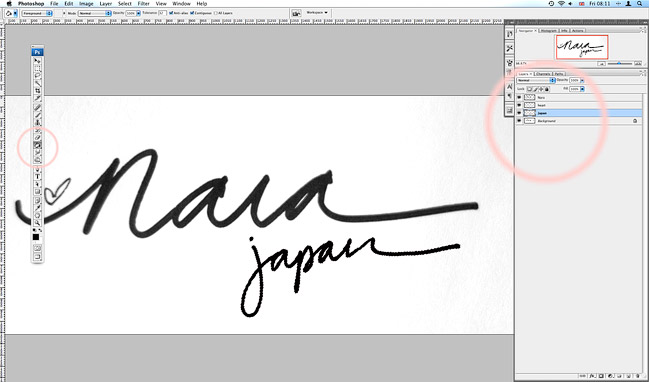
Create a new layer but this time do NOT paste. You should still have marching ants in the shape of your word, even though we now have the new layer selected. Click on the paint bucket, choose the colour you want for your writing, then click inside the marching ants. Now you should have your handwriting, but with extra bulk! If it looks okay, select all of this layer (ctrl + a) and head back to your digital layout.

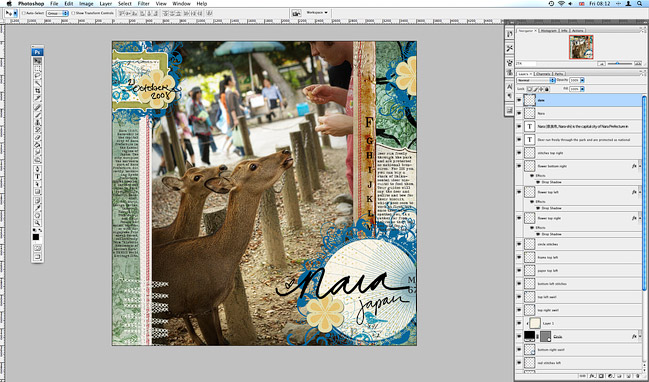
Paste and move it to the right place. Repeat for anything else you want in your own handwriting—I also added the date at the top left.

That’s your page all done! From here, I save three times. Save once as the .psd file in case you want to change something later, you spot a typo, etc. .psd will preserve all your layers just as you see the file on your screen. Save again as a full-size .jpg file—that’s for printing purposes—all the layers will be flattened so it will be difficult to edit that image. Then change the image size to something small that you like for galleries, blog, etc and save at that size too – also as a .jpg.

So there you go—I no longer have the excuse that I can’t put my handwriting on a digital scrapbook page…and neither do you!

xlovesx