How do you make a scrapbooking page kit?


Earlier this week my glittery friend talked a bit about preparing page kits while she was looking for ways to combine older supplies with new. Page kits are certainly not the only way to gather supplies for a page! But they are exceptionally useful if you want to scrapbook away from home or without making much mess, and they can help with supply economy, either because you want to make sure you use what you have or because you need to get the most from a limited crafting budget.
But what do you actually put in your page kits?
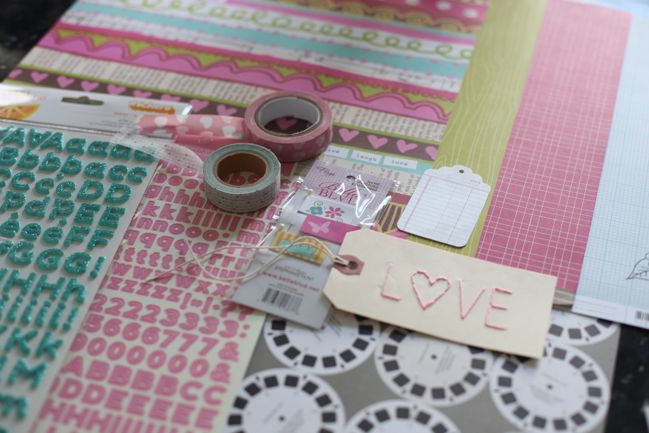
I start with paper – usually a mix of scraps and full sheets (including at least one full sheet for the background but I will often include two so I have a choice). I err on the side of too much paper rather than not enough.
I also need lettering in my page kits. Although I have a die-cutter, I prefer to use that just for embellishments and not for lettering. I nearly always use Thickers and another small flat letter sticker style for my titles, so most of my page kits will have at least two kinds of peel and stick lettering.
Then I turn to embellishments. Sometimes this includes more paper that can be cut apart to make embellishments (like those viewmaster reels). But it also includes stand-along items like the tag and paper flags here. I’m usually looking for something that includes dimension and at least one texture other than flat paper, so in this case the pins on the flags provide some dimension and the stitched tag includes the texture of the thread rather than just another printed paper. If I don’t have predetermined embellishments I want to include, I might die-cut or punch papers that I can layer to create my own embellishments. If I’m going to crop at home, I just leave the paper in the page kit and use the punches or dies as I come to that step. If I’m going to crop elsewhere I will go ahead and cut the shapes I think I will need and add them to the page kit (just loose shapes in the page protector) so I don’t need to pack so many heavy, bulky items.
My last step is to look to the in-between elements that will tie it all together. These include things that can work as a strip, trim or border, so it will commonly include border stickers or washi tape along with either twine, thread or ribbon. I often use a border punch in that category too, but that would be packed with my tools. I try to plan on using just one or two border punches if I’m cropping away from home so you’ll see designs that are more general and less specific to the page theme. (Or I may borrow a punch from someone else at the crop. If we’re really organised we make a plan of who will bring which punches so we can have the maximum number of shapes with the least weight to carry. No duplicates!)
Then I place that page protector in an album and start to fill the next one! But what about the photos? It depends on my mood and the project as to whether I create the page kit to match the photos (photos first) or create a page kit and then decide on the pictures (supplies first). I do both equally! Whichever comes first, I just pop the photos in the page protector too so they are ready to go. Putting them all in the album makes it easy to transport and the finished pages can go right back into the page protector so they are safe for the journey home. I also really like this format of album planning so I can see a project come together from the beginning even if I haven’t made or sketched out a single layout just yet.
I also pack a separate kit of my basic tools: scissors, adhesive, journaling pens, pop dots, sewing needle, black and brown ink pads and ink applicators, and anything else that I know I want to use but is too bulky for the page protectors, like spools of twine, punches or bottles of paint or mist. That plus my album of page kits and I am ready to go!
Your turn… do you use page kits? And if so, what do you put in them? Do you err on the side of too much or too little? I’d love to hear your process!
![]() Read more about: online-scrapbooking-weekend
Read more about: online-scrapbooking-weekend
Next post: How do you create a scrapbook page from start to finish?
Previous post: How do you store your paper scraps and off-cuts?


