


Scrapbooking Challenge :: From One to Another


For your next challenge, I’m delighted to introduce Relly Annett-Baker as a special crop guest. I love her take on the process of how she takes an inspiration piece and makes it her own, which you might see as a unifying theme so far this weekend! I hope you enjoy her story of creating a scrapbook page! Don’t miss her challenge at the end of this post.
I’m what you might call a time-poor, stash-rich scrapbooker. I have mucho mucho paper, embellishments, photos and stickers and maybe an hour or two a week in which I can scrapbook. I travel a lot, work hard and I also have two little boys who fill all my hours with hilarious antics and sweet moments. This means I have a lot I want to scrapbook as well.
After my second baby was born, I stopped scrapbooking for over a year because I wasn’t sure I’d ever have time again but I kept checking message boards and blogs, always thinking ‘I should really …’. Most of all the thought that Thing 1 would have a scrapbook of his baby and toddler years and Thing 2 wouldn’t was what prompted me to start making pages again. Before I had children and much more time to myself, my pages were detailed, distressed, very layered and artsy. When I returned I made a decision – I was going to keep stuff a lot simpler, and I was going to focus on the story behind the pictures. I didn’t have time right now for making miniature artworks. Just for memory keeping.
So, I started by doing something I’d never done a lot previously. I scraplifted. I started by scraplifting myself. I found pages in Thing 1’s album that I could copy (and simplify) for Thing 2’s album. I looked at design team galleries and started copying stuff from there too – sometimes whole pages, sometimes details. One thing I found a lot was that I was drawn to pages with sweet girly details but with two digger-dirt-and-danger little grub attractors at home I needed to do some rework to turn them into a page that fitted my photos. Slowly, this became a challenge to me. Can I recreate this pink and frilly page in a style that fits me? I came up with a process and I’m going to share it here, so please play along!
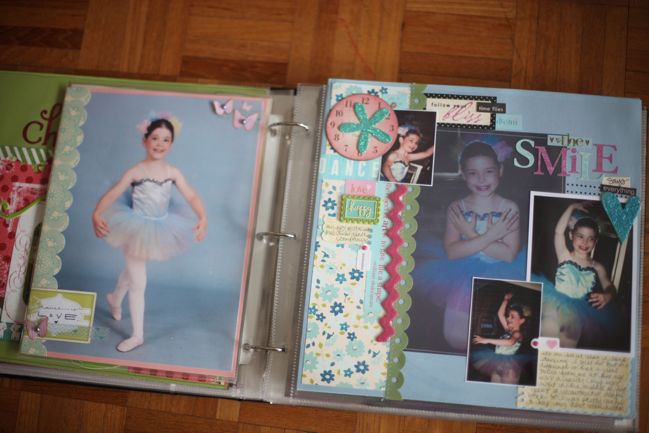 Click here for more about this album.
First, I get the original layout up where I can see it – usually on my phone or laptop. Here I took a layout of Shimelle’s (doesn’t she look adorable in her ballet outfit?) with a variety of photo sizes on it and made a start.

I then take a scratch piece of 12×12 – usually an insert from a page protector – and use that to copy down the sketch. I’m pretty rubbish with proportions so if I do it on actual 12×12 paper I get a better feel for the sizes I’m going for.

I knew I had a ton of pictures in 3×4, 6×4, and 7×5 of my oldest boy that I had taken over the years. You know the sort, super-cute snaps but no particular story to them. The ones I picked out were all from various times in previous summers, around his birthday, so I decided to tell that story and show him growing like a weed!

I assembled my papers, looking for at least three contrasting patterns as I wanted to mount my pictures, and one small repeating detail pattern to replace the floral design in Shimelle’s original layout.

I then chose some stickers and embellishments that I thought would fit. Shimelle’s design had several clusters of small embellishment around the pictures and I wanted to recreate this. I tend to get this stuff out early, so that I can look at what I want to work with, rather than tripping up on boxes round my studio as I rush to finish. I often have to make my layouts in several 15 minute blocks so this helps me remember what I was planning too.

Next I cut the paper, according to my sketch and mounted my pictures. I knew my photo sizes were a little different from the original layout so that some re-arranging would be required. I decided to move the largest photo down a little and move the journalling block to the bottom left. The baby picture would balance it on the other side. I then went ahead and inked all the pieces.

I also chose two border stickers to put back to back alongside the left-hand strip of patterned paper, like in Shimelle’s layout.

Once the photos are down, I usually create my title next and that’s what I did here. I copied the contrasting small flat stickers and larger dimensional letters for my title from the original layout. I’m plagued by lots of leftover numbers on my sticker sheets, so I decided to use all the numbers up to five. (Although I guess you might assume my son is 12,345 years old! )

I looked back at the sketch and remembered that there was a large round embellishment top left and a large heart top right. Weighing up my options, I decided to ditch the heart cluster and instead focus on the top-left. This had been a clock but I decided the summer theme needed some sunshine. I also found a matching kite that I mounted on sticky pads for dimension.Finally, I added some sticker clusters to add some horizontal lines to a very vertical layout, and some primary colour embellishments to match my pictures.

And so, my challenge to you is to find a layout you love that isn’t in a style or colour scheme you’d usually use and scraplift it with a twist that makes it yours.
To enter this challenge create a new project by changing something dramatic – like how Relly started with something very girly and made it a boy page. You can use any page from your pins, bookmarks or favourites – you can even scraplift yourself and adapt a favourite page. If you prefer more direct inspiration you can use these two layouts as your start or take a look at a few favourites I’ve bookmarked recently: one photo, two photos, two square photos, three photos or four photos. Then upload a picture of your project to a gallery or your blog and link to it here! Entries close at the end of next weekend.
| By day, Relly is a Content Strategist, helping companies sort out their online content. By late-afternoon until around 8pm, she’s Mummy to two little boys. By 10pm, she’s usually in bed. In the twilight hours between these happenings she scrapbooks, bakes and makes things for her house. She tweets prolifically as @RellyAB and has a new blog, Loves Handmade, which she absolutely promises she will update with some tutorials and layouts. Right after this cup of tea. Zzzzz. |
 . . |
![]() Read more about: online-scrapbooking-weekend
Read more about: online-scrapbooking-weekend
Next post: Scrapbooking challenge :: Put it in a Pocket
Previous post: Scrapbooking Colour Challenge :: Yellow, Grey & one other colour


