


paper: pretty paper. true stories. {and scrapbooking classes with cupcakes.}

lovely to meet you Twitter Facebook Pinterest YouTube

Take a Scrapbooking Class

online scrapbooking classes

Shop Shimelle Products

scrapbook.com simon says stamp shimelle scrapbooking products @ amazon.com shimelle scrapbooking products @ amazon.co.uk

Reading Material

travel

Best of Both Worlds :: My scrapbooking product picks for August 2013
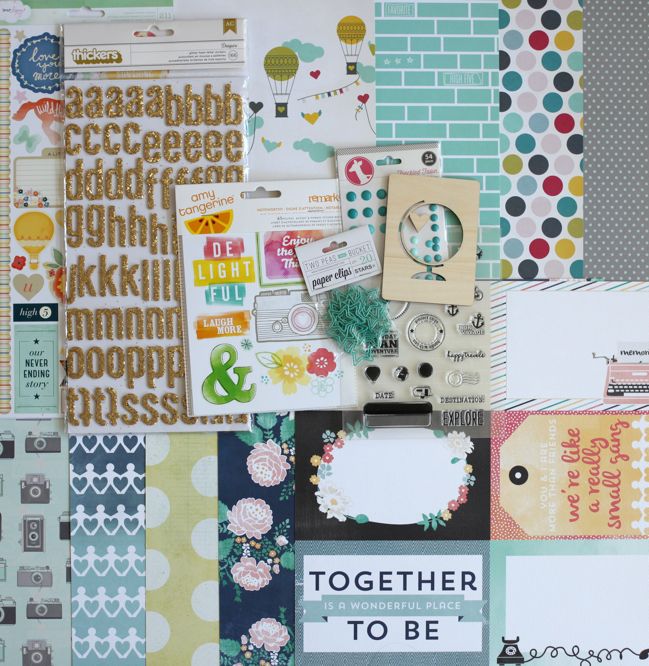
Best of Both Worlds scrapbooking kit :: August 2013

Welcome to August! I think this month just may explode on my calendar – there is a crazy amount of stuff happening here this month. Some of you who have been reading for a while know that when I go a bit on the quiet side, it means there are big projects afoot. One of those I can share with you today, as part of the Best of Both Worlds product picks for August: this is the first month that the kit includes something actually designed by me! I thought we might have to wait till next month, but it arrived at Two Peas yesterday, so I’ve included it this month, which explains why it makes its debut at the very end of this video, after it seems like the kit is complete! Can it be a debut if I don’t even have a set to show you? Well, at any rate, it doesn’t get mentioned until the very end.


Yes, that means there are two stamp sets on the shopping list. I’ll show examples from both, and the Travel/Everyday Adventure set is on sale right now, so if that takes your fancy, this is a great time to pick it up, but I realise that means the kit is now a crazy price if you add one of each item to your shopping cart. Just know that the price comes back into line if you drop one set of stamps, and of course, if you’re not a stamper at all then leave both out and you’re down to a very affordable kit.

Click here to shop for the August 2013 Best of Both Worlds Scrapbooking Kit

The Nailed It stamps are my response to the six different stamps (I counted!) and countless papers and die-cuts (so not counting) that say Best Day Ever! or something along those lines. I actually love stamps like that and I love scrapping the happy things so it’s no wonder that I am drawn to them, but my days are definitely not all in the ‘best ever’ category and I wanted something with a bit more bite because sometimes those stories are still fabulous to record. So this set has lots of simple, short phrases to sum up plenty of those days that don’t deserve the ‘best ever’ label. And they’ve all been designed with the size of 3×4 and 4×6 cards in mind, so you can use them with Project Life and other divided page protector systems as well as traditional 12×12 pages and cards.
paper b-sides
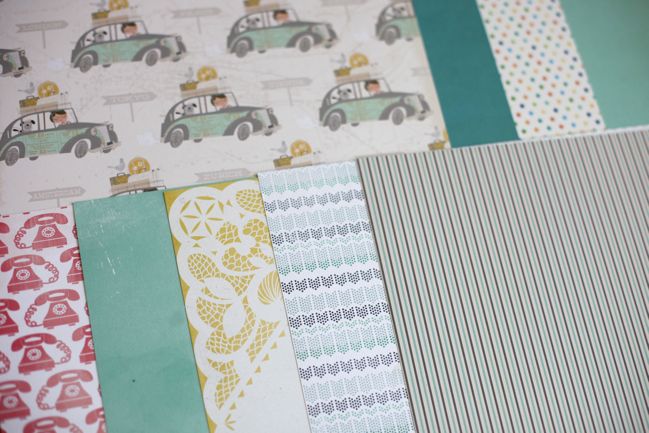
In regard to the rest of the kit, this month I’ve gone full-out on the aqua. Perfect for the beach, perfect for travel, perfect for sunny skies, and it works equally well for both girls and boys. So there is just aqua all over this kit and I love it like that.

If you are looking to change it up or add more to this month’s kit, think about what other colour you like best with aqua. There is a tiny bit of pink, orange, and yellow in this kit as accent colours – if one or more of those speaks to you, then add more of that! I’m also quite fond of red with aqua, so that might be another option. The star clips and the enamel dots are available in colours other than aqua if you want a bit more variety. There are other designs of the wood veneer cards if the globe is not your style. (If it is your style, it’s also available in this new stamp set).

Gold accents look beautiful with these colours, so I’ve pulled out Heidi Swapp colour shine mist in gold and gold embossing powder. On at least one page I’m going to add in some metallic gold rub-ons by Jenni Bowlin (her rub-ons are such fabulous quality, if you’ve never tried them. They are a class above the rest.) and I’m thinking gold sequins here and there too.

I went with gold glitter Thickers for the alphabet, and there is also this gold glitter in a smaller font or this swirly font if you prefer. If you hate the idea of actual glitter on your page (shock! horror!) then try this metallic gold foil alphabet instead. Same colour effect; no loose glitter.

If you’re thinking more in collections than single sheets, then the three you’ll want to check out this month are Hello Again by Carta Bella, What a Wonderful Day by Fancy Pants, and Travel Girl by October Afternoon.

As always, there is no subscription to this kit and everything is first come, first served. Items are not reserved in your shopping cart – if you decide to come back in a few days, they may be sold out, I’m afraid. But there is a good stock of all the items on the kit list right now. If the items you want are sold out by the time you click, you can click the ‘request and notify me’ button, which will register that more people want that item and send you an email as soon as it returns to the shop so you have the first chance to get it. International orders, if the shipping on your box is different to the amount you paid at check out, open a customer service ticket within thirty days and the excess will be refunded. All of the links in this post are affiliate links to Two Peas in a Bucket, which support this blog and allow for prizes, guest artists, and all that sort of stuff. I just ask that if you want to share this kit with others, please direct them to this post rather than directly to the store. (Any questions about any of this? Just let me know!)

Click here to shop for the August 2013 Best of Both Worlds Scrapbooking Kit
online scrapbooking weekend
I told you August’s calendar had lots in store! If you have any spare time this weekend, you are cordially invited to an online scrapbooking weekend right here. I’ve called this one the ‘Best of Both Worlds’ weekend because all the projects involve the eight kits from 2013 in some way, but kits are not a requirement to participate. You’re welcome to jump right in with any supplies you like! But if you have one or many of the kits waiting to go from just paper to finished projects, then this is your chance to blitz through with plenty of ideas and examples. Call it a catch-up weekend if you like! Posts start Friday evening and go through Sunday evening, and the challenges will remain open until the end of the following weekend, so there is more time to participate if you can’t join in during this particular weekend.

I look forward to sharing all those layouts and other ideas with you starting tomorrow night!

The Patterned Paper Effect:: A Scrapbooking Tutorial by Tomomi Hiramaru

The Patterned Paper Effect:: A Scrapbooking Tutorial by Tomomi Hiramaru @ shimelle.com

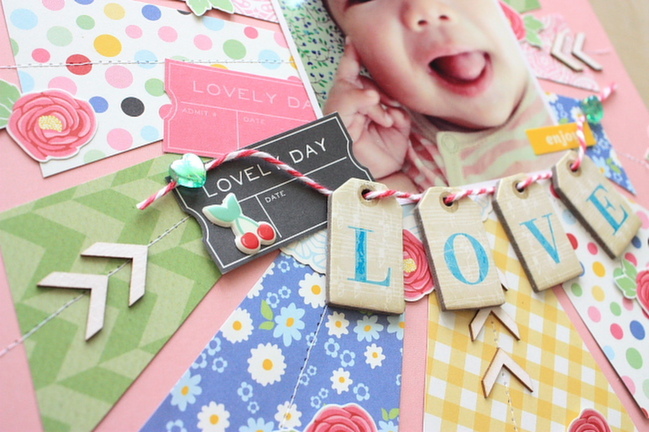
Do you like patterned paper? Of course! I love paper very much!! So I always want to use a lot of patterned paper on one layout and obviously, I want to use them effectively because of loving them. Now, I would like to share one method with you.

The Patterned Paper Effect:: A Scrapbooking Tutorial by Tomomi Hiramaru @ shimelle.com

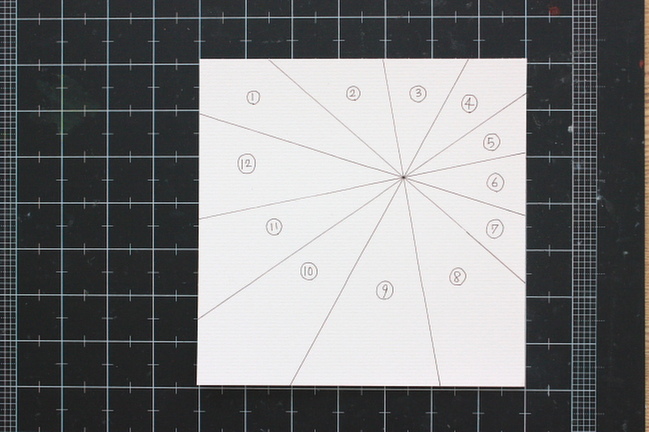
To begin with, make a paper template.
Cut a cardboard (or cardstock) into 7 × 7 inches using your cutting tool. But you can cut it, size and shape; rectangle, circle, as you like. Define the center and divide around it. The more you divide, the more various kinds of paper you can use.

The Patterned Paper Effect:: A Scrapbooking Tutorial by Tomomi Hiramaru @ shimelle.com

!The Patterned Paper Effect:: A Scrapbooking Tutorial by Tomomi Hiarmaru @ shimelle.com

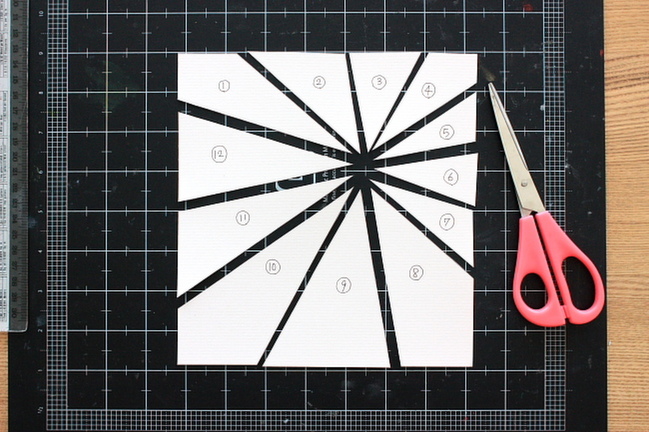
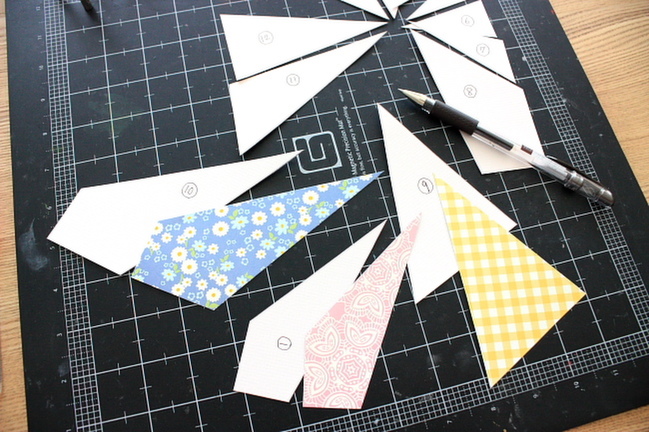
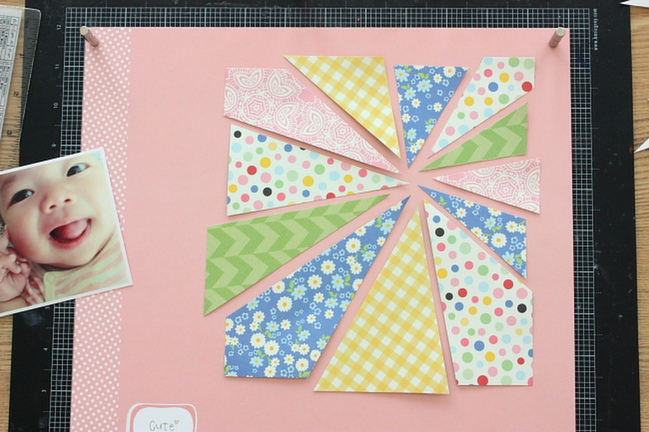
Cut it along the line which you divided or cut patterned paper as you like, using those templates.

The Patterned Paper Effect:: A Scrapbooking Tutorial by Tomomi Hiarmaru @ shimelle.com

Set up them on a simple patterned paper or a cardstock. I moved some them at random and put it, but you can also place them neatly.

The Patterned Paper Effect:: A Scrapbooking Tutorial by Tomomi Hiarmaru @ shimelle.com

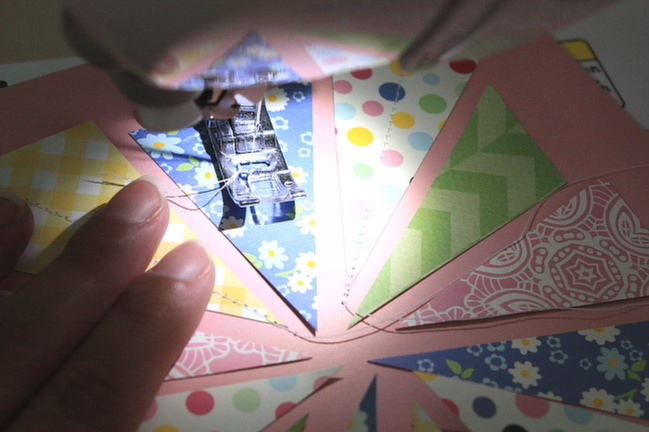
Sew the middle of all the pieces with a sewing machine.

The Patterned Paper Effect:: A Scrapbooking Tutorial by Tomomi Hiramaru @ shimelle.com

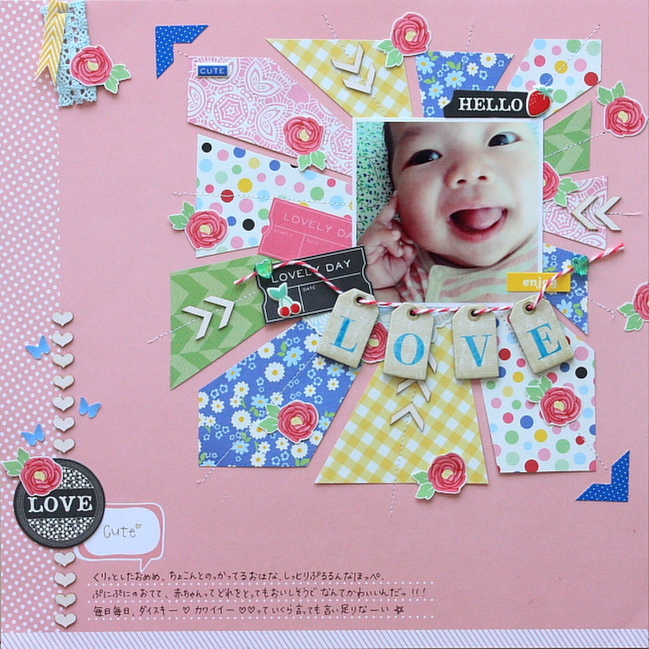
Finish off your layout with your favorite embellishments, papers and so on. I used chipboards, wood embellishments, stickers and papers of the floral design that I cut by myself.


Tomomi Hiramaru lives in Fukuoka, Japan with her husband and three beautiful daughters. She just gave birth to the third girl in April of this year. Her passion for scrapbooking just increases.
Tomomi creates mainly 12inch layouts. Her scrapbooking style is prettily combining patterned paper and embellishments, and using bright colors. You can see more of her work on her blog.

What You've Been Making!

What You've Been Making by Shimelle @ shimelle.com

Time to take another look at what all of you have been making for your scrapbooks. We are now moving onto the first two sketches in February, Simple Designs for Patterns on the Diagonal and Adapting a Sketch Page for Project Life .

I love how Katie Scott’s layout clearly took inspiration from guest artist Paige’s beautiful layout with the sketch, and yet made it her own with different colours and a different theme. This page proves how that stitched stripe background can be so versatile, and it can be made with scraps, so it’s an efficient use of supplies too. Snow White’s Layout shows an innovative way to use a sketch. Replacing the photo block with a fold-out journaling booklet is a great twist on the design and gives her writing quite a special treatment, and the diagonal stripes take on a candy cane motif when paired with a Christmas theme. The warm colours in Mel’s Layout are gorgeous, but it’s that central paper that made me spot something that I definitely need to try: using a border or corner printed paper with this sketch. Her placement of the papers in the corners makes great use of a tricky pattern, since those corner printed papers can be so pretty but rather a challenge to use well.

If you’d like to see more of the responses for this sketch, take a look here.

What You've Been Making by Shimelle @ shimelle.com

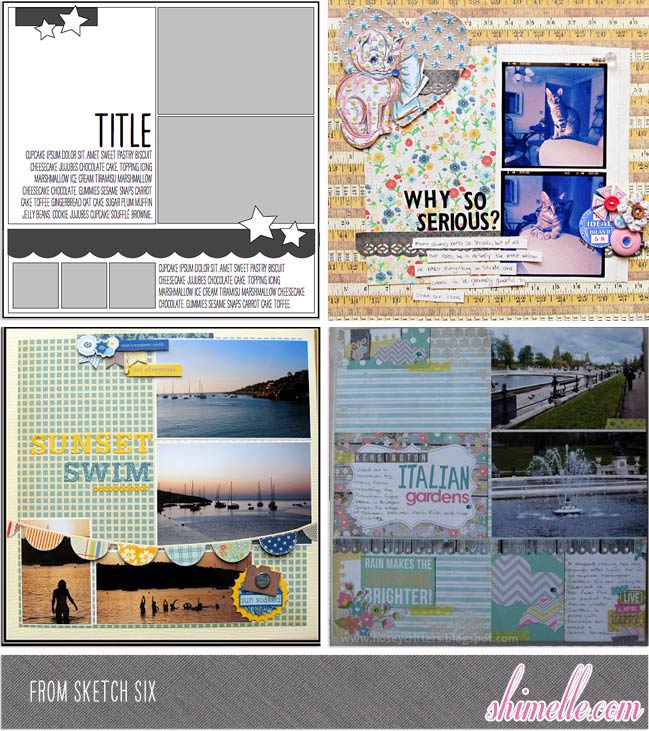
Sketch six (Adapting a Page Sketch for Project Life) is much more elaborate than the previous sketch, which resulted in more detailed layouts.

The colours on Christy’s layout are gorgeous! This is a great example of a page that keeps the focus on the photos, but still has a sense of fun with the theme. Kate Taylor took on a very different perspective of the “
sketch. Her page uses the style of a divided page protector and keeps things blocked away in tidy, even portions of the page. The Simple Stories papers are a great choice for this, and I like how the embellishment appears in a large triangle along the edge of the page. The last page takes a very similar theme, but showcases it in such a different style. Kerry’s layout has s a very sophisticated look, with more open space in the background. The choice to separate the four photos works really well as there are really two different styles of picture here. I think I would have been tempted to put them on separate layouts, but this design proves they can work really well on the same page.

Thank you for joining me this week and please, keep your responses coming in! Take a look here at all the sketches you can still work on. I hope they inspire you to get crafty.

Happy Scrapping!

Five Ways to use a Grid Design by Jennifer Hufford

Five Ways to use a Grid Design by Jennifer Hufford @ shimelle.com
One of my go-to designs is the grid design. It’s a super easy way to design any project or layout. Many may think a grid is basic, but I find it to be very versatile.
Today I am going to give you five different ways to use a grid design in your Scrapbooking.

Five Ways to use a Grid Design by Jennifer Hufford @ shimelle.com

Use a Grid in the Background
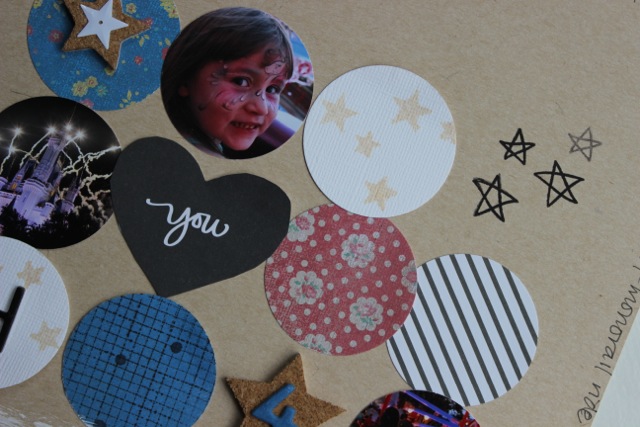
A grid design does not need to be front and center in your project. Use it in the background to create a solid foundation for your design. In this layout I used a punched circle mask and painted a circle grid in the background. I then layered my photo and bits and pieces of papers and embellishments over the grid.

Five Ways to use a Grid Design by Jennifer Hufford @ shimelle.com

Use Pattern Paper
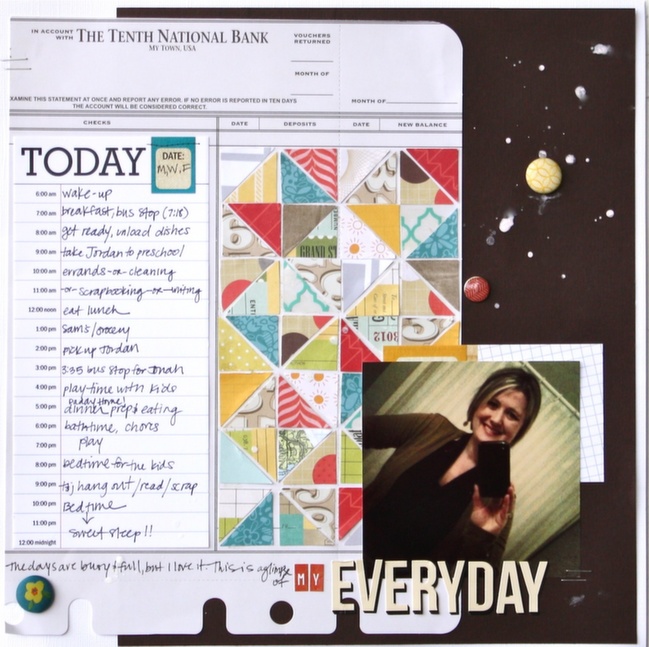
One simple way to create a layout with a grid is to use pattern paper as your grid design. Don’t always think of a grid as something that is perfectly symmetrical. In this layout I created a grid with my papers by punching the pattern paper in squares, then trimming into triangles. The pattern was then created by putting the triangle pieces together in a square and diamond design.

Five Ways to use a Grid Design by Jennifer Hufford @ shimelle.com

Pair with an Enlarged Photo
Recently I have enjoyed pairing an enlarged photo with a grid in a two page design. The enlargement offers a wonderful focal point for your layout. The grid balances the enlargement with smaller items and details.

Five Ways to use a Grid Design by Jennifer Hufford @ shimelle.com

Include Photos Within your Grid
In this layout example I once again used a grid as a part of the foundation, or background of my layout, but I was also able to squeeze in three more photos in my layout by placing them as part of my grid design. A grid design is a perfect way to add multiple photos within your layout!

Five Ways to use a Grid Design by Jennifer Hufford @ shimelle.com

Project Life
What could be more perfect for a grid design than a system all-ready set up with grid-style pockets? These pocketed pages are a perfect way to complement a layout in your album. I filled my pocket pages with memorabilia and photos to complement my layout.

I hope these 5 layouts inspire you to create with a grid design today!


Jenni Hufford lives in Indianapolis, IN and is married to Todd. She is a stay at home mother to Jonah James and Jordan Nicole. Jenni enjoys applying the creative aspect of scrapbooking into every day activities with her family. Currently, Jenni is a Blog Contributor for Project Life at Elle’s Studio, and is a Jenni Bowlin Studios Ambassador. You can learn more about Jenni on her blog at the Hufford House

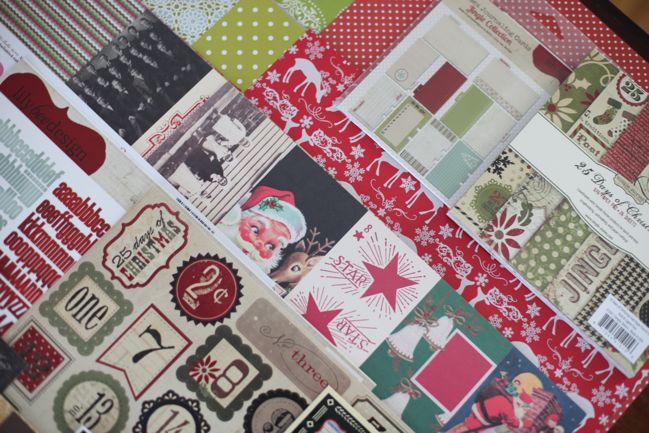
Reserve your Christmas in a Box scrapbooking kit for 2013

christmas scrapbooking supplies
Yes, I know it’s July.
Yes, I know those are supplies from last Christmas.
Hear me out anyway.

This week is the summer trade show for the craft industry in the US, and that’s when all the new Christmas collections are debuted and I order supplies for what will become the annual Christmas in a Box scrapbooking kit!

I’ve been offering Christmas kits (called Christmas in a Box) to UK addresses for the past six years or so, and for the last two years I worked with Two Peas to also be able to offer the same supplies from their shop, shipping to anywhere in the world. That will continue this year. Every year the UK supply of these kits sold out on the first day, so last year I introduced a deposit and reserve system that worked pretty well. This year I will do the same, and I have a version for both UK and rest of world addresses. The two work in different ways, so please read the details that apply to you before clicking to reserve.

For shipping addresses in the UK: if you would be ordering to a UK address and would like to reserve a kit, you can do so by paying a £5 deposit today. Kits will ship around the first of November (earlier if possible – manufacturers’ shipping dates are an important part of picking what will go in the kits). The £5 will be deducted from the total price of your kit. In past years, the kits have been priced at £40 to £45, including first class postage, and that is the same price range I will use this year: it will be no less than £40 and no more than £45, including first class post to a UK address. So you would simply pay £5 now to guarantee your kit, then the £35 to £40 balance will be due when the kit is ready to ship to you. If you choose not to pay the remaining balance for your kit, the £5 will not be refunded and you will not receive the kit, but that’s all: no further action will be taken.

That’s exactly as I ran things last year and for 2013, I’m adding just one change to that: a set time in which you need to pay before your box will go back up for sale. The only snag I had on this project last year was a handful of boxes that were reserved but not paid in full despite several claims that they would be paid any day. I totally know what it’s like to try to manage a crafty treat for yourself when the budget is tight, so I kept letting those days go by… but in the end those boxes were never paid for and I found myself with Christmas boxes in January, which are not really a hot item. Also, there is no room here for these boxes to stick around! So here is what I think is fair: you will get ten days from the first invoice to pay the balance. I’ll email at least two more reminders before the tenth day. On day eleven, I’m going to go ahead and list those boxes for sale at the full price. If you don’t feel that is fair, don’t reserve a kit. I’m hoping that seems pretty sensible and fair.

christmas scrapbooking supplies
and those supplies are from Christmas 2011.

For shipping addresses in the US and rest of world: your kit will be fulfilled by Two Peas in a Bucket, and like the Best of Both Worlds kits, you’ll have the freedom to make some changes if you would like. But the most important thing for us to get the numbers right, so we don’t vastly underestimate how many scrappers would like a kit. To gauge that number, I’m offering a deposit on this too, but it will work a little differently. Unfortunately, with the flexible kit structure, I cannot guarantee every item to every person, because everyone is free to increase the quantities on items they like. So instead of a deposit that goes to a credit, your deposit will be returned to you via a Two Peas gift certificate. You’ll pay a $5 deposit now, and you’ll receive a $5 gift certificate before the kit goes live. You’ll also get an email with a heads up of when the kit will be live to order, and this way we can make sure that each item on the shopping list has more stock than the number of people who have paid that deposit. There may be minor differences between the US and UK kits – each year there has been one or two little items that wouldn’t arrive to another country on time, etc, and I just made little changes to find something very, very close that could get there on time.

To be very transparent about where your money is going between now and November: you’re paying your $5 deposit to shimelle.com, and when the kit is ready, I will send you a $5 gift certificate to spend at Two Peas. If you decide you don’t like the kit, you’re free to spend that $5 on anything you want at Two Peas, and if that means you want to spend it later in the new year, you’re welcome to do that. The gift certificate does not cancel out any discount codes or loyalty discounts, so you can still use the free US shipping code, etc. Just know your $5 will be sent back to you as a gift certificate, not cash, and as you’re sending the deposit to shimelle.com, you’ll need to contact me if there is a problem between now and then, not Two Peas customer service. You can reach me by email any time (shimelle at gmail dot com).

Yes, I definitely realise it’s a bit different to consider paying a deposit to reserve a kit sight unseen, and by no means do I feel you have to do that! There will be a very (very!) limited number of kits further available to UK addresses at the time should you wish to see the kit in full. Or there is the option of ordering the kit contents from Two Peas, which requires no deposit (and Two Peas ships internationally). It’s totally up to you which option is best.

To get an idea of the value of scrapbooking supplies packed into the kits, you can see kits from 2012 and 2011 as examples. There will be a similar balance: plenty of paper, letter stickers in a range of sizes, versatile pieces for layering and writing, quick-to-use embellishments and pieces with dimension. The kit does not include an album and can be used easily for different sizes of scrapbook, from a tiny mini album to a full 12×12 book. I always look to create a kit that can be used to the very end, so instead of everything being loudly Christmas in nature, you’ll find Christmas prints with simpler b-side prints (polka dots, stripes, ledgers) and elements that are Christmas in colour rather than pattern, so you can easily use those papers for non-Christmas projects by mixing and matching with other elements from your stash.

You don’t need to participate in Journal your Christmas to purchase the kit, and the kit is not required to participate in Journal your Christmas. It’s just for fun, and it can be a great way to treat yourself to a lovely mix of brand new products for Christmas crafting when the calendar is extra busy with holiday celebration leaving you little time to shop. In case it’s not obvious, Journal your Christmas will run again this year. It had a big refresh last year and will have a few smaller updates this year, and you can sign up at any time and have access to all the materials from previous years. (Rest assured, all previous participants are still welcome to join in at no extra cost.)

Okay, I think that is everything! Please be sure to select the right deposit – £5 for UK addresses, $5 for anywhere else in the world. It will get really messy if you click the wrong one, so please triple check!

Reservations will close at the end of this Saturday, 27th July 2013.
Reservations have now closed. Thank you!

Origami Arrows:: A Scrapbook Tutorial by Marcy Penner

Origami Arrows:: A Scrapbook Tutorial by Marcy Penner @ shimelle.com

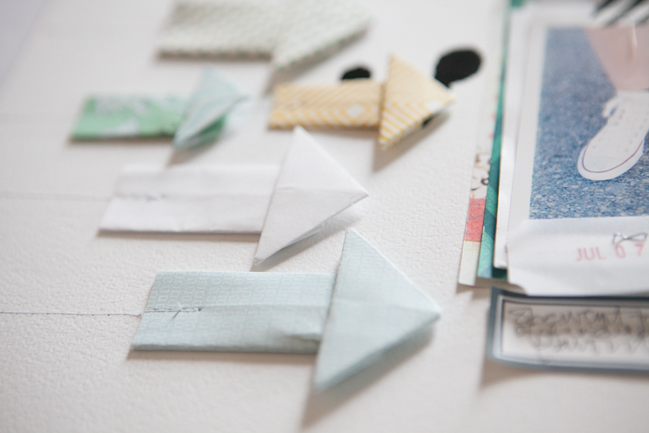
I love using arrows on my projects. There’s nothing like an arrow to highlight something on your page and add emphasis. They’re even perfect as a subtle accent. They work for any theme and are super versatile. They’re truly a workhorse.
I wanted to put a spin on the everyday arrow for this tutorial. Origami arrows, with their added dimension, are the perfect little twist to this favorite embellishment.

Origami Arrows:: A Scrapbook Tutorial by Marcy Penner @ shimelle.com

Origami Arrows:: A Scrapbook Tutorial by Marcy Penner @ shimelle.com

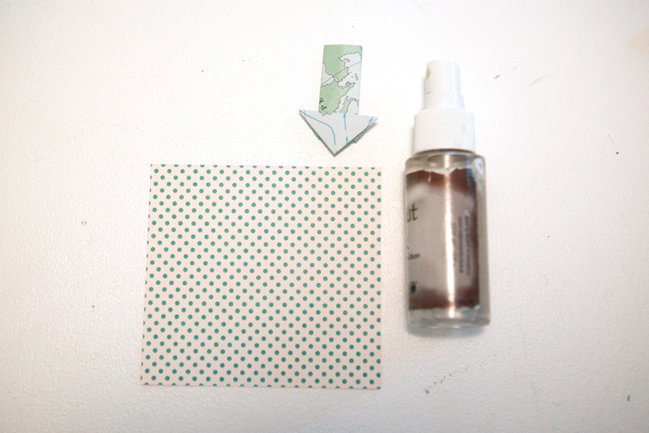
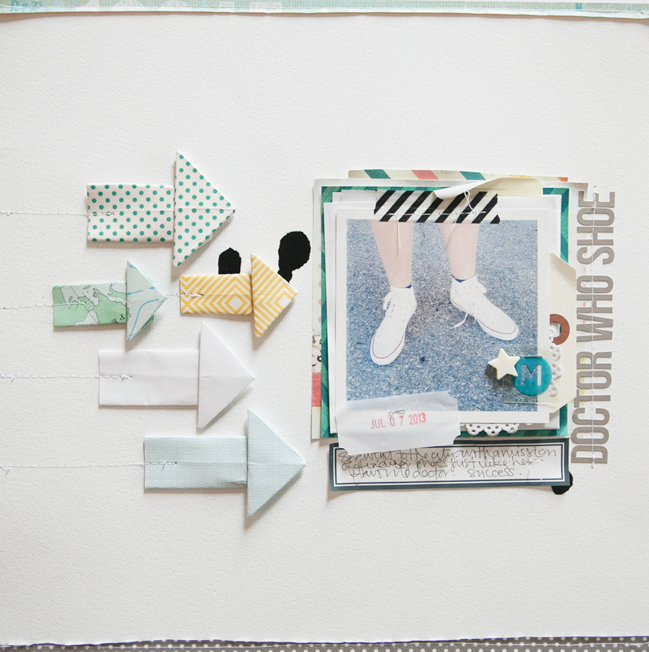
Trim your paper into 3×3 or 4×4 squares. I used both on this layout.
Note: If you’re using origami paper or copy paper you can skip this step.
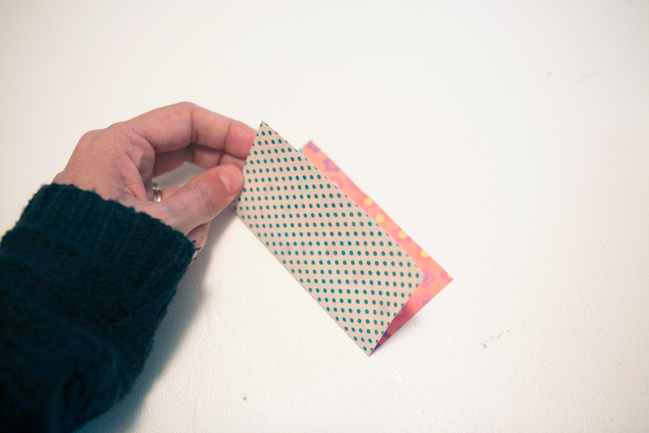
Lightly mist your patterned paper with water. This will make it easier to fold. I misted both the front and back with three spritzes each. Start by folding your square in half. This fold will make a folded line going through the center of your finished arrow. If you do not want this line in your finished product then just fold a tiny bit in the center.

Origami Arrows:: A Scrapbook Tutorial by Marcy Penner @ shimelle.com

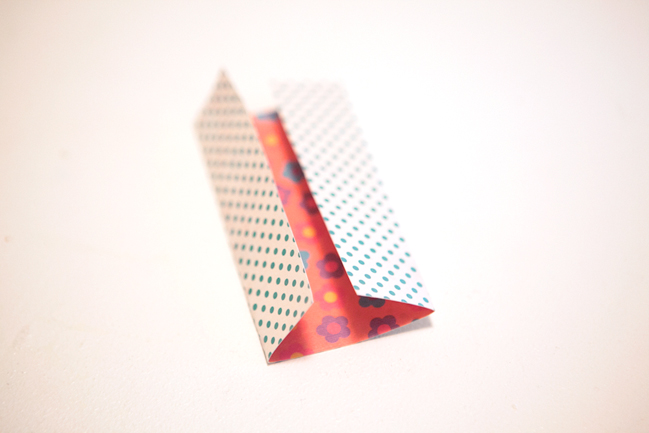
Open your paper back up. Fold the outside edges in so they meet on the folded line you just made.

Origami Arrows:: A Scrapbook Tutorial by Marcy Penner @ shimelle.com

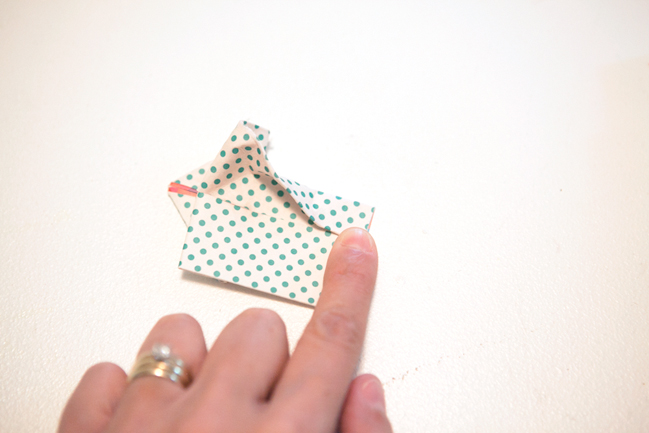
Now take the outside corners and fold them in to the center to make a tip.

Origami Arrows:: A Scrapbook Tutorial by Marcy Penner @ shimelle.com

Origami Arrows:: A Scrapbook Tutorial by Marcy Penner @ shimelle.com

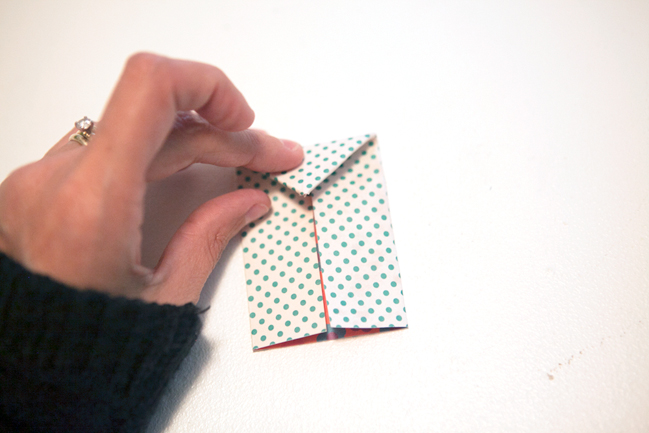
Fold over this entire triangle you just made.
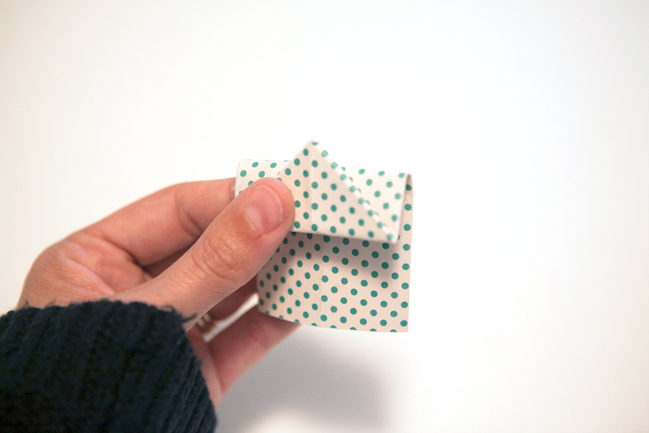
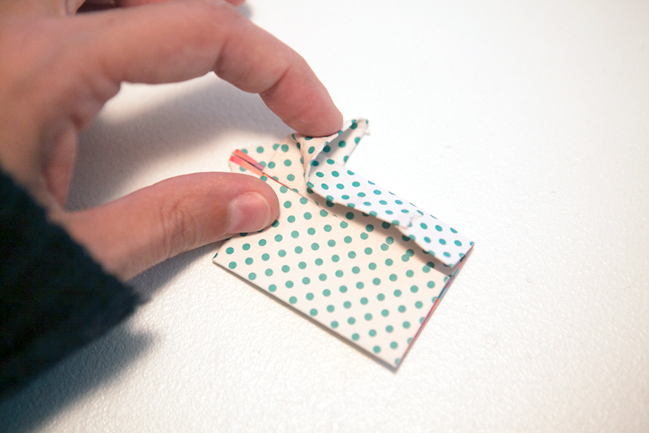
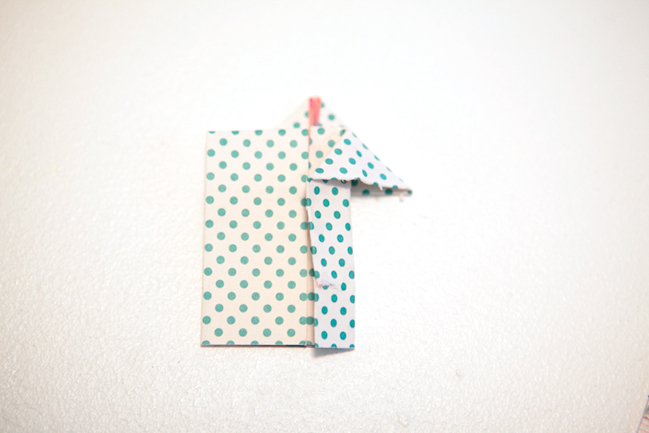
Flip your paper over and fold the large rectangular portion of your paper over so that it reveals about half of your little triangle. Here’s a view from the front and the back.

Origami Arrows:: A Scrapbook Tutorial by Marcy Penner @ shimelle.com

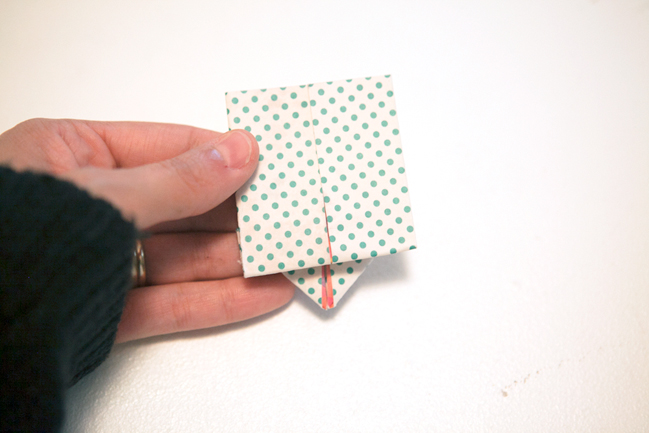
Now turn your shape over so that you’re looking at the back side… the side that shown in the last image. Take the bottom corners and start folding them inward to the center.

Origami Arrows:: A Scrapbook Tutorial by Marcy Penner @ shimelle.com

Origami Arrows:: A Scrapbook Tutorial by Marcy Penner @ shimelle.com

As you do this, find the opening in the sides of the flaps and use your fingers to spread it flat as you fold. Do this on both sides. Flip your arrow over. It’s done!
Feel free to use a glue dot to keep the arrow closed, especially if you’re doing this with patterned paper.

Origami Arrows:: A Scrapbook Tutorial by Marcy Penner @ shimelle.com

I love the extra dimension they add to my page. Sure, I’ll continue to use my punched paper arrows and my stash of arrow stickers, but it was fun to learn something new and incorporate it on my projects.

Now I’m wondering what an arrow folded with vellum would look like! Or maybe one made with watercolored paper. Guess I’ve got some folding to do.


Marcy is a self-proclaimed simple girl. She is married to her high school sweetheart and they have three kids. For the last 12 years they’ve been living on the family farm, homeschooling two of their three kids and renovating a 120 year old farmhouse in Canada. Yes. Still renovating! She’s a major homebody so country life is a great fit for her!
Back in the day she earned her Bachelor of Education degree, but an artistic life has always been calling her name. She’s always busy doing something creative, photography (sometimes shooting others, but enjoying shooting her own family the most), scrapbooking, decorating… you name it! She loves that scrapbooking combines so many of her hobbies into one! It’s the perfect fit.

You can find Marcy at her blog, Hello Forever , and hanging out on Twitter and Instagram. She also design for Studio Calico and is a Garden Girl over at Two Peas in a Bucket.

Gardeners' Digest scrapbooking blog hop (July 2013)

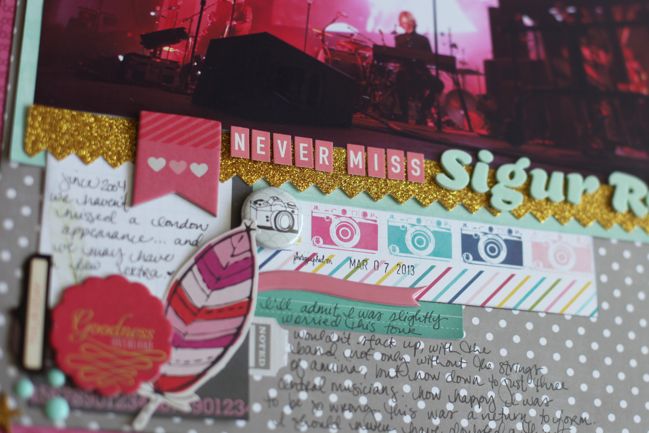
scrapbook page by shimelle laine @ shimelle.com
Welcome to the July Gardeners’ Digest, with updates from the Garden Girls! Since last month, Glitter Girl has been on several new adventures, covering scrapbooking panoramic photos, adding stamps to your journaling, creating title pages for albums, and using map prints without travel photos.


Here’s a look at Glitter Girl’s latest adventure, and you can find her new video weekly here at Two Peas. Are you up for her scraplift-yourself challenge?


This month one of my favourite projects in the garden is by Jen Kinkade. I had to pick her bespectacled project in the Scrap your Stash series! As a girl with glasses, I’m loving this trend. Unfortunately it does make me want to shop for funky new frames all the time and glasses are significantly more expensive than paper and stamps! Guess I’ll have to settle for new frames on my pages but maybe not on my face. See more of Jen’s project here.

scrapbooking supplies
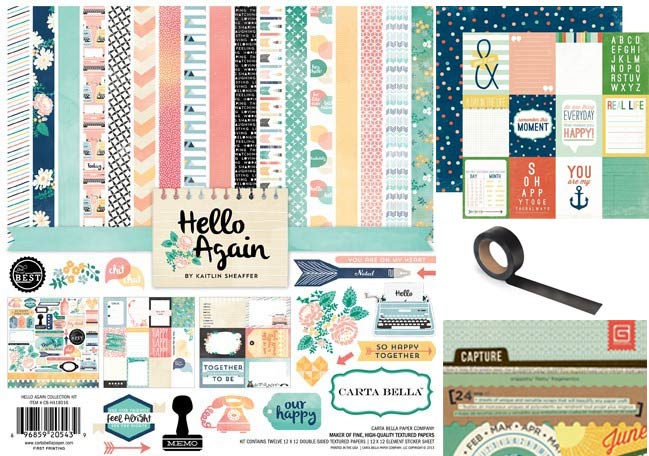
With it being CHA week, new products will start to arrive in the droves next month! But there are a few new things at Two Peas this July that have caught my eye. First up is the Hello Again collection by Carta Bella. It’s designed by Kaitlin Sheaffer, the lovely lady behind Ormolu designs, and I’m excited to use that style in paper form! Some other new picks that have jumped into my cart include this cut apart sheet by Echo Park, chalk tape by Fancy Pants, and plenty of new items from BasicGrey’s Capture and Carte Postale collections.

scrapbooking workshop by celine navarro
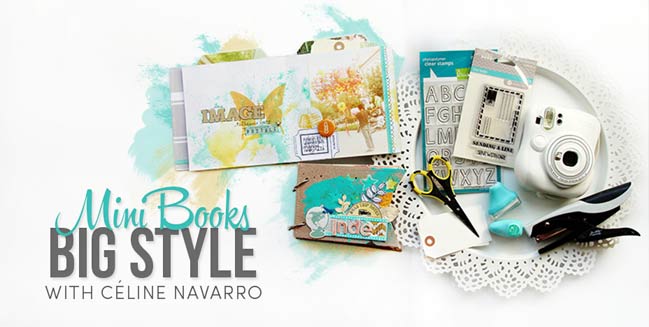
Want a little more scrapping inspiration? One comment left on this post by the end of the month will receive a class pass to Celine’s new Two Peas workshop, Mini Books, Big Style. (You can see the full workshop details through that link.) This workshop includes minibooks and technique videos to break down Celine’s gorgeous mixed-media style. Although it’s designed for mini books, you can definitely use what you learn in this workshop on your standard pages too. No need to wait to see if you’ve won- if the winner has already purchased the workshop, the class fee will be refunded. Make sure you include a valid address in the email box when you leave your comment, and your Two Peas username would be a great help too, though not a strict requirement. Good luck!

I’m the last stop on the hop today, so you can jump to Paige to find the beginning and follow right on through to see what the Garden Girls have to share with you! Enjoy! And you can find the full list of links on the Two Peas blog.

Gardeners' Digest :: Scrapbooking News from the Garden Girls
Gardeners’ Digest is a monthly update from the Garden Girls, the design team at Two Peas in a Bucket. To keep up with the Garden Girls throughout the month, check out the garden gallery any time!

What You've Been Making!

What You've Been Making @ shimelle.com
Time to take another look back at what you’ve been making in response to some of the 2013 sketches. Today we’re going right back to some designs from January, with Two Photos in Quadrants and Scrapbooking with Square Print Photos.

Continuing from last week, let’s start with the third sketch challenge, Two Photos in Quadrants . Looking at the sketch, it is quite simple. However, sometimes that’s the best way as it gives you more freedom to add little embellishments and really show off your photos! In Lori’s layout I love that she has sneakily added in more photos but kept to the overall photo size. It doesn’t look overcrowded, which I think it shows that you can have fun with a simple sketch and turn it into something truly creative. The choice of colours in Tilla’s layout is so lovely. The blue in the photos look so vibrant amongst all the browns, with just the right amount of contrast. I feel like I can really capture the beauty of her holiday from this layout. Unlike the other two, HokieCoyote’s Layout is digital. I like how the background is more sparse, which makes the photos the main focus and you turn to the journaling to see what it’s all about! I love that your eyes sweep across the page, as it tells you the story.

If you’d like to take a look at even more pages from this sketch, then have a look here.

What You've Been Making @ shimelle.com
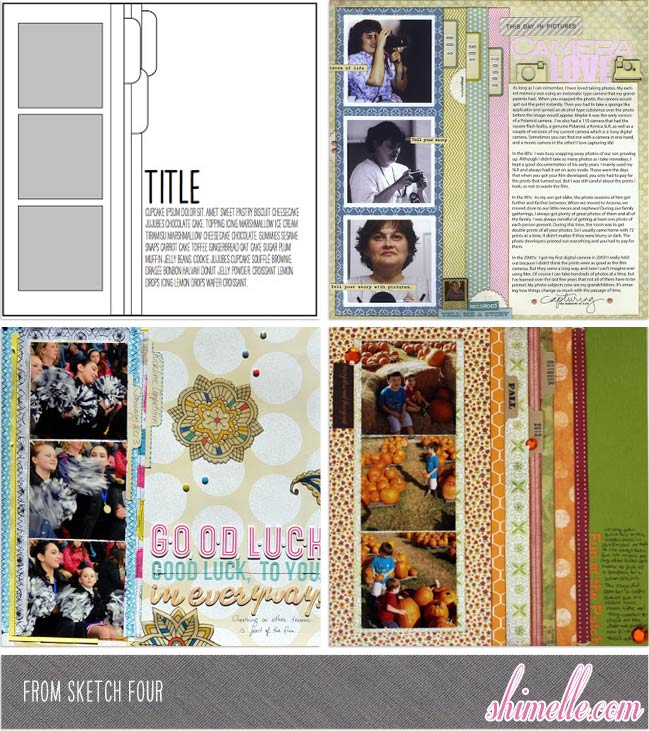
The fourth sketch is quite a contrast to the previous sketch as photos had more focus whereas this time you had more room to journal and add embellishments.

Don’t you think the little photo boxes look like a strip of film negatives? I didn’t even think of that when I drew the sketch, and now it’s all I see. I get the feeling that Debbie had the same thinking when it came to her layout. When you read through her journaling, you notice that the pictures & the writing on the little tabs all match as you go along. It’s a wonderful use of design elements to help tell a story. In Leanne’s layout, she’s made the sketch spread across the page and let more of the photos do the talking, as it were, rather than a big amount of journaling. Maya’s layout has many added elements to it such as the zig-zag stitching and layered patterned paper, making it very colourful. I like Maya’s layering, making you feel like you could lift up those tabs, revealing some hidden journaling. The dots between the letters are a great touch here, a mix of both cute and purposeful so as you’re reading, you’re joining in the cheerleading!

It’s great seeing how different all the finished pages can be when it comes to a sketch and remember, if you wish to look at the other wonderfully creative responses, you can find them here.

It’s been great looking through all your layouts and I hope you can take something away from them! If you’ve been inspired to do some scrapping, four new sketches got put up last week, so if you wish for your work to be featured on ‘What You’ve Been Making’ you have three more weeks to submit your layouts. Find all the scrapbooking sketches here.

Happy scrapping!