Happy (inter)National Scrapbooking Day! Time to get started with challenges and sharing new scrapbook pages! First off, we’re looking for texture. Instead of just paper and stickers, throw some fabric or lace into the mix and see how it works for you.
Stitch it, pin it, staple it, or just glue it, but see how these textile textures work alongside your favourite papers and photos for a bit of contrast.
Fabric pieces on layouts don’t need to be an overwhelming focus. The hot pink dot pattern to the bottom left and right side of this layout are small fabric remnants, and just the small detail of a few loose threads and a softer texture makes for a twist to the layering without creating a page that is sewing-machine-themed from start to finish.
For a second idea to get you started, guest artist Karla Der goes with lace!
This is a photo of my little girl when she was just a few months old and beginning to give big smiles. I just love how the rays of sunshine worked so perfectly behind her.
I printed these photos on a 4×6 print and then cut it down the middle to make it look like a photo strip. I didn’t want a mat around the photo, but I wanted to separate it from the paper and give it a softer look. I used two types of lace trim and layered them behind the photo strips. The paper is from Crate Paper Notes and Things. The embellishments are a mix of Shimelle’s Starshine and True Stories, Evalicious and Maggie Holmes.
-Karla
The above posted with much irony. I am not feeling very hip or fancy or cool lately! But it doesn’t mean I’m not still having fun. Today I packed a lunch with everything except the broccoli cut into the shape of train cars. That is totally the definition of cool, right? I should scrapbook train shaped sandwiches. That would take it to a whole new level of cool.
But what I’m really meant to draw your attention to is not the ‘cool’ of it all but that big arrow! I challenge you this week to scrapbook with arrows. Arrows with stamps, die cuts, patterned paper, stickers, chipboard, or paperclips, perhaps! Everything else is completely up to you, so you can take your inspiration in any direction you like!
A few years ago, Marcy Penner shared this tutorial for creating arrows from patterned paper scraps, and there’s also this sketch and video in the archives, if that helps you get to the point with your page design. But for brand new inspiration for this week’s challenge, take a look at these examples from contributing designer Heather Leopard and guest artist Mandi Holmes.
Bryan and I recently went to Santorini, Greece as part of our anniversary trip. One of the most memorable things we did was ride donkeys down the Caldera cliff to the dock and back up again. The cable cars were not operating out so we figured we’d be adventurous. Because it is a very treacherous cliff, it meanders back and forth across the mountain. I thought it would be fun to tell that story not just with the pictures and words but also through the design of my arrow.
I designed it so that it leads you back and forth up to the top. I wanted the arrow to lead to the photo and then I included another “Is this for real?” arrow to lead to the photos, then another arrow pointing to the top of the cliff. I rounded it out by including a small film strip of other memorable photos from the ride.
- Heather
I created this page because I have a love with old buildings and items that were once popular. I love capturing these moments in a scrapbook page because it helps keep their history alive.
For the journaling on this page I wanted to have it hidden since there were a lot of facts about the windmill. That gave me a good place to start with the arrows, and I stitched one to point toward the hidden journaling and make it a bit more obvious so it can be read. Then a second stitched arrow points to another important element on the page – the photographs!
- Mandi
You have a week to complete the challenge and share a link – but of course you’re welcome to set your own time schedule. Whatever keeps you happy and creative!
Today’s Guest Artist: Mandi Holmes loves cooking, doilies, and coffee. You can find more from Mandi on Instagram, Facebook, and her blog.
I’m a firm believer that we all have our own unique blend of why we scrapbook. For some it is 95% about the photos and 5% about trying new stamps. For others it is 33.3% a love of pretty paper, 33.3% a love of pretty photos, and 33.3% a love of a little quiet time not to worry about much else in the entire world. And as much as I love the pretty paper and as much as I love the pretty photographs, my personal blend weighs very heavy on the writing. Sometimes it’s a lot and sometimes it’s just a little, but for me, the journaling is what makes it part of a bigger story I tell page by page, and that makes me a collector of ways I can incorporate those words on my pages when there are times I don’t really fancy just adding a journaling box or some lines.
Here’s a case in point: a tutorial Kirsty Smith shared here many moons ago. It’s such a favourite of mine that I’m bringing it back this week specifically for this challenge.
I challenge you this week to make journaling the heart of your scrapbook page, taking inspiration from Kirsty’s tutorial. The subject matter and how you take the inspiration is completely up to you, so you can go in any direction you like! To get you started on this week’s challenge, take a look at these examples from contributing designer Leigh Ann Odynski and guest artist Mari Clarke. As a bonus, both have shared videos of their process today!
Taking inspiration from Kirsty Smith and her layout with “How to hide journaling in plain sight”, I wanted to use the journaling as a design element on the page. Typically, I add the journaling into the design already on the page and size it to fit on my computer, then print it on my home printer. This time, I thought about how I could still stay true to my style, but incorporate the journaling in a more unique way, thinking about the journaling at the beginning of the process rather than near the end. That’s how I came up with the little labels stitched to the bottom of the page. The EK Success label punch made quick work of punching out all those little journaling boxes.
The next portion of this teen layout came about really quickly once I found this free cell phone cut file from Scrapbook and Cards Today Magazine. What goes together better than teens and cell phones? After I chose a variety of patterns from the Shimelle Starshine line – I used 12 in all – I cut the shadow from the patterned papers and the cover in white. Added a vellum “screen” for the phone and they look so cute!
Next, you can add vellum, transparency, or printed cellophane like this one from Heidi Swapp, under the die cuts at the top of the page for added texture and interest.
Then, you can add more patterned papers under your photo to tie in all the color at the top of the page. It was so much fun adding in different layers of embellishments with the Shimelle stickers, wood buttons, enamel shapes, epoxy paper clips, and cardstock and acetate pieces from the die-cut pack.
My focus for this layout was teen life now, so the title “Life @ 17” came to mind. All the little journaling labels tie in with facts about life and technology, and facts from the US Census Bureau on US households and computer and internet use. Use your country’s stats to personalize your page, and have a go at this fun challenge! You can capture this moment in time for your teen, and wouldn’t you love to have a page like this from your teen years, or your parents’ teens? What a different set of pages they would be!
Thank you for stopping by today, and enjoy the rest of your day!
- Leigh Ann
I love to scrapbook using photos of my son and daughter when they were teenagers. They were such fun years, and I love to document the stories of those days so we won’t forget the details. Teenagers can be very sensitive when it comes to what parents share about them. When I was creating this layout, I chose to keep the majority of the journaling hidden to ensure that the big story would remain a mystery when first glancing at the layout.
The ‘hidden in plain sight’ technique from Kirsty was just right for this page, and something that was refreshing to try without being difficult or time-consuming.
The journaling is handwritten on 12×12 white cardstock; I then placed a piece of vellum over the journaling and created the rest of the layout on the vellum overlay. I secured the vellum to the cardstock with a paperclip from the Starshine collection. Just remove the paperclip and slide the journaling out to read the details. The floral washi tape from Starshine made for a beautiful but super easy detail to divide the page and add colour.
- Mari
You have a week to complete the challenge and share a link – but of course you’re welcome to set your own time schedule. Whatever keeps you happy and creative!
Today’s Guest Artist: Mari Clarke loves creating, teaching, and drinking lattes in the sunshine. You can find more from Mari on Instagram, YouTube, and her blog.
After beautiful sunshine this weekend, there is a sky filled with clouds over my house this morning and it feels just about perfect to make some coffee, put on some music and do one of two things: read a good book… or scrapbook. Of course. Shall we have a challenge this week to combine those two things?
This week, I challenge you this week to scrapbook about books or reading. Go specifically to your favourite book or journal about a wider scope like books you’ve read over the years. Everything else is completely up to you, so you can take your inspiration in any direction you like! A few years ago, Glitter Girl created a few pages for my Harry Potter album, and there is much Alice influence in my albums too! To get you started on this week’s challenge, take a look at these examples from contributing designer Gina Lideros and guest artist Tanya Hubbard.
Quality time to myself is a big deal in my household, so I decided to scrapbook about a special moment that is sacred to me – coffee and books. When my children were younger we had a local book store that we were at every weekend – sometimes multiple times a week – and I would grab my favorite coffee while they grabbed their favorite books. I would often get lost in the books and the stories that they told. I always looked forward to a couple of moments of peace. Sometimes it was my only peace at the time because my children were little and my husband was deployed.
Using my Silhouette software, I used a floral background available at Just Nick. I backed each flower with a different piece of patterned paper and then adhered them onto background paper (Hubble, part of the Starshine collection) I then added bits of spray mist, my photo, and journaling. Pieces from the Shimelle True Stories and original collection were used as well to help bring my layout to life.
- Gina
I love the theme for this week, a favourite book. I do feel I might have stretched it a little by going with my favourite author, Terry Pratchett but I do love all of his books, so it fits. I have had in my stash a number of Shimelle’s elements from her first collection and thought this was the ideal opportunity to use them and when I looked through her sticker book, I knew immediately what I wanted to do.
I love long titles and working premade elements into them, so Shimelle’s word stickers were perfect to tie in my love of reading and getting lost in a book with my love for creating scrapbook layouts, a win-win all round.
- Tanya
You have a week to complete the challenge and share a link – but of course you’re welcome to set your own time schedule. Whatever keeps you happy and creative!
Today’s Guest Artist: Tanya Hubbard loves cats, scrapbooking, and her family (not necessarily in that order). You can find more from Tanya on Youtube.
This page is a bit of a blast from the past! It’s a design I’ve been meaning to come back to lately in terms of birthdays, as a certain small person in this household has one of those coming up later this week! I’d love to take this idea of journaling by numbers and instead of documenting just one evening, document a longer time frame, like possibly two whole years of milestones on one page. Could that fit? And more importantly: could I use a massive stack of number stickers?
This week I challenge you this week to scrapbook with numbers. Create a new scrapbook page that highlights numbers as a significant part of the design, be it in the patterned paper, the title, the journaling, or the shapes on the page. Everything else is completely up to you, so you can take your inspiration in any direction you like! To get you started on this week’s challenge, take a look at these examples from contributing designer Heather Leopard and guest artist Chris Robertson.
It’s a big deal when it comes to turning double digits so I decided to go big with this layout. I have a couple of goals with this page: 1. document how my little girl still makes wishes even though she was turning 10 and 2. include a space to include either 10 things she’s into or a space for me to write my thoughts, wishes and feelings for this little girl.
_Using my Silhouette software, I mocked up the size and placement of the numbers and words to make sure that I could get the numbers as large as possible. I used a font that has the middle of the “0” cut out but you could also cut your photo and place it on top. I then cut little strips of paper and added them to the outside edge, overlapping here and there. Once that was all complete, I stitched them to the paper. The next step was to cut the title and add confetti, using pattern paper circles and mist. Last but not least, I added journaling strips to the section of the “0” that is opposite the photo. Now I just have to decide if I write my wished for her or if I quiz her about her wishes and dreams for her future. You can see more photos of this process on my blog
- Heather
Birthdays are so much fun to scrapbook! I love the fact that all my glittery numbers reinforce the milestone birthday that my daughter was celebrating at the time. When I started to work on this page I wanted each of the special number clusters to resemble the colorful balloons we had for this super fun celebration.
The balloons were a great sparky addition to the day so I thought the glittery numbers would always remind me of that. All the supplies used to create the layout are from Close to My Heart.
- Chris
You have a week to complete the challenge and share a link – but of course you’re welcome to set your own time schedule. Whatever keeps you happy and creative!
If you’re looking for the new class information, that will be posted here later today. Thanks!
Today’s Guest Artist: Chris Robertson loves, her family, photography, and paper crafting. You can find more from Chris on Instagram, Pinterest, and her blog.
Okay, I hear you: last week’s challenge was not the easiest… but it was so much fun to see those pages appear with that familiar embellishment placement yet each page looking completely unique! How about we go a little simpler this time though? And it gives me an excuse to repost this layout that is years old and inspired by a layout a decade older than that, and yet it still makes me smile with one of my favourite colour combinations and that little pocket trick that means there’s no need at all to spend time getting everything just so in an embellishment cluster, because it’s just going to move when you turn the page anyway!
And now, on to the challenge! This week you need to look for something specific in your stash. I challenge you this week to scrapbook with vellum! Use a lot or a little; plain or patterned – whatever you have on hand. Everything else is completely up to you, so you can take your inspiration in any direction you like! A few years ago, my sparkly friend shared a video on this topic, if that’s helpful! To get you started on this week’s challenge, take a look at these examples from contributing designer Nicole Nowosad and guest artist Jen Schow.
Vellum adds such a soft touch to a project. I love combining vellum over patterned paper to create a completely different look, or even using it on it’s own in replacement of patterned paper. I did both on my project to create a fresh and easy layered look by using some yellow vellum on my project.
I trimmed some of the clouds from the Shimelle vellum paper, and to hide the adhesive, I added some buttons and glitter heart so the adhesive has a place to hide behind it!
- Nicole
I love the softness and depth that vellum adds to a layout, and a baby layout? Even better. I paired up the Shimelle Starshine collection (and bits from True Stories as well) with some of the new Crate Paper Little You collection and I love the way these two collections work together. I knew I wanted to use the constellation paper for a background the minute I saw it, but sometimes dark papers are hard for me to use as a full sheet.
Enter vellum. It softens it up just enough, but you can still see the stars shining through. I cut some clouds from the Starshine 6×6 paper pad and layered them on top of and underneath the vellum and I love the depth that creates. You can watch the whole thing come together in my process video.
You have a week to complete the challenge and share a link – but of course you’re welcome to set your own time schedule. Whatever keeps you happy and creative!
Today’s Guest Artist: Jen Schow loves pretty paper, taking photos, and putting together puzzles. You can find more from Jen on Instagram, YouTube, and her blog.
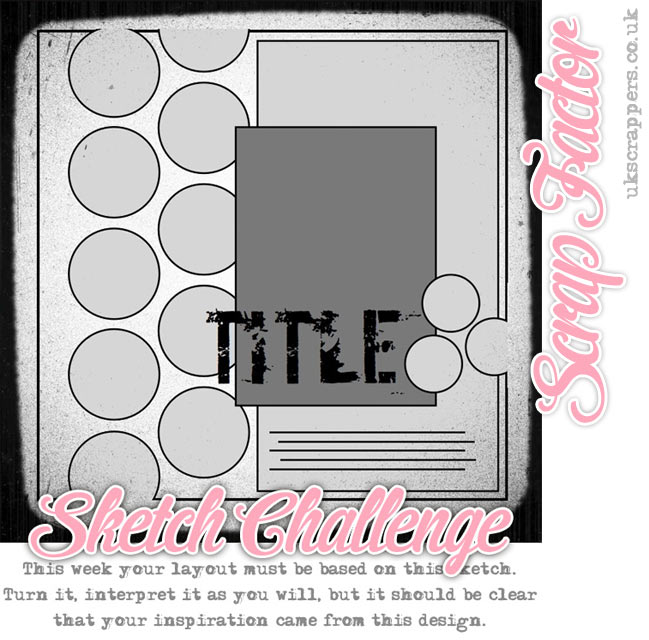
The loveliness of sketches: use them once, use them twice, use them a dozen times and still come up with something that looks new while completely eliminating that phase of creating when we just push paper around on a desk wondering where all the pieces should go. This week’s challenge is a throw back to one of my favourites of all the sketches I’ve ever posted here over the years. It made me giddy to see two people take it on for today, so I’m very excited to see you give a try!
I challenge you this week to scrapbook with this page sketch. You can see the full layout, along with a process video, from my original try with this sketch here. To get you started on this week’s challenge, take a look at these examples from contributing designer Sheena Rowlands and guest artist Irit Landgraf.
I find sketches are a really useful way to kick start my mojo. I was instantly drawn to the circles on the left side of this sketch and decided to make them the feature of my page.
I chose a photo of my daughter as a bridesmaid at my brother’s wedding last year so I felt flowers would be perfect to cascade down the side. They are hand sewn using embroidery floss and decorated with sequins. I picked out some of the pink papers from the Starshine collection plus a couple from True Stories to create a soft feminine page. I added a cluster of embellishments, cut title, and journaling tag to complete the page.
- Sheena
Thanks to the sketch, this layout came together really fast. I wanted to use some stickers and rub ons from Shimelle’s first collection. I love the images, the cupcake, tea cups, and vintage cameras, but larger embellishments can be tricky to use.
The circles in the sketch gave me the idea for my design. Grouping elements by color is another go-to technique that makes my process much easier! Watch my process video and see how everything came together!
You have a week to complete the challenge and share a link – but of course you’re welcome to set your own time schedule. Whatever keeps you happy and creative!
Today’s Guest Artist: Irit Landgraf loves traveling, scrapbooking, and chocolate ice cream (preferably Italian). You can find more from Irit on Instagram, YouTube, and her blog.
Happy Monday! Have you been up to any crafting over the past weekend? Or looking forward to some time to create over the Easter holiday weekend? Whenever you find the time, I have a new challenge for you to stretch your scrapbooking muscles, whether you choose an Easter theme or some other photos from your desk!
This week, embrace colour, but only in your supplies. I challenge you this week to scrapbook your black and white photos. Go ahead and change that photo with every clashing colour imaginable, print it in black and white, and enjoy using any colour scheme you choose rather than struggling to make everything match. Or you might have photos that were originally taken in black and white, perhaps! Everything in style and theme is completely up to you. In recent years, this photo is my favourite in black and white, going from ho-hum in the original colour version with the tinge of hospital lighting to soft and dramatic in monochrome. (There’s a video of that page too!) To get you started on this week’s challenge, take a look at these examples from contributing designer Gina Lideros and guest artist Melinda Sweetman.
Since this week’s challenge is to create using black and white photos, I dug deep into my photos from past Easter events. I found this photo of my son that I loved taken on Easter a few years back. I wondered at first if I could make it work with a flower background and lots of pinks, not unlike Glitter Girl’s latest adventure!. Have you ever used a masculine photo before on a feminine layout? I wasn’t sure at first, but I love it now. I’m glad that I tried something that was a little out of my norm.
Because of the Easter theme, I specifically chose candy-colored papers from the Shimelle Starshine collection, and paired it with a few older embellishments from the Shimelle True Stories collection. I also added a few bits and pieces from other American Crafts collections. To start creating my layout I used my Silhouette Cameo to cut out my background and then backed each piece with patterned papers. I topped it with Thickers and just a few small embellishments.
- Gina
This page documents a little family tradition that started back in 2013 when my littlest guy was not even a year old! I have yet to scrap most of these fun memories but figured I would start with last year’s photo as my boys were posing so nicely next to the bunny trap! I wanted to use a lot of bright fun colours so the black and white photo was perfect!
This annual event started when my husband came up with the idea of a trap inspired by Wile E Coyote, grabbed a washing basket, some rope, found a piece of wood from his stash and a plate with a carrot on top and voila! It was such a hit the first year that my big guy asked about it the following year and this Easter coming up we will do it again for the fourth year. Our family got a pet rabbit named Olaf in 2014, but not once did it cross my boys’ minds that perhaps we would catch the “wrong” bunny. Even when I suggested it they both laughed at me!
I pulled that fun paper from my stash, did some water colouring after a light coat of gesso and then matched some paper, stickers, rub ons, and Thickers from the very first Shimelle collection with the roller stamp from the True Stories collection and also some of the Life Is Beautiful and Hello Sunshine collections by Cocoa Vanilla Studios. I love the vibrant and fun look of this page and can’t wait for my boys to look back at this when they get older and laugh!
- Melinda
You have a week to complete the challenge and share a link – but of course you’re welcome to set your own time schedule. Whatever keeps you happy and creative!
Today’s Guest Artist: Melinda Sweetman loves coffee, her family and pretty paper.. You can find more from Melinda on Instagram, Facebook, and her blog.


