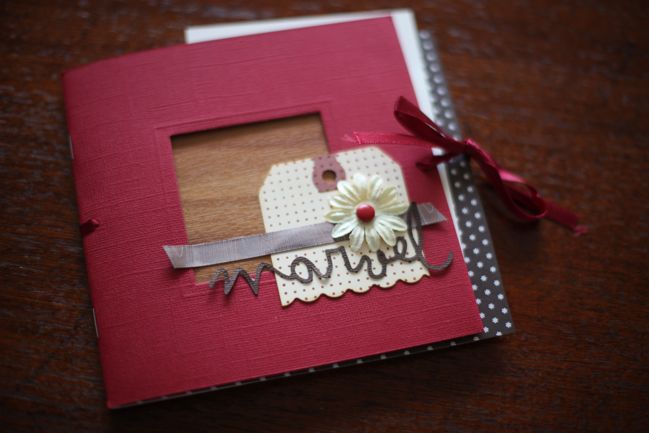
Minibook Marvel Tutorial :: part one

Last weekend one of my workshops at the Stitch and Craft show was this little scrapbook: a 6×6 minibook that can work with pretty much any happy topic. It’s called Marvel, and for the next three days you can find all the instructions for this mini right here on the blog. If you were in class, parts two and three pick up where we left off. If you weren’t there, you can adapt the project to suit your own supplies and photos. My finished album includes fifteen photos: five 4×6, five 3×5 and five 2×3 prints. (All my measurements are in inches – my apologies to my metric friends.)
The album itself is a 6×6 book with cardstock pages and cover and a staple-bound spine. I’ve ordered these from Bazzill in the past but I believe they have been discontinued. Not to worry: there is a similar (if not identical) book by Kolo or you could make your own by cutting 12×12 cardstock in half, folding and stitching the binding.
The cover has a square window for a photo but we filled this with some woodgrain loveliness in the form of sticky-back plastic (which is exactly the same as contact paper stateside but I think you will agree sticky-back plastic is far more fun to say) from the DIY store. I adore this stuff and use it for many minibook projects. It is not archival though so you may want to keep it away from your more formal albums. My view is that minibooks are meant to be enjoyed until they fall apart – I don’t have any plan for these projects lasting to antiquity so I don’t mind using products with dubious ph levels. Of course you could use a photo or patterned paper in the window if you prefer.
At the bottom corner of the window, add a luggage tag. We stamped these with a polka dot background then cut off the bottom of the tag and gave it a decorative edge with a border punch.
With the tag stuck in place, there are just a few things to add. A strip of ribbon is tucked into one side of the window then glued over the tag. The title was cut on the Silhouette with a cursive font. You could substitute any lettering you like of course! Then just a flower with a brad centre to hold everything in place. Nice and easy and simple to make with supplies you have to hand.
Tomorrow I’ll cover the first half of the book’s pages. The supplies are pretty simple: you can use cardstock and/or patterned paper and quite a lot of the designs are made with punches. I used several Martha Stewart punches plus some Fiskars border punches but as long as you can cut or punch basic shapes in a variety of sizes to create layers then you can easily follow along. You’ll also need adhesive and a journaling pen and then you can add whatever else you like to make it work with your style. Choose some photos and colours and check tomorrow for the first eight pages.
xlovesx
![]() Read more about:
Read more about:
Next post: Minibook Marvel Tutorial :: part three
Previous post: Exciting news :: Order the new Scrapbook Inspirations Book!


