pretty paper. true stories. {and scrapbooking classes with cupcakes.}

lovely to meet you Twitter Facebook Pinterest YouTube

Take a Scrapbooking Class

online scrapbooking classes

Shop Shimelle Products

scrapbook.com simon says stamp shimelle scrapbooking products @ amazon.com shimelle scrapbooking products @ amazon.co.uk

Reading Material

travel

a stamped card and details on the online scrapbooking weekend

a stamped card and details for the online scrapbooking weekend
handmade stamped card woodgrain
Three things today:
A. Today is the ninth. That means tomorrow is the tenth. And we do 10 Things on the tenth. (I say we because you’re totally invited to join in the fun.)

handmade stamped card woodgrain
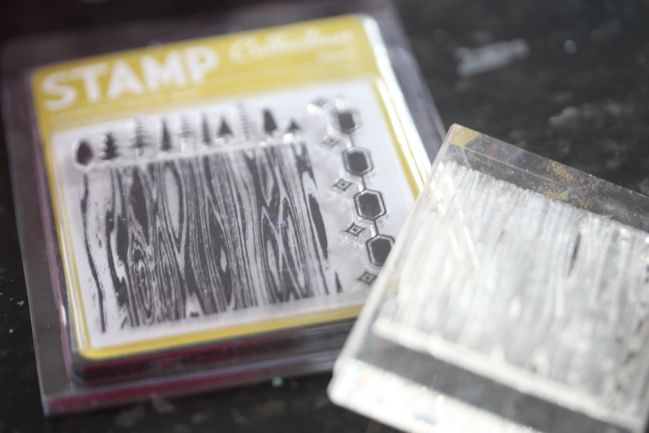
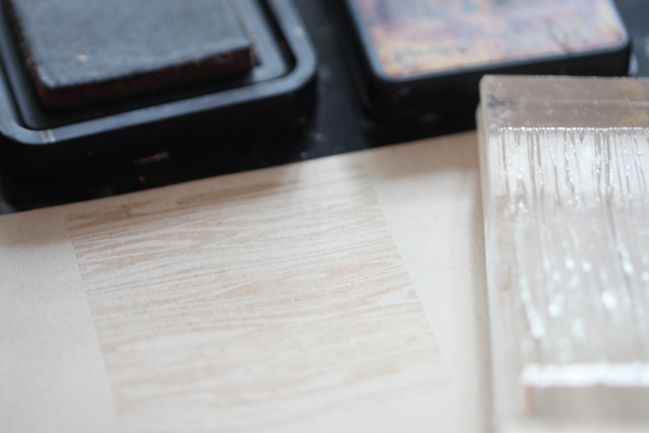
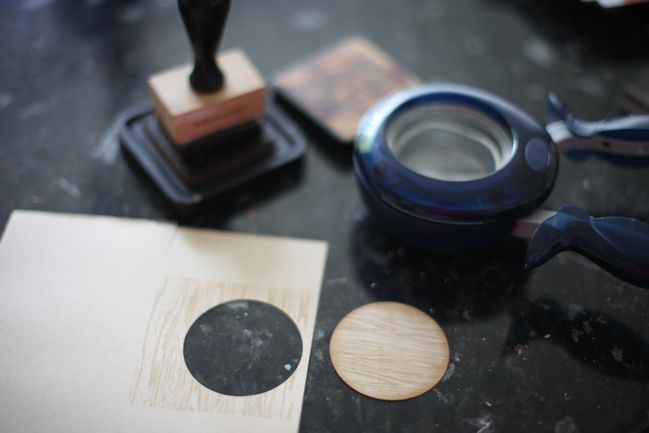
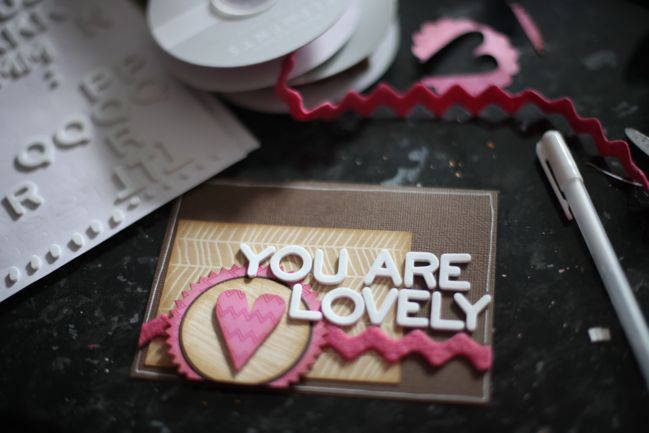
2. I am totally in love with this woodgrain stamp from American Crafts stamped in vintage photo distress ink on kraft cardstock. I love it. I made this card with it, but also one of the challenge layouts for this weekend.

handmade stamped card woodgrain
D. This weekend is the online crop! It’s totally free and you’re invited to take part with your own stash and choose any and all challenges you would like to enter.

Want to know a little more?
There are ten formal challenges, each with an amazing sponsor donating a prize. That means you can win fabulous stuff from the likes of Jenni Bowlin Studio, American Crafts, Studio Calico, Lily Bee, Cosmo Cricket, BasicGrey, Pink Paislee and more! Each of these requires participating in a layout challenge to enter and win. (By the way, those links all go to their Facebook pages. Go click the like button for all your favourites!)

There are three comment-to-win giveaways with a variety of prizes. Each has its own rules, but they are all just a comment for an entry – no crafting required.

There are also mini-lessons with crafting techniques, photography tips and journaling prompts. Some may have prizes, some not. I’m not telling just yet.
There are some special offers for shopping available only during the weekend. Again… not telling just yet.

Everyone is welcome to participate – you can be just starting to scrap or scrapping for ages, paper or digital, single page or double. It’s all in good fun. The posts run Friday, Saturday and Sunday, but you will have more time than that to complete the challenges so it doesn’t need to be a mad dash to the finish line.

handmade stamped card woodgrain
Oh, and one other thing. I have $100 to give away. $100 scrapbooking shopping spree to Two Peas in a Bucket, which sounds pretty fun to me. One person will win that to spend on whatever she wants in the Two Peas store. You know, just a choice of more than 12,000 things. But you’ll have to turn up Friday to find out how you can win the $100 gift certificate, okay?

But seriously? I can’t wait to scrapbook with you all weekend long!

xlovesx

Scrapbooking Giveaway Winner

scrapbooking giveaway winner
Rainbow Winner

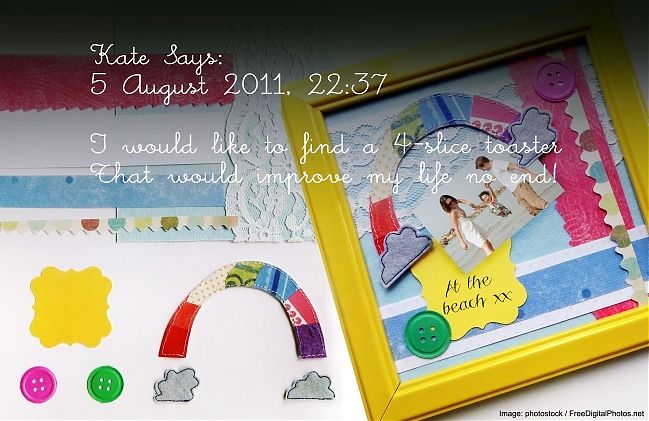
Congratulations to Kate, who wins a gorgeous rainbow themed mini kit from Emily Parkes Art.

Kate, please email me (shimelle at gmail dot com) with your address.

There’s a new giveaway every Friday night, so check back next week for another chance to win just by leaving a comment.

Have a great week!

xlovesx

PS: While we are on the topic of rainbows, this gives me hope for a bit more happiness here in London today.

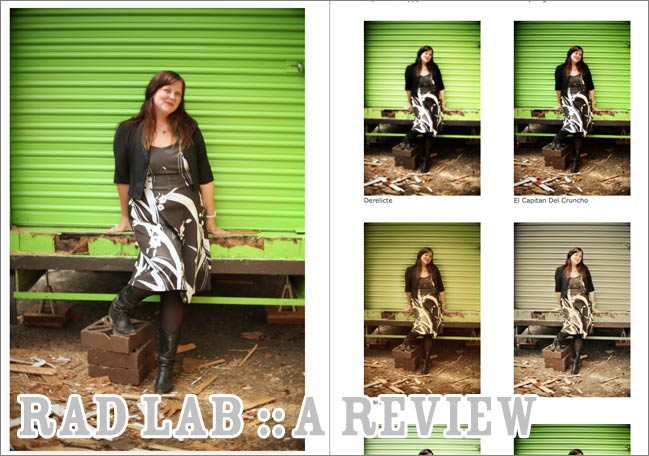
RadLab Photoshop Plug-In - A Review

review of rad lab for photoshop by totally rad actions
I’m not the only person who will say it, but I’ll declare it right now: I love Totally Rad Actions. I just searched my email for the receipt from my first purchase and I’ve been using them since 2008, and I’ve loved them since day one. I don’t use a lot of processing on my day-to-day images, but when I do want to take an image from just okay to something so very cool, Totally Rad is how I get there. But there have always been two drawbacks:

1. You pretty much have to memorise the actions to use them without spending all day either trying them or referencing a guide. Because actions are just text and the play button, so if you don’t remember which action does what, there’s going to be a lot of trial and error going on. As a result, I tend to use recipes that repeat the same actions frequently. While that makes their use more efficient for me, it also means there are a great many fabulous options I pretty much overlook all the time because I’m focusing on what I know.

2. It only worked with full Photoshop – CS3 or higher. So I couldn’t really talk about it all that much here, when many of my readers use Photoshop Elements and I can’t really give a justification to take that big step to full Photoshop if Elements does everything you want it to do.

So now Totally Rad have released a new product. It addresses both of these things.
1. It creates this completely easy-to-use interface that lets you see what each action will do to your photo before you apply it. No more needing to memorise what every action does.

2. It works in Photoshop Elements as well as full Photoshop.

It’s called… RadLab.

I purchased it last week and have been using it for a week (well, five days) before reporting here as I wanted to make sure I gave it a whirl with different images. After a week of trying it, I love it and I really recommend it if you’re looking for a way to develop a post-processing style without a cumbersome workflow. It’s still a major purchase item – it’s not something I would suggest as a spend if you only edit photos now and then. But I know some of you are further into your photography than that, so this is a good step in that case.

Here’s a look at how I’ve been using it so far. I’ve been using it in Photoshop CS3, on a Mac, so if you have a different edition, the Photoshop screen may look a bit different, but the functionality is the same.
Using RadLab by Totally Rad Actions in Photoshop
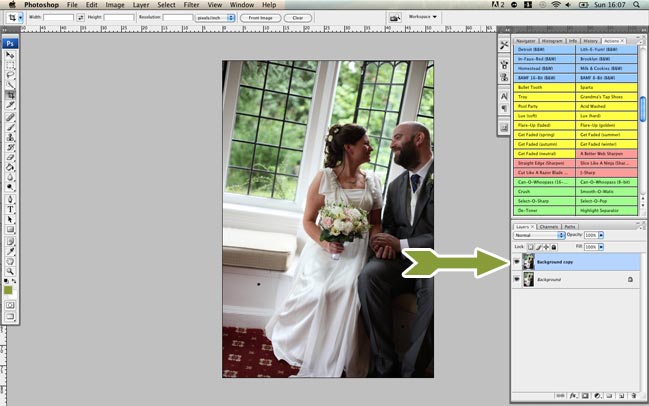
1. Open the photo and immediately duplicate the layer. This is a good measure for all photo edits, as it means you can’t accidentally save over your original JPG, as you’re making it a PSD image straight away. It’s extra helpful with RadLab as you can later adjust all your settings on one layer – but we’ll get to that in a minute. So duplicate the layer and then use the copy as the active layer.
Using RadLab by Totally Rad Actions in Photoshop
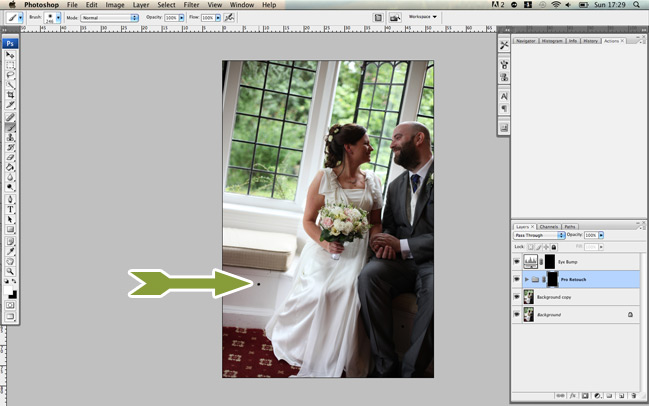
2. Make any paint-brush edits first. Paint-brush edits is a totally technical term I’ve coined. In truth, I call them paint-brush-y edits, but that’s probably too annoying for general conversation. What I mean are the type of edits you’re not applying to the entire image, but painting into certain areas, like lightening or darkening a certain part of the photo or smoothing skin. Some photos need paint-brush edits and others don’t, but RadLab isn’t the place to do them and it seems a lot easier to add those edits first rather than last. If you’re making any changes here you definitely want to commit no matter what, go ahead and flatten all this and duplicate the background layer again so you have one clean image and the copied layer to process.
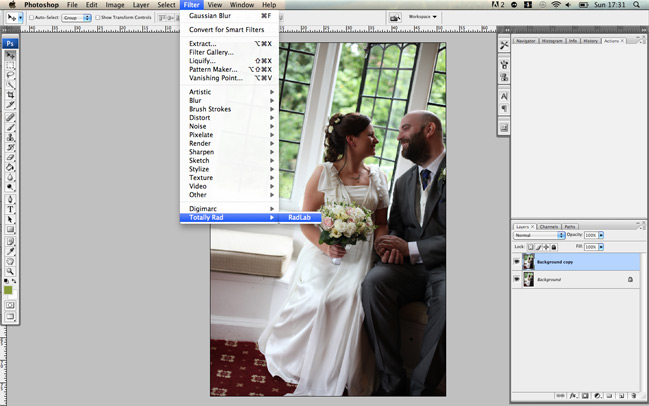
Using RadLab by Totally Rad Actions in Photoshop
3. Now open RadLab. It’s not an action in itself – it’s in the filters menu. Select it there and it will launch this whole new workflow on top of your Photoshop screen. Magical.
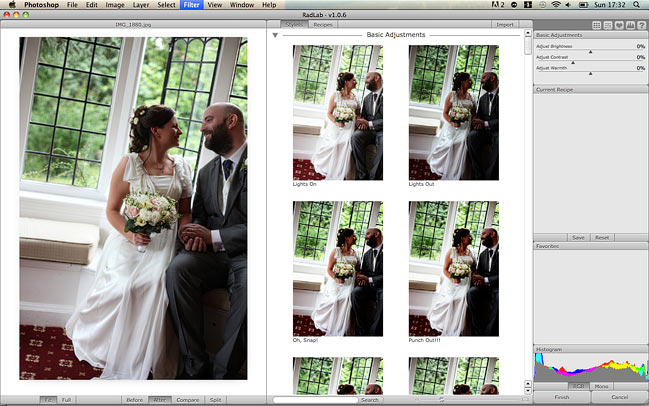
Using RadLab by Totally Rad Actions in Photoshop
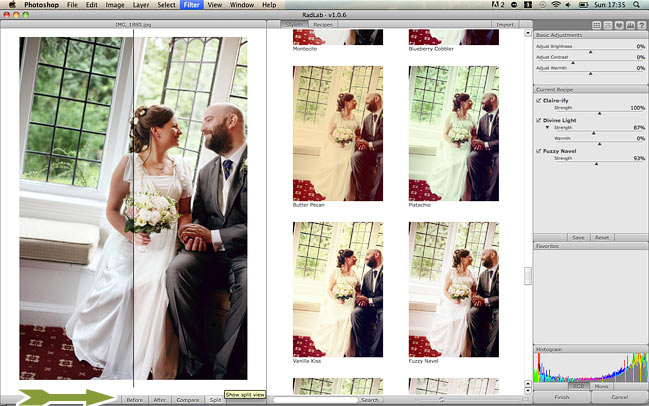
Your image appears at the far left, the potential edits appear in preview form in the middle and your editing controls are at the right. Have a look through the middle window for your different options. There are seventy-eight different effects (called stylets) you can use, but then you can mix and match them for nigh-on-unlimited final outcomes. When you see something you like, hover over it to see it previewed on the larger image. If you like it, click and it will apply the effect.
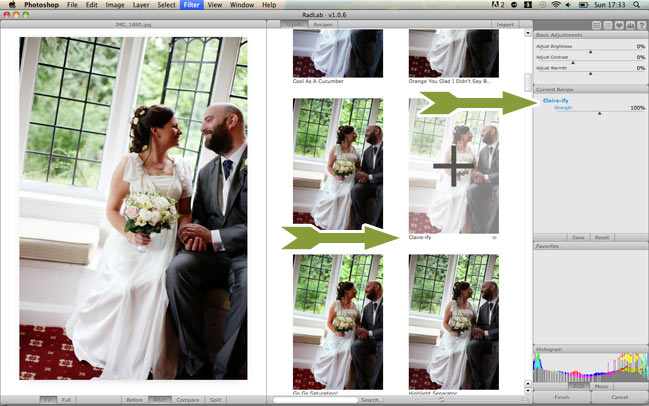
Using RadLab by Totally Rad Actions in Photoshop
Once you’ve applied an effect, you can edit it at the right. Strength is the most obvious edit and works much like opacity would work with layers. Use the slider to adjust whether you want more of less of the selected effect. It’s particularly handy with the vintage washes which may default to a bit more extreme than needed, but unlike opacity, you can also boost an effect to more than the default if you like.
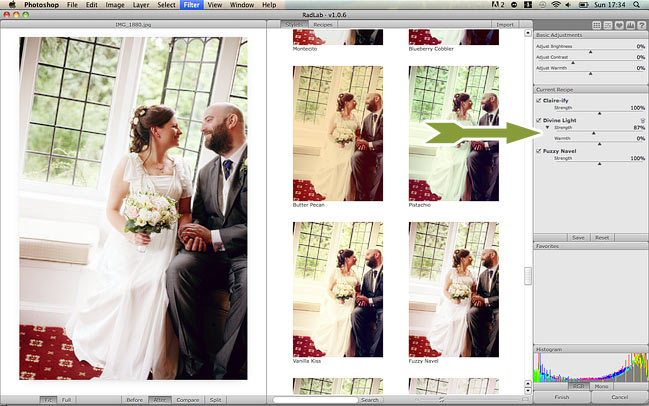
Using RadLab by Totally Rad Actions in Photoshop
Some effects have more options, like the extra slider here for warmth. You can also click entire effects on and off (much like the layer palette) so once you’ve layered a few up, you can see if perhaps they aren’t all necessary. At the top of that frame you’ll also find overall edits for brightness, contrast and warmth, without having to leave the RadLab window.
Using RadLab by Totally Rad Actions in Photoshop
The default view of your image within RadLab is the ‘after’ with all the effects applied, but at the bottom of the window you can also select the before to see the original then two things that are even better: compare lets you see both the before and the after, side by side, and split applies your effects to just the right side of the image. I find it’s useful to be able to see that before so I don’t go so far into process-land that I lose the mood of the original image, so these tabs are much appreciated in my workflow.
Using RadLab by Totally Rad Actions in Photoshop
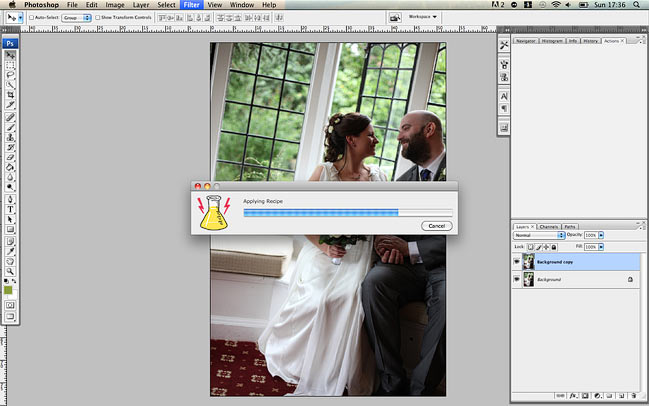
Once you’re happy with all your processing in RadLab, click the Finish button at the bottom right, and you’ll be taken back to your regular Photoshop window, where you can either save or continue editing.
Using RadLab by Totally Rad Actions in Photoshop
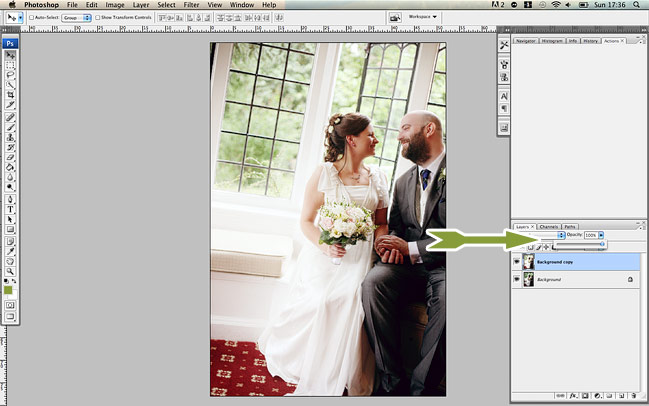
If you decide you’ve been too heavy-handed with the processing, all of your edits are now on one layer above your original image in the background, so the opacity slider can take the processing down a notch if needed. Then just save (or resize and save for web) as you usually would!
Using RadLab by Totally Rad Actions in Photoshop
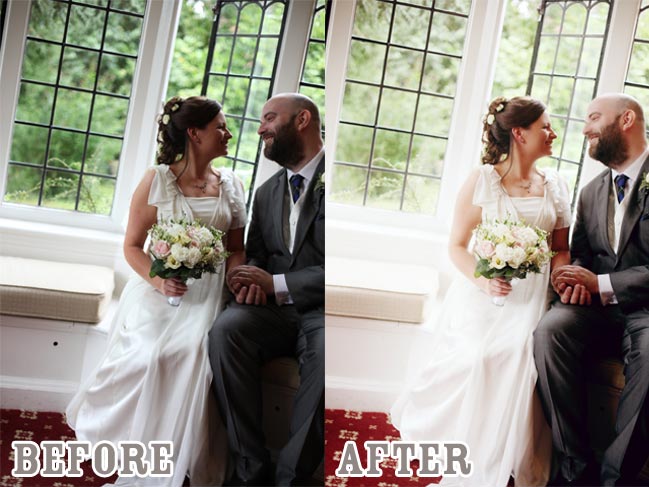
So there’s the finished image using pretty much only RadLab (though I did paint out the bolt in the wood panel) and I like the after way better than the poorly exposed before image.

What I really like about RadLab:
RadLab saves your history of recent edits and lets you save your own recipes of edits, so you can apply the same look to all the photos in a session much quicker than adding all those actions to each photo manually. The first thing I did was save my four most used recipes. True, you can make actions of multiple actions without RadLab. I have a few of those but some combinations just don’t seem to like working that way and they worked just fine in this setting.

Because you can save time with the saved recipes, I timed how long it took me to run the processes in the two different ways (with and without RadLab) and I estimate my editing time with RadLab is, on average, one third of what it is without RadLab. As in an hour’s worth of editing now takes twenty minutes. Um, that is the definition of totally rad in my book. I wish I could make time improvements like that with pretty much everything else in my life.

The fact that everything is visual means my edits are generally better because I’m not relying on my memory of a handful of actions I use most often and forgetting other things that would be perfect for the photo. So it’s faster and higher quality, which is a rarity in life.

It’s ridiculously easy to install. There’s no messing with settings or anything – you pretty much just click ‘go’ when you download it and when it’s done, you open Photoshop and it’s there.

Different looks produced by RadLab for Photoshop by Totally Rad Actions
A few drawbacks of RadLab:
If you have already paid for the two action sets, you are paying for several of them again. But not all of them though, as the paint-brush actions and such aren’t included here, and I wouldn’t want to be without some of my most-used tools, like Pro Retouch, Yin-Yang and f-zero. There are also new effects you’re getting in RadLab that don’t come in either action set (I’m particularly fond of the addition of a 600-style Polaroid finish and some of the less-intense warming tones) so that may help rationalise things if you’re adding this on to an existing collection of Totally Rad Actions.

There is one bit of scrolling that I get wrong with the way I use my mouse, and I mean to scroll up and down through the stylets I’ve applied, but I accidentally scroll the strength slider for whatever stylet I’m nearest. I’m pretty sure this is just because I’m a bit weird with how I use the mouse and I don’t think it would affect everyone. It might affect you on a mighty mouse or if you use multi-finger scrolling on a Mac laptop. It’s not a big deal – it just makes me roll my eyes and put the slider back, but I wanted to tell you the whole truth about what I’ve found over the week.

As mentioned earlier, this isn’t a little bargain add-on for just a few photos. It’s $149, which isn’t spare change. (UK readers, that’s about £90 today.) It’s not for everybody and I want to be totally upfront about that. But if I multiplied out the time savings I’m making, it’s worth every penny.

Photoshop takes up a ton of processing power and you’ll know if Photoshop crashes on you often. That really doesn’t apply to everyone – it depends on your computer and how much you like to push it to the max! I haven’t experienced any extra drain from running RadLab, but if you experience a lot of crashes, I would think it could get frustrating if you saved your progress less than in your usual workflow.

So there’s the whole truth from me! If you want to see more detail and watch a video and see actual professional photographers use this on their photos, head over to Totally Rad for plenty more (and, of course, the option to buy it for yourself). There are definitely other tricks and tips there – this is just what I’ve found from a week of using RadLab and the developers know way more than I do about what it can really do.

Happy snapping – whether you’re processing or not!

xlovesx

Scrapbooking giveaway day!

scrapbooking giveaway day
Rainbow Embellishments
This weekend, one commenter will win a rainbow embellishment selection from Emily Parkes Art. The lucky winner will receive a 6“x6” yellow (glassless) frame, along with a handcrafted rainbow and cloud embellishment, a scalloped edge tag, two paper button embellishments and a selection of different sized card stock.

Emily loves creating with textiles, and combines her love for both art and textiles in any way she can.
She has produced a few different product ranges including textile embellished accessories, textile art, embroidered hoops and wall hangings. Emily was excited to share “I now concentrate on what I love to do best, pretty pieces of textile art including new products especially for scrapbooking and D.I.Y crafting”.
You can follow Emily on Twitter or subscribe to her blog

To win, comment on this blog post describing what you hope you would find at the end of the rainbow.

Entries close at midnight Sunday UK time and the winner will be posted Monday evening, so be sure to check back to see if it’s your lucky day!

Good luck!

xlovesx

online scrapbooking crop :: mark your calendars!

online scrapbooking crop
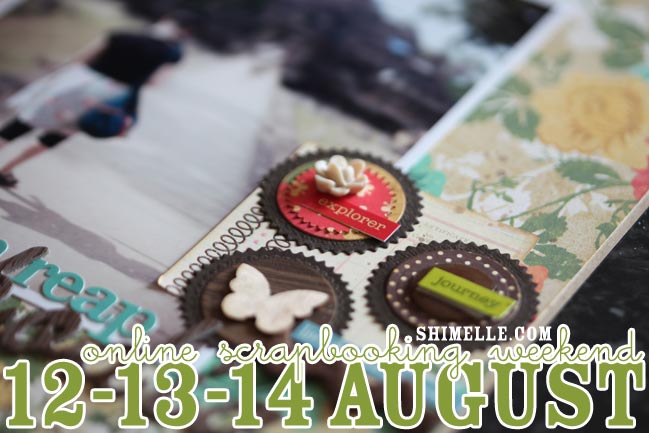
Mark your calendars – the next shimelle.com weekend scrapbooking event will start Friday the 12th of August and run right through to Sunday the 14th. And of course, you are invited!

During this weekend of inspiration, you’ll find tutorials, challenges, videos, prizes, special offers and all sorts of fun things. It’s totally free and it all happens right here!

You don’t need any special supplies to participate and it’s perfect for making a dent in your existing stash or using up lots of scraps from other projects. You can work in digital, paper or hybrid formats. You can pick and choose which challenges and techniques are right for you and leave the rest – if you change your mind later you can find the instructions in the archives.

I hope you’ll join in the fun, and I’d love for you to invite a friend! You can crop together in person or online.

12-14 August :: Get it on your calendar!

I can’t wait!

xlovesx

Scrapbooking Sketch of the Week

scrapbooking sketch and scrapbook page ideas
Good news, I think. After a two-week-and-one-day hiatus, sketch of the week is back. That’s good, right? I mean the coming back part. Not the hiatus part. But onward.

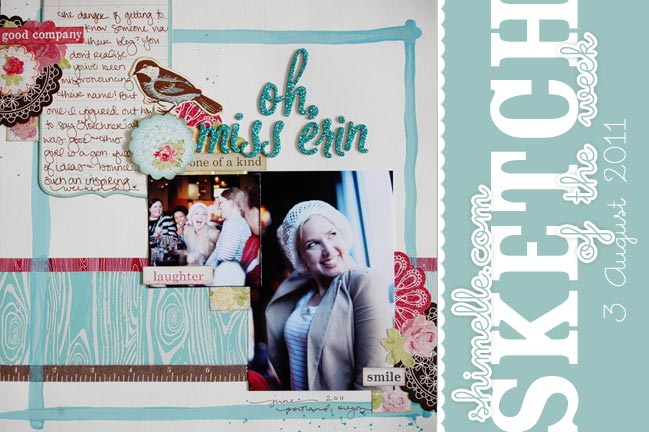
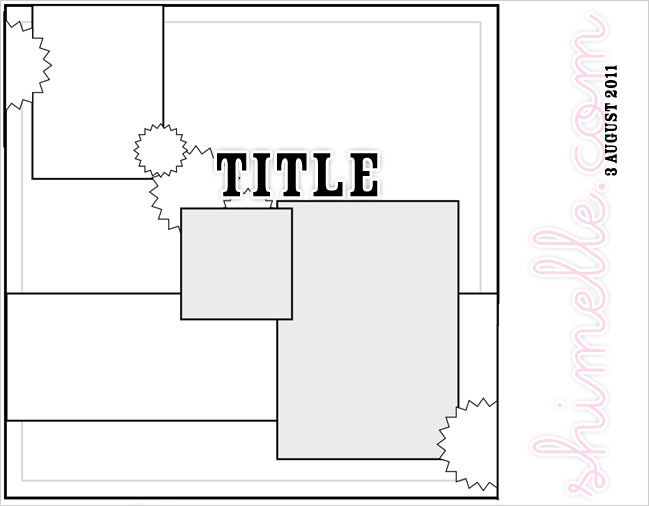
Also, this week’s sketch is a little different to the normal drill in that I didn’t draw it. Amidst a day that mixed work, craft and coffee with Relly Annett-Baker (find her here on Twitter until she finishes her scrapbooky web presence), she drew me a sketch and challenged me to scrap from that. She also gave me strict instructions, like “use pretty things”. I am hoping I pass muster.

scrapbooking sketch
This week’s sketch includes one 4×6 portrait photo and a smaller square image, which I printed at 3 inches. I used vanilla cardstock, woodgrain paper from Hambly, Thickers letters by American Crafts and stickers and die-cuts from Colorbok, along with Jenni Bowlin paint and Glimmer Mist. But of course you can use any colours and supplies you fancy!


The Miss Erin in the picture is Erin Loechner, by the way. She blogs at Design for Mankind.

As always, the weekly sketch is no-stress and just for fun! If you use it, I’d love to see, so please leave a link if you post your page online.

scrapbook page ideas
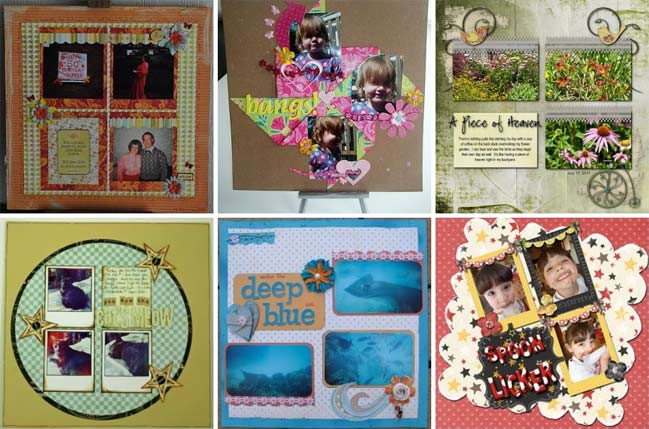
All those many moons ago, the last sketch included three photos in a sort of grid. These are six of my favourite interpretations. Click the corresponding link to see each page in more detail and get to know the scrapper who created it.
Top row, L to R: one, two, three.
Bottom row, L to R: four, five and six.
Thank you to everyone who joined in!

Now… are you up for some sketchy scrapping this week? I hope you’ll give Relly’s sketch a try!

ETA: Relly has made a page from her own sketch too. Find it here.

Everyday Scrapbooking Adventures

everyday scrapbooking adventures
everyday scrapbooking adventures Random aside: I processed this picture with the new Radlab addition to Photoshop and I’m loving it so far. I used it in CS3 but you can use it in Photoshop Elements too. I’m going to blog more about it on Saturday.
Yesterday The Boy and I had a scrapbooking discussion. It happens less often than you might think, as usually scrapbooking interactions with The Boy go something like Does this layout look finished? and he replies “Yeah, I guess,” and on we go about our merry day. But yesterday we were actually talking about scrapbooking. And writing. And blogging. And why it hasn’t become popular to add video to digital scrapbook pages so they look like the newspapers from Harry Potter. But mostly the writing stuff.

He read my travel posts after were back at home, not over my shoulder while I was typing them. Mostly because I can’t write at all if someone is watching over my shoulder. It makes me too conscious of how much I edit as I type. In this paragraph alone, I’ve made six seven changes. If someone were watching, I’d have made at least eighteen, I reckon. So he read them in one sitting, I think, and then got curious as to what I had been writing in my journal along the trip was the same stuff I was blogging or if I had written just the details – itinerary style – with my pen then created the more thoughtful stuff later. For the first week or two, I had written just a report of where we went and what we saw. It felt like work. On a busy day and when nothing was in English, it was hard to figure out where we had been. In my head ‘we went to a floating market and sat in a row boat’ could suffice but I had to refer to guidebooks or the internet to find the name of the market and the type of boat and what we had for lunch. Sometimes I regretted looking up what we had for lunch. Trust me when I say some things in the world taste way better when you don’t know what they are.

Soon I tired of the tedium of those kinds of reports in my journal and I decided to let those details go. I wasn’t a researcher. I wanted to experience each day, not stress about the minutiae of the map coordinates. I am not leading an expedition to new lands. I’m a scrapbooker on holiday. So one day my journal turned from the factual reports to my real thoughts on a place and I’ve never regretted that. I wrote about little things I saw and bigger things they made me think about. I wrote about how old ladies smile in Viet Nam and how I cried at a makeshift petrol station even though I was riding a bicycle. I don’t know the name of the village with that petrol station, but that’s okay. I also don’t know what you really call a petrol station when it’s actually a shelf on the side of someone’s house with a glass jar of petrol and a money box.

Anyway, while The Boy and I were having this scrapbooking conversation, he said sometimes when he reads what I write, it’s like we were on two different trips. Not that he didn’t physically go to the same exact places, but that we were thinking different things. And then he got to the real point: Is that something that comes from scrapbooking?

Yes, I think it does. It’s the same thing I mention at the end of this:

{Many of you have seen this via this guest post I wrote for Ali’s blog, but I wanted to share it here too.}

So we had this conversation about how he thought it was cool (yay!) that I was seeing some other layer of daily life and that it was motivating me and on one hand that sounded fabulous. But also that he had no interest in actually scrapbooking. The crafty stuff – whether paper or digital – just isn’t something that’s ever going to be fun for him, and that’s fair enough. But taking pictures he gets. And writing he gets, though he doesn’t write as often.

I told him that was still a scrapbook.

That part of the conversation may be continued another day.

xlovesx

Giveaway Winner

scrapbooking giveaway winner
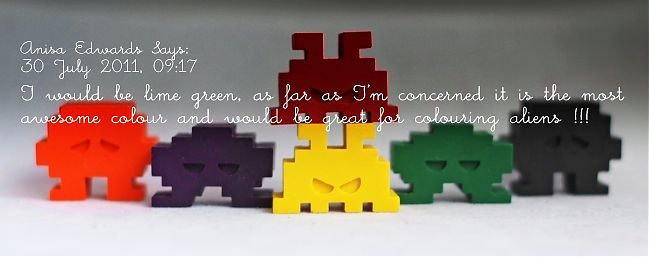
scrapbooking giveaway winner alien crayons

This weekend’s winner is Anisa Edwards who wins the retro alien crayons from Colour me fun.
If you love them and want to see more Colour me fun products, then why not check out their store.

Well done Anisa! Please email me (shimelle at gmail dot com) with your address.

There’s a new giveaway every Friday night, so check back next week for another chance to win just by leaving a comment.

Have a great week!

xlovesx