pretty paper. true stories. {and scrapbooking classes with cupcakes.}

lovely to meet you Twitter Facebook Pinterest YouTube

Take a Scrapbooking Class

online scrapbooking classes

Shop Shimelle Products

scrapbook.com simon says stamp shimelle scrapbooking products @ amazon.com shimelle scrapbooking products @ amazon.co.uk

Reading Material

travel

Remember, remember

I think the biggest reason I am loving Ali’s lifeart challenges is because I’m using relatively current photos that I want to scrap…not the several-months-in-advance calendar that we use whenever we are preparing things for print, workshops or display. Well, that and clicking on all the links that get left in Ali’s comments to see how so many different crafters interpreted one idea. There is much good in all that.

This time everybody’s using a minimum of three stamps: one geometric, one text and one organic. I used the circle of dots stamp by Fontwerks for my geometric, the ornate crown by Autumn Leaves for my organic, and a few with text: two postage style stamps from Blade Rubber and a Heidi Swapp rolling word stamp for ‘people’, ‘place’ and ‘things’.

I love layering stamps but it can get a bit messy if things don’t want to sit right. So sometimes I use masks to keep things from overlapping too much – especially if I stamping more than one stamp in the same colour ink. I stamped the circle of dots first and wrote the text inside.

Then I stamped the same thing on a post-it note {and I am in love with these post-it notes, yes!} and cut it out to cover what has already been stamped. Then I stamped on top of that to make another layer. I originally wanted the big crown to be subtle, so I used a shadow ink.

But it was too pale and although it could be seen on the left background, it faded away on the brighter colour of the other side of the layout. So it ended up in black after all. A few more masks and stamps and it looked like this, and I called it quits there. Masking can also be super cool if you use a dye based ink with a background image then pigment inks and embossing powders on images on top.

It wasn’t that we just decided to burn a bunch of stuff, and it wasn’t homecoming during football season or anything. We had a bonfire night party last weekend with fireworks and a bonfire and a Guy and everything. Plus three Americans and a pumpkin pie. We had a barbecue in the dark which was priceless. Good, good times.

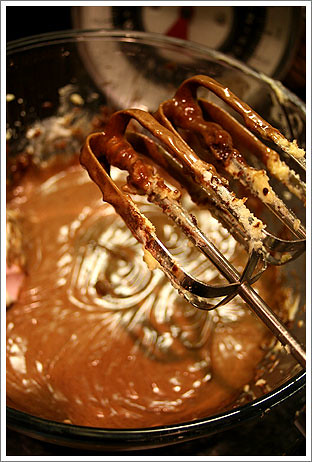
And happy time making this…after I packed the first sixty kits for the UKS crop. More about that soon. Still need to pick up the envelopes to start posting those this week.

xlovesx

Warm my heart

Is it really Saturday already? Time is playing tricks.

Also it is really cold.

So make some hot chocolate cupcakes, turn on the heating and knit a new sweater, okay?

Hot Chocolate Cupcakes

ingredients:
125g unsalted butter
125g sugar
100g dark chocolate (at least 70% cocoa)
2 large eggs
1 teaspoon vanilla extract
100g plain flour
75g self-raising flour
1 teaspoon baking powder
1 teaspoon bicarbonate soda
1 packet instant hot chocolate (sachet for a single cup)
150ml sour cream
50ml milk

Heat the oven to 170C. Line cupcake tin with papers—makes 16-18 average sized cupcakes.
Place chocolate in a glass bowl over a saucepan of simmering water and melt. Remove from heat.
Place softened butter in mixing bowl and beat until light.
Add sugar and mix until fluffy.
Add chocolate and mix until even.
Add eggs and vanilla and continue to mix, scraping sides of bowl with a spatula.
Add flour, baking powder and soda, mixing until well incorporated.
Add sour cream and stir through until no white streaks remain.
Sprinkle the hot chocolate packet across the top of the bowl, then add the milk and mix in. Depending on your hot chocolate, you may need slightly less or more milk, so just watch as you stir and add a little more if the batter is excessively thick.

Fill the cases just over halfway and bake for about 18 minutes, until a chopstick comes out clean. Let cool in the pan for just a minute or two, then remove to cool on a rack. Beware—these cupcakes will sink in the centre as they cool. In fact, you can actually see this happen as you take them out of the oven. Once they are iced, it doesn’t matter anyway. But don’t let that think you’ve done something wrong. You haven’t.

You can ice these with vanilla cream (whipping cream, 1 tsp vanilla and sugar mixed to taste) which really suits the hot chocolate feel, but I just fancied buttercream this week because I’ve been using fresh cream quite a lot recently. Ever since my local shop started carrying that random bit of americana called marshmallow fluff, I’ve been adding two big spoonfuls to my buttercream (which is just unsalted butter, icing sugar, a tiny bit of milk and a tiny bit of vanilla extract all mixed together) and it is smooth and sweet without being marshmallowy. So there ya go.

xlovesx

Chase all {my} cares away

So I’m totally giddy about this. Getting to design stuff for Banana Frog Stamps. Love that they are British (it’s nice to have just a few things that aren’t imported in my stash). Love that they are easiest stamps to store IN THE WORLD. They are so low maintenance…that’s just what I need to keep with my clean space love. Thank you so much Bev for this opportunity to get my fingers inky.

This page was part of what I submitted and it is a hilariously whack project to make, so you should try it too: write a personal ad for yourself that takes up an entire page. Mine says SWF, 29, love live music, literature, paper crafts and cupcakes. Seeks more time to appreciate her fabulous life. Don’t worry: the boy is still here. It’s just an exercise. An exercise in using beautiful letter stamps from Banana Frog. eeee.

My love for other stamps lives on too. Stamps = happy.

xlovesx

It's beginning to look a lot like...

If I can go ‘round the corner and pick up an eggnog latte, it is definitely Christmas season.

Here, that means I need to pull out my pink and green album. My Christmas journal. And the more people who do that right along with me, the more fun Christmas gets each year.

Journal your Christmas is something we’ve done for the last two holiday seasons. And we’ll do it again this year. But of course, we’ll move with the times and make things a bit more entertaining.

Journal your Christmas starts on the 1st of December and runs right through to the 6th of January—the twelfth night of Christmas.

Each day there’s a new prompt—37 of them. You’ll receive this by email, to give you a new holiday topic to mull over each day, as well as something to see to inspire you.

There is no set project to make: you can work in any style and any medium. You could focus on your writing and turn your season into a Christmas blog with daily entries. Or focus on finding or taking a photograph for each day of the holidays. Or create a scrapbook or an art journal in your own style. The prompts are designed to get you thinking rather than telling you the right or wrong way to make something.

This year, there will also be audio messages to listen to, the opportunity to chat with others in the group and the ability to post your work on writtendown.

They’ll be more sneak peaks as we go through November, of course.

Sign up now:
$30.00

xlovesx

I've just gotten taller

Preconceived notions are such interesting topics. How student A looked challenging on paper but is a dream in real life (or vice versa, of course). How a movie looks good from the trailers but dreadful in person (or thankfully, sometimes the other way around there too). How things can generally be different than they seem. Hmmm.

Here’s a light-hearted preconceived notion for you: chocolate should be dense but vanilla should be light and fluffy.

I did say it was light-hearted.

So I figured you have to try these things to learn if the notion is true. Dense vanilla cake then. Like pound cake and yet…not. Not crumbly at all. And the chocolate is very, very dark. Not sweet.

They’re not for everybody. They’re for grown-ups.

Grown-up Cupcakes

Cake Ingredients:
250g unsalted butter
200g sugar
4 large eggs
2 teaspoons vanilla extract
2 teaspoons baking powder
200g plain flour
200g self-raising flour
1/4 cup runny honey
1 cup plain greek-style yoghurt
1/2 cup whipping cream

Heat oven to 175C. Line trays with cupcake liners – makes about 22.
Beat butter until it is fluffy, then add sugar and beat a further 3 minutes.
Add eggs one at a time, beating each one until even.
Add vanilla and mix again.
Add the remaining ingredients, alternating between the wet and dry. Mix until all flour is incorporated evenly.

Fill liners just over half-way and bake until a chopstick comes out clean – about 20 minutes. Cool in the pan for 5-10 minutes, then place on a rack to cool.

Filling ingredients:
100g 70% dark chocolate (the really dark stuff you can find in the baking section)
200g dark chocolate (more like the quality of a dark chocolate candy bar rather than what you find in the baking section)
125g unsalted butter

Break the chocolate into small pieces. Place all the ingredients in a glass bowl. Place bowl on top of a saucepan filled with water just under the boil. Melt the chocolate and butter but don’t let it burn. As soon as everything is melted (or actually a little before), remove from the heat and stir with a wooden spoon. Let cool but not set.

Crack the cooled cupcakes by placing a knife in the centre of each one. Fill this with the chocolate, and leave to set.

Topping ingredients:
1 1/2 cups whipping cream
50g sugar
1 teaspoon vanilla extract.

Place all in a bowl and whisk until peaks form. Spoon onto cupcakes or place in a piping bag to decorate.

A little apology for the lateness of the Christmas info. Just ironing out the last few things—sign ups will start tomorrow, Saturday the 4th.

xlovesx

Some breakfast and coffee

I figured I didn’t need to really limit myself when answering that what to do with the pumpkin question. I can buy more pumpkins tomorrow and make all of the above.

Well, I already made the above. That’s a hunky dory birthday cake for Miss Chelsea at work. It was her rescheduled birthday. Which is like an on-schedule birthday in that you get cake and presents, but better because you don’t actually get any older. I think this is perfectly acceptable.

Also, it is only called hunky dory cake because it was while baking this cake that I realised that all but one of my favourite David Bowie songs come from the same album. Seriously, I missed out on that somehow. Until last night. Plus I love the expression hunky dory. I actually say it and I think I get away with it. I do not, however, get away with saying Homie don’t play that, as much as I would love to. If you prefer logical names to your baked goods (oh how boring are you?) then this would be a pumpkin ginger cake.

Pumpkin Ginger Cake Hunky Dory Cake

ingredients:
225g unsalted butter
200g sugar
300g light-brown sugar
4 large eggs
1 teaspoon vanilla
400g cooked and chilled fresh pumpkin
200g plain flour
200g self-raising flour
1 teaspoon baking powder
1 teaspoon bicarbonate soda
1.5 teaspoons ground cinnamon
1 teaspoon ground nutmeg (remember fresh is stronger than dried)
.5 teaspoon ground cloves
about 1/2 of fresh ginger, grated

Notes for using fresh pumpkin…take a whole pumpkin, around 4-5 pounds. Use a big knife to stab a few vents in the top. Place on a baking sheet and stick in the oven for an hour at about 150c. After an hour, it should feel soft to a fork touch. Turn the oven off and let it sit in the oven for another 30-60 minutes. Remove from the oven and let cool entirely. The skin will peel off easily and the guts inside will pretty much detach from the flesh without drying out the pumpkin. You don’t want skin or guts – you want the ‘wall’ of the pumpkin. Put all of this in a mixing bowl (save the seeds if you want) and mash with the potato masher, then blitz with a mixer or hand blender until there are no big chunks left. Store in the fridge for a day or two. If you want to keep it longer than that, put it in plastic and freeze it and you’re good to go.

Heat oven to 160c. Grease two 8-9 inch cake tins well, or use cupcake liners.
Beat the butter with an electric whisk until fluffy.
Add sugars gradually, mixing well.
Add eggs, mixing after each one.
Add the vanilla and pumpkin and mix.
Add the dry ingredients gradually, stirring and mixing as you go. Mix until the batter is an even consistency. The pumpkin will make it look a bit different than a normal yellow cake batter—that’s just fine.
Fill the tins or liners just over half full and bake for 20 to 25 minutes. Mini cupcakes don’t take so long.
Let cool in the pan and only turn out onto a rack when completely cool. If you’re not using liners, avoid the cooling rack entirely and turn out onto your serving plate. This cake is soft and will fall right through your cooling rack if you’re not careful. It’s best not to ask how I know this, okay?

Serve with flavoured cream:
1 pot of whipping cream
Maple (or other flavour) syrup

Whip the cream until it is soft and fluffy. Add the syrup gradually, whipping until it will hold peaks. Place between the layers of a layer cake or on top of the cake.

You can make your own flavoured syrups by boiling equal volumes of sugar and water along with something to give it flavour—vanilla extract, pieces of ginger, mint leaves, whatever you fancy. Let it boil for five minutes or so, until it reduced and has the consistency of a syrup. A quarter cup of syrup will flavour about two cups of cream, depending on the strength of the syrup.

This entire cake keeps well in the fridge overnight. Just take it out at least thirty minutes before you want to serve it.

And I should have the info for the Christmas class up by this Thursday.

xlovesx

I'll fly away and save the world

The last Sunday in October. I’m roasting a pumpkin in the oven right now, it’s so autumny.

October half-term has been brilliant. Lots still to make, but lots of stuff made. Clean house. Full of ideas. And not at all isolating like half-term can sometimes be.

Christmas break in seven and a half weeks. But still, multi-tasking makes one appreciate the work they love even more, right?

More importantly, if you have not stopped to see the work that was posted on written down, you really should. Fabulous books, girlies. I have loved every single minute.

Now: pumpkin pie or pumpkin cupcakes?

xlovesx

They say it's their design

It would appear Cupcake Studio is open for business, as it had its first guests yesterday. True, you may say that Jen, AKA ‘The New Girl’, coming round to knit while I finished up things to post to the magazine does not qualify as really being open to the public, but if I tell you that four people have stepped into my studio space over the past three years, and two of those live in this flat, maybe that will put things in perspective.

I have always felt the need to shut the door to my studio if we had company. It was a horrible feeling, because really I want that space to feel like it is part of my home. It is certainly part of my life. But stuff-exploding-everywhere was not exactly the look I wanted to give to anyone who stopped by.

When I first moved into this flat, I only bought enough furniture to get by. That meant I needed a bed, a wardrobe (built-in closets are exceedingly rare here), a table and some shelves to put supplies on. I think I paid £20 for four free standing shelves. £5 for three years of service really isn’t that bad. But they didn’t make me happy either. And if you’re going to look at something a lot, I really think it should make you happy.

So now the £5 pine shelves are gone. Two paper racks are gone. They are replaced with that shelf practically designed for scrapbookers and a knitting chair, which hasn’t actually arrived yet.

She’s not all finished, but she’s getting there. And her door will stay open.

xlovesx