pretty paper. true stories. {and scrapbooking classes with cupcakes.}

lovely to meet you Twitter Facebook Pinterest YouTube

Take a Scrapbooking Class

online scrapbooking classes

Shop Shimelle Products

scrapbook.com simon says stamp shimelle scrapbooking products @ amazon.com shimelle scrapbooking products @ amazon.co.uk

Reading Material

travel

Maybe September is my favourite month

School is back to full swing. As of tomorrow, we will have been through the full two-week timetable with all the year groups. Two of my classes are just straight-forward knowledge seekers, which is fabulous. The other three are able but very hard work…like Bart Simpson’s attitude with Lisa Simpson’s intellect. And let me tell you, thirty Bart Simpsons in one room is a little bit knackering.

But I love this. I’m big on the And what have you learned today? (like that wasn’t already obvious) so the other day instead of asking, I handed out post-it notes. They all wrote something and posted it on the door as they left. All but one post-it was academic I learned to say “I did” and not “I done”. I learned about exposition and resolution for story writing. and the non-academic one has caused more than a few laughs from people stopping by my classroom I learned not to feed the dog next door at break time. Well, he asked why the dog was barking. So I had to explain, didn’t I?

Can you imagine how horrible it would be to be my child? I can imagine them rehearsing their answers before walking up to the front door. If I haven’t learned anything today, I bet Mum will kick me out of the house! Well…whatever makes you learn.

xlovesx

{chocolate} Almond Kisses

this week: buying real furniture (as in not out of the ikea catalogue), surprise {un}birthday parties and excellent electrical storms. life is good.

so is this recipe from chocolate & zucchini. if you have never made this, you must. it is super easy and super yummy with the most amazing melty texture. fabulous.

but i also have a penchant for almond slants on things. for months i could not find any real almond extract and the artificial stuff tastes of more chemicals than a neon pink bottle of panda pop. but bless williams-sonoma. they had the real stuff, and i have been waiting to open it. so patiently.

{seriously, it is a wonderful thing there is no williams-sonoma near me. i only have a small kitchen, after all.}

Chocolate Almond Kisses

Ingredients:
200g unsalted butter
250g dark chocolate
200g sugar
4 eggs
1 teaspoon almond extract
1 tablespoon all-purpose flour

Heat the oven to 180C. Line cupcake tray with liners. These are mini sized.
Melt chocolate and butter in a glass bowl over a saucepan of hot (but not boiling) water. Keep stirring while melting.
Remove from heat and saucepan and add the sugar. Just stir it in—no need for a mixer or a whisk.
Let cool until not hot to the touch.
Stir in the almond extract.
Add eggs one by one.
Add flour and stir until the texture is even.
Fill liners just over 1/2 full.
Bake for about 12 minutes (mini), 18 (regular) or 25 (giant).
Let cool in pan for 5-10 minutes, then remove to a wire rack.
Once cool, place in the fridge over night. Remove an hour or two before serving, and add icing.

I’ve used two different icings on these—double cream whipped up with almond extract and icing sugar or buttercream with almond extract added. Today we had pink buttercream with a few sparkly sprinkles. But these pictures were prettiest.

Love that there’s no need to use the mixer for these and the melty factor adds a punch of almond. Eeeee.

xlovesx

Thursday, Thursday {on a Sunday}

Getting back in the swing of things. Both the school day and the shared laptop. Haven’t heard anything from the insurance folk yet. Tedious.

But this week had a Thursday! So the first Cupcake Thursday of the academic year, then.

If you ask my grandmother what kind of cake mix I would pick for my birthday every year from basically the age of 8, she would reply, ‘Yellow – with pudding in the mix.’ Or at least I think she would. Although I am sure they achieved it with lots of chemicals, there was (is?) an American cake mix that claimed on the box to have pudding inside, and it was a very, very moist yellow cake. Something you don’t always get with homemade cake recipes. So with a bit of a brainstorm, I decided custard might work. And apparently it did. They were all eaten promptly and co-worker Adam – lover of many snack foods – claimed they were a particularly good variety of cupcake. So hurrah! Custard in cupcakes is a good thing, I think.

Custard Cupcakes
{makes 12 standard size cupcakes}

Ingredients:
2 medium eggs
1 1/4 cup sugar
125g unsalted butter
1 cup Bird’s Custard (I have only tried the one that comes ready mixed in the tub—don’t know if the powder would mix up the same…or if you are in the states and can’t get this, my best bet would be vanilla pudding cups.)
2 teaspoons vanilla extract (or 1 if you are not a vanilla fan)
1 1/4 cups self-rising flour
1/2 teaspoon baking powder
1/4 teaspoon bicarbonate soda (baking soda in the states)

Heat oven to 180C. Prepare pan with cupcake liners.
Crack eggs into mixing bowl and stir to break yolks.
Add sugar and mix with mixer or electric whisk until colour lightens.
Add butter and vanilla and mix until light and fluffy.
Fold in custard until evenly distributed.
Add flour, baking powder and soda and mix.
Fill each cupcake liner just over half full.
Bake for about 18 minutes, or until a chopstick comes out clean. (I am sure other people do not use chopsticks for this. I find it more than useful, and Ariel will tell you, we really have way too many chopsticks in our kitchen anyway.)
Cool on a wire rack. Ice only when cupcakes are at room temperature.

For the icing, make up a basic buttercream by mixing unsalted butter with icing sugar and a little bit of vanilla. Then add custard a tablespoon or two at a time until you are happy with the consistency. The more custard you add, the less it will set, even if you refridgerate the icing. So be careful if you have to travel with them—I shall not be responsible for getting custard out of your upholstery! Thankfully, the new girl didn’t mind holding the tray in the car for her first Cupcake Thursday!

xlovesx

Unrest in the forest

The summer holidays from school have come and gone so quickly – we went back to work full time yesterday, the year 7 students started today and from tomorrow it’s 1000 kids every day until October half-term. But there was time for one last summer weekend. Wiggling in the Woods.

It’s a girly scrapbook weekend with friends in a forest-ish field with oversized insects, sleeping policemen and a gorgeous little cafe. Good times. And productive ones—usually there is more chat at crops than making stuff, but we managed to do both. I started working on my Iceland photos and I’m loving the freedom of a full album just for us. I hadn’t done a double page spread in at least a year, so I felt like I was learning how to walk again, but I managed 4 double pagers and a single one before the weekend was out—and I didn’t even arrive until a day late. A brilliant way to end the summer and a huge public thank you to Janice, who just excels at putting on something that is a perfect fit to our crowd.

I just love making stuff right now. I’m somehow ended up in a really good place, just this minute. Divine.

xlovesx

Unnecessary crash testing

Starting with the SAD.

I am now a walking advert for the MacBook pro and its magnetic power cord. Alas, this is my powerbook, which does not have such a genius device to help prevent it crashing to the floor when people like me are stupid enough to trip over the power cord. Thankfully the insides are still working, so on Friday the insurance company shall take her away and fix her up.

Or they’ll decide that’s too expensive and tell me I can buy a MacBook pro. But somehow, I doubt that.

But on to the GOOD.

This is the comment I drew out of the jar:

Lori Says:
25 August 2006, 18:18
I found your site via Wendy Smedley’s blog—this class looks great!

so Lori, you best email me girl because you’ve got a free place on the class!

The class starts Friday, so if you’re sitting on the fence, you best go ahead and jump now! :)

xlovesx

just a note

...we’re heading off for today and tomorrow to visit the boy’s brother and see broken social scene, pearl jam and placebo at the reading festival. we’re back late monday evening.

the only reason that i’m telling you all this is to put anyone’s mind at rest who signs up for the new class between today and monday. i’ll add you to the group by tuesday!

{and i’ll also show the you the horrible picture of how i have killed my powerbook. so sad.}

xlovesx

Rose-coloured times

Yesterday was a positively brilliant day filled with the best ever exam results from my students, and the boy had exam success too with a mention in the financial times. Topped off with a fab meal at The Bell with two new friends and neighbours, I have been on cloud nine for the last twenty-four hours.

Good moods do great things, you know.

By request, I’ve posted a little sneak peek here of the new class, Learn Something New Every Day. Remember these are little pages in a small format book, and you’ll realise just how easy it is to achieve an entry every day. {By the way…I know that page includes a little polaroid-style print, but don’t fret—this isn’t something you need! I was just playing with my little instant camera but in the class we explore lots of different ways of getting photos onto your daily pages.}

But because I am in a good mood, I’ve got a free place to give away. You have to comment here to enter. Sometime over this three-day weekend I will put all the names in a jar and draw one to do this course for free. {And I don’t know about you, but when I am shopping, free is my favourite price.} And because I would never want to make something annoying for those of you who signed up straight away {thank you!}, if you comment you will be put in the draw too. If you win, you can choose to give the class to a friend or have a refund of your class fee. It’s all good.

Spread the word!
And have a brilliant weekend.

xlovesx

Keeping it real

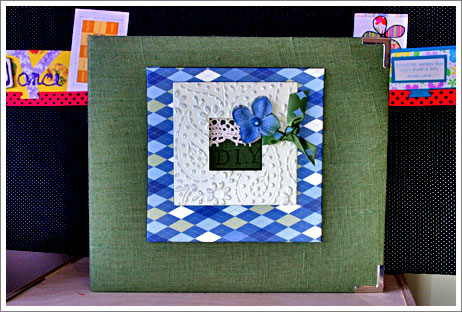
You might have seen this album in ScrapBook Inspirations — it was in the August issue. It’s my DIY album, where I keep a photo and a few notes about any craft projects (particularly the first time I make something new). It also has a place to keep plans and ideas for things I want to make but haven’t just yet. I actually use this album because it’s a cinch to add things, and even the initial assembly is pretty easy.

Supplies

*8×8 album {Mine is an olive green linen album from the classic collection at We R Memory Keepers.}

*Page protectors

*Three colours of solid cardstock, including one light shade for writing {I used Bazzill’s Admiral blue, Pesto green and Vanilla cream.}

*Three 12×12 sheets of coordinating patterned paper {Mine are from Chatterbox — buy a few extras if you will want to keep this album going for a long time. You won’t need them straight away, but it would be frustrating to run out just as they aren’t in stores any more!}

*A yard of printed ribbon to match {Chatterbox here again.}

*Writing implements: Computer & printer, black pen, letter stamps with green & black dye inks if you prefer stamps to electronics.

*A few little extras for your cover: I used a Making Memories tin frame, an extra sheet of patterned paper wrapped around a chipboard frame, a silk flower with a brad centre, with scraps of ribbon and lace trim. I also tabbed the sections with ribbon tabs from Scrapworks.

*And this download: the blank project card! Just click and it will download as a pdf for you to print.

How-To

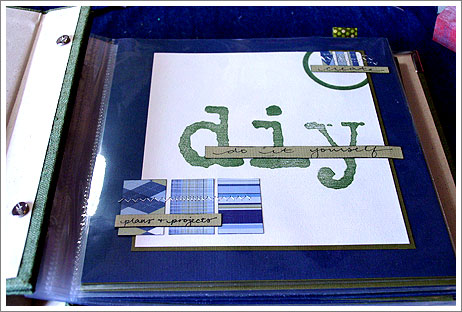
*Make your title and section pages first, as they are the only ones that use the papers in different sizes. Follow the pictures as a guide or make your own design.

*Trim the two coloured cardstocks to 8×8 to make your blank pages. You’ll need enough to fill your page protectors – so it depends on how many pages you want in your album. My project entries have one colour on the left side and one on the right — so I am not working on the both sides of the cardstock. I like everything extra sturdy! But obviously you can use half as much cardstock if you would prefer to work on both sides.

*Print the blank project card on your light cardstock and trim down to just outside the box. Make a bunch so your album is filled with cards waiting to be filled — that will help you actually use this album! By the way — the template as is will print in navy blue. If that doesn’t match your colour scheme, set your printer settings to black and white and it will print in black. Best of both worlds.

*Use the off-cuts of your darker cardstock to make a partial mat for your project card.

*Trim your patterned paper into 1“x1.5” rectangles. These go along the left side of your project card. You can sew them if you want — if your craft projects involve sewing, then it fits the theme of your book.

*Add a ribbon loop to the top right corner of the entry. These don’t go off the top of the page, although the ones on the section pages do in my album.

*Organise all your pages into the page protectors.

*Put all your spare matching supplies in a bag with a label so you can come back to them when you run out of pages.

*When you complete a craft project, take a photo or two. Fill out the card for the right side of the spread and mat the photo on the left. You can add extras (I add one of those silk flowers like the cover – but only if it doesn’t clash with the project) or just leave it plain. The entries only take a few minutes and that way? This album ends up filled for real.

xlovesx